Desperados 3: Mission 11 - map, badges Desperados 3 guide, walkthrough
Last update: 24 February 2021
Key points of Desperados 3 - Mission 11
Important locations on the map
Supply chests
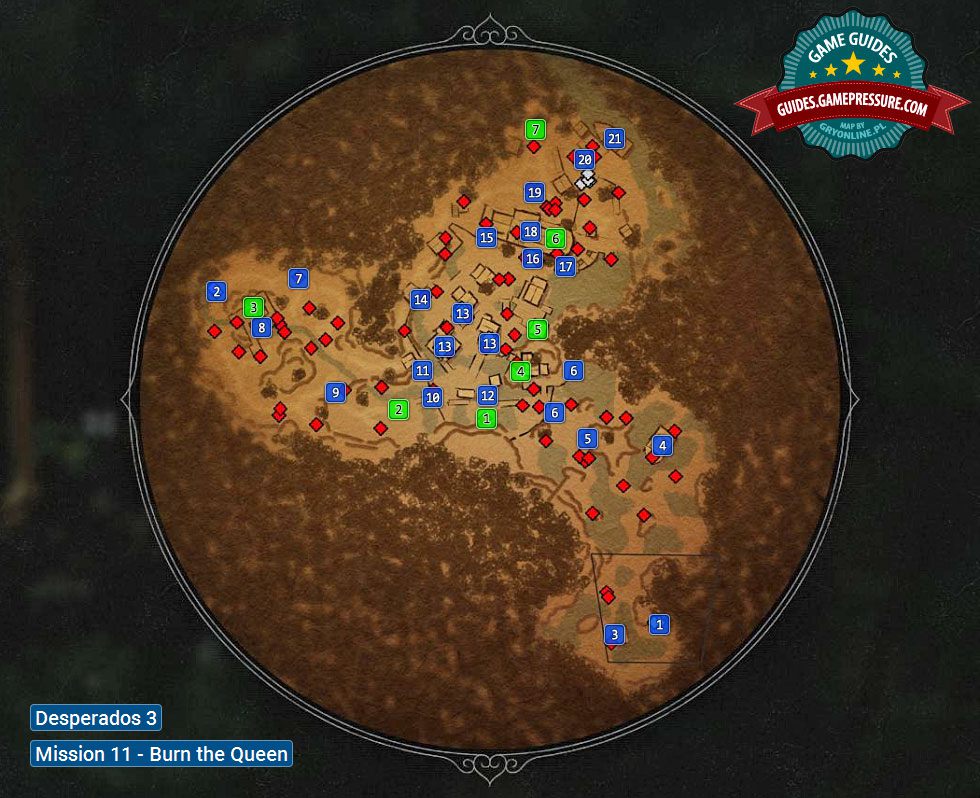
This page of the Desperados 3 World Atlas contains a detailed map for Mission 11 - Burn the Queen. Our map shows the entire marshlands area which contains, among others, a small village and the titular Queen - a large steamer guarded by enemies. This page of the guide, in addition to showing the map, also lists the challenges (badges) from Mission 11. Those require, for example, using only Isabelle to attack opponents or avoiding stepping on loud surfaces.
The full walkthrough for Mission 11 can be found on the next three pages of this chapter. Our guide also contains links that refer back to the map. For example, the symbol (M11,5) means that you should find the blue dot with the number 5 on the map dedicated to Mission 11.
Mission 11: Markings on the map
- Red dots symbolize the bandits who are in the marshlands - they are all hostile towards playable characters. White dots symbolize imprisoned civilians and chickens.
- We have marked all important locations (worth visiting) with blue dots. Descriptions for these areas can be found just below the map.
- Chests with various supplies are marked with green dots. Their contents enable you to use the weapons and abilities that have limited number of uses.
Mission 11: General information

Mission 11 (Burn the Queen) takes place at night on an area which major part is covered with marshlands. Team members make their way into the swamps from two different sides, which means that the first part of the mission will involve leading them so that both parties meet and then the further dangers will be addressed by the whole team.
In the middle of the map, there is a small village with prison cells in which civilians are held. Your task is to get rid of the enemies guarding the targets and open the cells with McCoy's lockpicks. One of the cells hold Wayne, a character that has to be freed and safely brought to the extraction point.
There is a large steamer (named Queen) in the northern part of the map. Your subordinates will have to get onboard the steamer (the ship is pretty well guarded), spill oil from a barrel located on one of the upper decks of the ship and set it on fire to destroy it.
This mission has two unique obstacles, and they are related to the fact that it take place in the swamps:

1) there are many small water reservoirs in this area, which are marked with dark spots on your map. Entering the water creates additional noise, and as a result, you may inadvertently warn surrounding enemies. You can crouch to avoid generating noise when you step on the water, or completely avoid stepping in the reservoirs (this is one of the challenges of this mission).

2) You leave your footsteps on muddy surfaces, and they continue to appear for a while - an example of this situation is shown in the screenshot above. This is not only a cosmetic feature, as enemies can react to found footsteps - they will go into "danger" phase and start to follow them to detemine who is the culprit behind the tracks. If you don't want trouble, then avoid muddy surfaces or pass such areas long before any of the enemies revisit the location.
It is interesting to note that finding footprints doesn't have to mean that you'll be detected in a moment. You can intentionally use this mechanic to distract your opponents and make them reach chosen locations. A particular advantage of this method is that Long Coats also react to it, and this is one of the few opportunities to convince them to leave their post or steer away from their patrol route.
Playable characters:
- Isabelle - Available from the beginning of the mission. She starts in the south-east corner of the map (M11,1) and is accompanied by Hector.
- Hector - Available from the beginning of the mission. He begins in the south-east corner of the map (M11,1) and is accompanied by Isabelle.
- Cooper - Available from the beginning of the mission. He starts in the western part of the map (M11,2) and is accompanied by McCoy.
- McCoy - Available from the beginning of the mission. He begins at the western part of the map (M11,2) and is accompanied by Cooper.
- Wayne - An NPC that is imprisoned in one of the cells in the village(M11,13) and whom you have to free. After regaining freedom, Wayne has to be led to the extaction point (M11,21). Wayne is completely defenseless.
Mission 11: Badges / Challenges
In Mission 11, there are a total of 8 badges. Tips for each of them can be found below. Challenges are initially hidden, although you can fulfill them during the first playthrough of the mission.
Challenges are unavailable if you play on Beginner. In order to complete challenges, you need to choose at least the normal difficulty level. The same goes for replaying missions to get the remaining challenges.
- Don't step on loud surfaces
- Kill everyone except for civilians
- No knockouts or melee kills except for Isabelle
- Don't use McCoy's snipe
- Open all cages
- Hide all bodies in bushes, wells, houses, etc.
- Speedrun: Complete the mission in under 15:00 minutes
- Complete the mission on Hard difficulty
Don't step on loud surfaces

This is a difficult challenge, as there is no way you can keep track of it and you don't receive information whether you've failed it or not. You need to avoid any location containing water - this includes small ponds or streams. Leave this challenge for a easy difficulty playthrough.
Avoiding getting into shallow water, of course, means having to access some locations through other pathways, which unfortunately, may be heavily guarded. Focus on controlling one character at a time and rotate the camera to avoid getting into water by mistake. Also, rely more on your skills and leave footprints in the mud to distract your opponents.
Kill everyone except for civilians
This challenge is rather easy, and you should be able to complete it during the first playthrough. First of all, make sure to use Hector's skills to take care of Long Coats. You can also easily kill guard dogs, for example, by jumping on them from upper ledges or by using bear snares.
Look at the large map and make sure there are no red dots on it before leaving the area onboard a small steamer (M11, 21) - an example of this is shown in the above picture. Don't worry about a few red crosses because they don't apply to opponents.
No knockouts or melee kills except for Isabelle

Completing this challenge is not easy - wait until you're ready to repeat the mission on the easy difficulty level. Here are some valuable tips:
- When it comes to Isabelle, the enemies are best dealt with Connection. More so that you can use it as many times as you want. Leave Mind Control, which is a skill with limited amount of uses, for these opponents that are hardest to kill or disorient without alerting nearby guards.
- You can send other heroes to help Isabelle with distracting opponents as many times as you want. Among distracting abilities, McCoy's medical bag and Hector's whistle are especially useful.
- Isabelle cannot kill Long Coats, so avoid them and look for opportunities to distact them (e.g. footprints in the mud). Playing at the easy difficulty level, you will face less opponents of this type.
- Focus on achieving the mission objectives rather than seeking to clear the entire map from opponents.
- When setting fire to the Queen (M11,18), make sure that it is Isabelle that throws the torch into the spilled oil. This ensures that none of the opponents will die as a result of an action initiated by another teammate.
Don't use McCoy's snipe
This challenge is proposed to be dealt with while repeating the mission at the easy difficulty level. It can cause some problems e.g. in the area with footbridges (M11,8). You have to be more careful not to be in the sight of any sniper. Help each other with various alternate skills of the characters to distract the snipers and eliminate them. You can also try to use Isabelle's mind control on them, e.g. on the south side of the village (M11,12).
Open all cages

This is a very simple challenge, involving the prison cells in the village (M11,13) which are used to hold civilians. You need to search every cell in order to find Wayne. Even if you locate this NPC before opening all cells, use McCoy to clear all of them.
Hide all bodies in bushes, wells, houses, etc.

You can complete this challenge during the first playthrough, but you need to pay attention and hide all bodies, both incapacitated and dead. Take advantage of the fact that when you press the highlight button, all objects, bushes, wells, and entrances to buildings are marked with a white border. This makes finding places to hide bodies easier.
This challenge does not force the avoidance of killing opponents in arranged cases. They will be marked in red when you highlight interactive things on the map (an example of this in the image above), but this will not block you from getting a challenge. However, always make sure that the bodies of enemies who have died in accidents are not recovered. This may be the case if the balcony in the village is damaged (M11,14).
Speedrun: Complete the mission in under 15:00 minutes
Be sure to play at the easy difficulty level. This will not only allow you to get to the mission goals faster, but also reduce the number of elite Long Coat opponents on the map. Avoiding or getting rid of Long Coats can be difficult, especially if Hector cannot reach them easily.
Do not waste time fighting opponents whose elimination is not mandatory. We also advise you to frequently save your game and load an older save if you wasted too much time in some locations.
Complete the mission on Hard difficulty
This is the best choice for your first playthrough of this mission. However, be aware that you will repeat some of the parts several times. This is because many enemies are observing each other and/or patrol the map. Fortunately, this challenge doesn't have a time limit, and you can save your progress freely.

