
Desperados 3: Escape from an ambush and kill Jarvis - mission 3, walkthrough Desperados 3 guide, walkthrough
Last update: 22 February 2021
On this page of our guide to Desperados 3, you will find the first part of our walkthrough of mission 3 - Troublemakers in Flagstone. Getting out of the mini-ambush is very easy and will allow you to get to the main part of the task. Jarvis is one of the 4 main targets of the mission and you will find him in the stable trying to ride a bull. Our guide tells you how to get closer to Jarvis and how to kill him in an unfortunate accident.
In our walkthrough of mission 3 there are references to the map of the world atlas, which you will find on the first page of this chapter. For example, the sign (M3,1) indicates that you should look for the red point with number 1 on the map of mission 3, and the marking (M3,5) indicates that you should look for the blue point with number 5 on the map of mission 3.
You can complete mission objectives in any order. You don't have to eliminate Jarvis first.
Escape from the ambush

The mission starts at the back of a large building (M3,1). Cooper and Hector have to get out of a closed area that is being searched by three thugs of DeVitt's company which are trying to find the heroes.
Hector's skills will be very helpful in getting rid of local enemies. The hero can set bear traps, which are able to kill a captured enemy right away, and has a whistle skill that lures enemy to particular spot (enemies in a poncho are immune to this effect). Get rid of the first two enemies by using Hector's skills. Every time set a trap in a spot out of enemy sight, then whistle and hide Hector, for example, in the bushes. The enemy must be inside the blue circle to hear the whistling.

There is also a Long Coat opponent in the starting location, which is resistant to any distraction attempts. Take him out after you've eliminated two common thugs. Only Hector is capable of getting rid of Long Coat bandits - you can use an axe or choose hand-to-hand combat - knock out and tie up your opponent.
The exit from the starting location is in the north-western corner (M3,2). An important piece of information is that you can move around the whole central part of Flagstone without sneaking around. Heroes will not be detected and attacked even if they approach the thugs marked with red dots on the minimap. The forbidden zones are symbolized by red lines at their entrances - these are the points (M3,3), (M3,6), (M3,10) and (M3,15) on the map of our world atlas. You can kill the main targets in any order. For example, if you have problems with getting to Jarvis described below, you can leave him for later.
Time to murder Jarvis

Jarvis tries to ride a bull in a stable in the south-western part of the map (M3,1). Every once in a while, he leaves the bull to talk to a friend. Unfortunately, you can't get close to Jarvis that easily, because the whole stable area is a forbidden zone. If you enter such area, heroes will automatically be attacked upon detection.

The stable has three main entrances (M3,3). These are: the main southern entrance, a small staircase by the building and a hole in the northern fence. Only the hole in the fence is not observed at all times. Unfortunately, the elimination of bandits appearing in the vicinity of the hole can be difficult, especially since civilians are hanging around.
In our opinion, the best way to infiltrate the stable is to enter the building in the corner (M3,4), which is not guarded by anyone. The exit is located upstairs and right next to it there is an enemy in a poncho, who can be easily attacked. Hide his corpse in the building. Wait for a good moment with the attack so that you don't get noticed by the enemy wandering around. Stay in crouched stance at all times on the upper balcony, and you won't be detected even if someone from below is looking at you.

It's best to eliminate Jarvis in an arranged accident and you have to move Cooper to a small roof (M3,5) marked on the picture above. At least three of the surrounding bandits will be interfering with your plan.
- Wait until opponent number 1 (in the above picture) goes left to pee. Make sure that opponent number 3 is not looking at his direction. Jump on enemy 1 from the upper balcony and quickly hide his body in the bushes.
- Use the ladder to return to the balcony, wait for opponent number 3 to head south and make sure Jarvis (number 4) is not looking in that direction. Jump on opponent number 2 (you can use a knife or stun him immediately). Quickly hide the body of enemy number 2. Alternatively, you can whistle at the opponent number 2 and lure him to approach the bushes on the left, but make sure that no one else is within the range of this skill.
- Get rid of the opponent number 3 in any way you can (for example, jump on him or set a bear trap) or ignore him.
Ultimately, try to get to the ladder leading to the small roof by the indicated path.
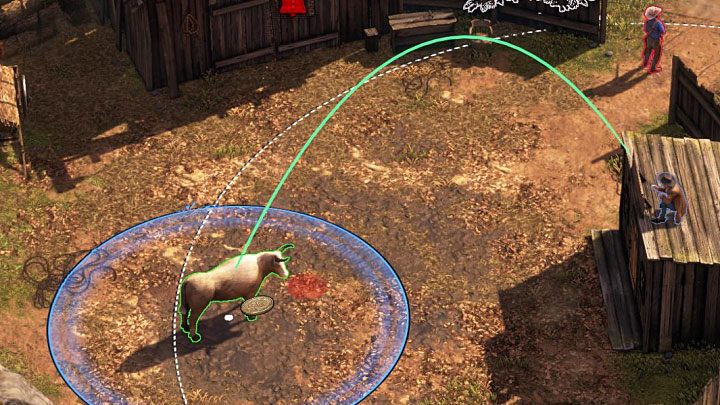

When you reach the roof, use Showdown Mode to plan the toss of a coin at the bull (M3,1). Wait until Jarvis is standing next to the animal to launch the prepared action. A bull struck with a coin will stab Jarvis with his horns. The target will die on the spot. It will be treated as an accident and as a result there should be no alarm triggered. Carefully leave Cooper's stable area to eliminate more people from the list.