The Scar - Reaching Gharn | Additional Locations Darksiders 2 Guide
Last update: 11 May 2016
Drive the Construct north and then take a left turn, destroying yellow crystals on your way. You should get to a large room with lava; start off by examining the left branch (the above screen).
Stop the Construct at the distinctive hole in the ground, and dismount. Star wall-running where shown on the screen. Pay attention as you go, because it's of course imperative to avoid the lava. Move only when it stops flowing.

Finally, grab onto the upper edge and climb to a small shelf. Interact with the rotating device pictured on the screen in order to open the first part of a large gate (don't worry, the device won't switch back to its original state). Examine the rest of the platform and you'll find a chest. See what's inside, then jump down and mount your Construct again.

Drive it back to the fork in the road and take the right branch this time. Stop at the hole in the ground and launch the chain at the hook partially covered by the lava.

Jump on the chain and move forth. Same as before, you'll need to time your movements so that you won't fall into the lava. When you reach the end of the chain, turn left and grab the hook shown above with Death Grip. Once you're on the new ledge, interact with the second rotating device.

Again, use the hook, then go back to your golem. Detach the chain and drive the Construct towards the newly unlocked passageway. Stop when you get to the above grate. Start scaling the left wall and you'll find yourself in an arena, where you're going to have to take part in a pretty challenging battle.

The battle is divided into two parts, and initially you won't have to overstrain yourself too much because you'll only be pitted against some Tainted Construct Warriors. Problems arise once you advance to the second stage of the battle, when the lava starts flowing in the area (the above screen). As a result, you're going to have to pay very close attention to how you attack so that your strikes don't take you too close to it, or that you don't get pushed in it by your enemies.

Keep your guards up especially in the final stages of the battle, when Tainted Construct Champions show up. Avoid their drill attacks and try to take them down one by one. After you win, return to your golem and drive it through the newly unlocked passageway, over quite a large lava tank.

Your destination is the door open earlier with the Skeleton Key. Head towards the drawbridge and use the Construct's chain (middle mouse button) to destroy all yellow crystals. It will lower the bridge.

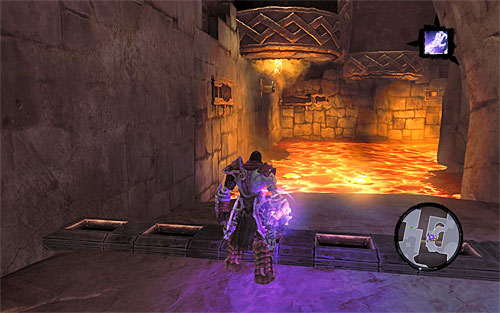
Go across the bridge, turn left and stop the golem at the hole illustrated above. Launch the chain at the hook outlined in the distance, jump on it and head south.

Stop more or less halfway through and face the hole in the east wall, pictured above. Bounce off the chain and try to latch onto the interactive hook with Death Grip. Make your way up, and when you land on balcony, latch onto the hook again to reach a shelf with a chest.

Carefully, jump down to the chain and continue south. Open the door and loot two nearby chests, then head for the above arena, where a mini-boss battle with Ghorn awaits you.
![Ghorn is much similar to Gharn, the boss proper of the main quest [The Fire of the Mountain] - The Scar - Reaching Gharn - Additional Locations - Darksiders II - Game Guide and Walkthrough](/darksidersii/gfx/word/1140813000.jpg)
Ghorn is much similar to Gharn, the boss proper of the main quest [The Fire of the Mountain]. Consequently, dodge his drill attacks most of all. He also likes to charge and use regular melee attacks.


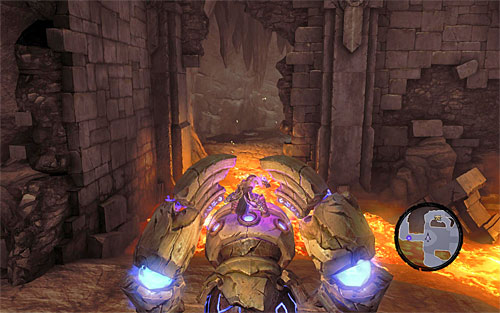
His rarer attacks include: causing lava bubbles (screenshot 1) and exploding (screenshot 2). In the former case, it's important to be mobile all the time, while the latter is all about maintaining a safe distance and not performing too many hits in one series.

Use Death Grip to pull yourself to Ghorn every time he misses. When you take around half of his health, you can count on a little diversity - he'll summon Tainted Construct Warriors for aid. Deal with them before resuming the offensive against Ghorn.

Continue hitting him until he loses almost all of his health. After a specific icon appears above his head, run towards him and press E. This concludes the trip to the Scar, but don't forget to grab the loot the mini-boss drops.
[TIP: Defeating Ghorn has been a part of the side quest [A Spark of Life]. If you haven't unlocked it yet, it will automatically show up in your quest log, so don't worry about missing the reward.]