
The Nook - The lower levels of the dungeon | Additional Locations Darksiders 2 Guide
Last update: 11 May 2016

Jump down one last time. Find an interactive lever in the southern part of the area and use it to open the south-east passageway shown on the screen. Go down the stairs.

When you reach a spot where the stairs end, start wall-running along the right wall, but after passing a ledge jump over to the left one. Enter the huge cave and get to two interactive hook pictured on the screen.

Use Death Grip on the first one and grab a Boatman Coin after landing on a shelf. Use the second hook to swing over to the larger bridge. Make your way south to initiate a mini-boss battle with Bheithir.

The thing that sets this battle apart from all other ones is that it will take place solely on the above mentioned bridge. Consequently, don't attempt to go back to the western part of the cave and pay very close attention to how you move so as not to fall down into the lava. Before you try to do anything, wait for Bheithir to land on the bridge. An obvious choice would be to use the pistol, but sadly it won't deal any substantial damage.


The key to winning this encounter is to switch between attacking (screenshot 1) and hanging onto the side edges of the bridge (screenshot 2). The latter will allow you to avoid Bheithir's charges along with those sections of the bridge that he sets on fire. If you chose to ignore both of these problems, you may get ready receive some serious damage. What's more, if Death is set on fire himself, he'll start losing health points for a few consecutive seconds.

Each time the boss charges at you, wait until it's possible to get at him from the back (the above screen) - he's practically defenseless against such attacks. Keep hitting him until it's over; you'll receive Bheithir's Talons as a reward.
[TIP: Defeating Bheithir has also been a part of the [Find and Kill Bheithir] side quest. If you haven't unlocked it yet, it will automatically show up in your quest log, so don't worry about missing the reward.]
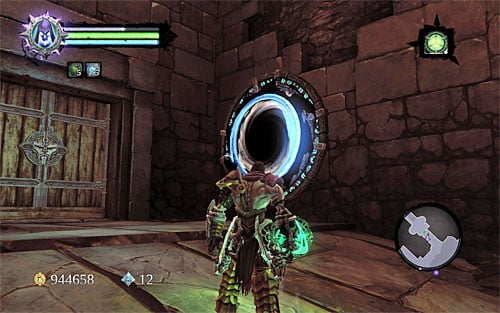
Go back to the interactive hooks and use them to get to the western part of the cave. Head north-west. Use Voidwalker (or Phasewalker) where pictured to activate the nearby portal, and then enter the west chamber.


Quite a complicated puzzle awaits you there. First, go left and scale the wall where shown on screenshot 1. When you reach the upper balcony, look around for a switch (screenshot 2) and a chest. Notice the gap - in a minute you're going to have to fix the ball in it.


Stay where the chest has been. Stand by the edge of the balcony and aim at the inactive portal to the east, illustrated on screenshot 1. Use Voidwalker (or Phasewalker) to activate it. Go back to the active portal (the one on the other side of the door) and jump through it to enter a hidden area with two chests (screenshot 2).

Jump down and head west. Climb the shelf in front of you, but stop where the screen shows and activate Soul Splitter.

Take control over the first half of the soul. Jump over the horizontal beams and then wall-run up to get to the beams above. There's one beam that's also a lever (screenshot 1). Switch to the other half. Have it jump over the beams as well, but this time head for the last beam at the bottom (screenshot 2), which is also a switch.

Both actions will remove the blockades around the ball on the left. Wait until the ball rolls all the way to the bottom. Approach it and roll it on the oval lift shown on the screen.


Make your way to the switch shown on screenshot 1. Flip it and quickly run to the ball. Wait until the lift takes you to the upper level. Approach the ball, roll it towards the second lift (screenshot 2) and push it using the middle mouse button. Note - if the ball falls down from the second lift, you're going to have to repeat the last couple of steps and try again.


Use the interactive hook again to get to the balcony with the second switch. Flip it and wait until the lift arrives with the ball (screenshot 1). The only thing left to do is to roll the ball into the gap mentioned earlier (screenshot 2).

Go to the adjacent room (the above screen) to find a chest and a switch that will open a way to the already explored central part of the cave.

Head east now. Be cautious because the place is guarded by a new swarm of Tainted Construct Warriors. After eliminating the first group, jump into the water. Dive and find a small room in which a Boatman Coin has been hidden (the above screen). This is the last treasure of this dungeon, so if you're not in a hurry to get to the Lost Temple, you can now conclude the trip.