Map and statistics | Mission 6 - Kasserine Pass Sniper Elite III Guide
Last update: 11 May 2016
Key points of Sniper Elite III - Mission 6
Important locations visited during the mission
Collectibles
Sniper Nests
Routes patrolled by enemy half-tracks
Important locations visited during the mission
Area where you start the mission.
Entrances/exits from the tunnels.
Paths leading to the northern hill.
First Nebelwerfer.
Central village.
South-western buildings.
Second Nebelwerfer.
Paths leading to the southern hill.
Stairs leading to Vahlen's HQ.
Officer carrying a safe combination.
Area where you must meet with Brauer.
Area where the Tiger tank appears.
Area that needs to be secured during the final part of the mission.
Safe inside Vahlen's HQ.
Locations of the snipers that appear after you've opened the safe.
Brauer's body.
Routes patrolled by enemy half-tracks
Route patrolled by the first enemy half-track (green line).
Route patrolled by the first enemy half-track (green line). It appears on the map after you've destroyed the Tiger tank.
Sniper Nests
Snipers Nest. Aside from unlocking the nest you can also perform a Long Shot here.
Snipers Nest.
Snipers Nest.
Collectibles
War diary - Survival Notes: Water.
Collectible card.
War diary - Missives from Home.
Collectible card.
War diary - Axis War Story: Remembering Emil.
War diary - Vahlen's Journal: Usefulness of Rommel.
Collectible card.
War diary - Axis Account: Dangerous Ambitions.
War diary - Note from Vahlen: In My Absence.
War diary - Letters to Martin.
War diary - Note from Vahlen: Safe Combination.
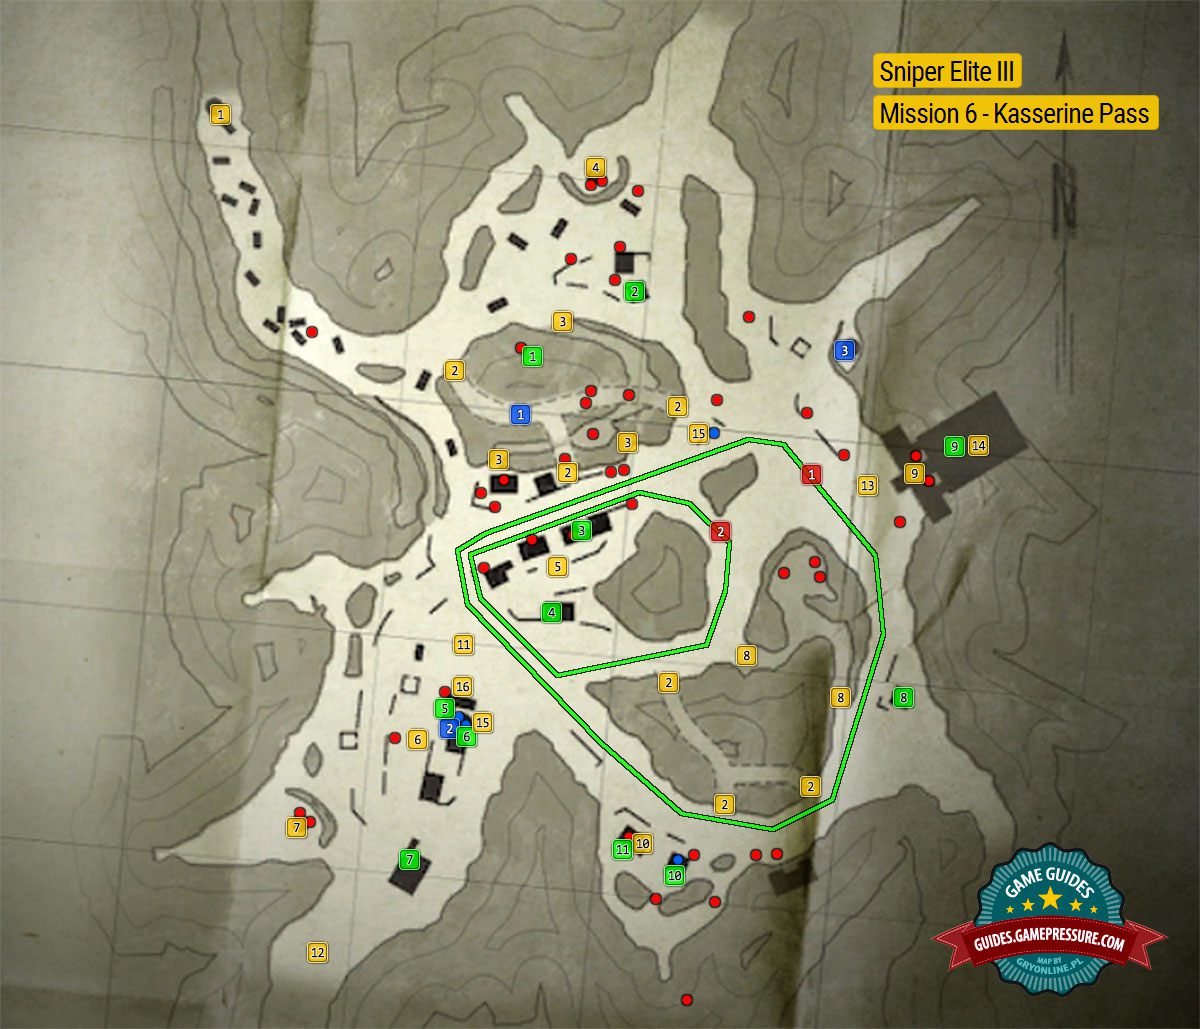
The above screenshot presents the map of the location, in which you play the sixth mission of the game. It is a medium-sized mountainous area and it surrounds the Vahlen's command center located in the temple. First of all, on the map, there have been the key places marked (mission objectives main paths, etc.) and the whereabouts of collectibles.
Apart from that, you there are colorful lines and dots on the map:
- The red dots signify the places where you encounter the opponents- Note: some of the enemies do not stay put and they patrol a given area. The opponents from the final part of the mission have not been marked, because they take positions near Vahlen's command center, in random locations.
- The blue dots symbolize the locations in which you encounter the enemy snipers. Note - the last two snipers (points 15 on the map), appear only towards the end of the mission, after you open Vahlen's safe.
- The two green lines signify the patrol routes for the enemy halftracks. The first one of these patrols the map from the very beginning of the mission. The other one appears after you destroy the Tiger tank.
Mission preparations
In this mission, there are several enemy vehicles that you need to destroy. Therefore, it is of key importance that you take explosives along. To blow up the halftracks, you only need the "regular" landmines. When it comes to the Tiger tank, it is best to destroy it with a well-aimed stick of dynamite. Also, you need to take the best available sniper rifle, because there are many opportunities to take long shots, during the mission.
Mission statistics
Optional tasks and challenges:
- You need to destroy two Nebelwerfer rocket launchers. The first launcher is in point 7 on the map. To learn more about how to blow up both of the rocket launchers, see the walkthrough for this mission.
- You need to visit three Sniper Nests.
- You need to take one Long Shot. you take the shot after you take positions in the sniper nest, located on the hill, in the central part of the map. (the blue point 1 on the map).
Collectibles:
- You need to find eight War Diaries).
- You need to find three Collectible Cards.

