Fallout 4: Map of Sanctuary - Sector 1 Fallout 4 Guide
Last update: 17 April 2024
Key points of Fallout 4 - Sector 1: Sanctuary
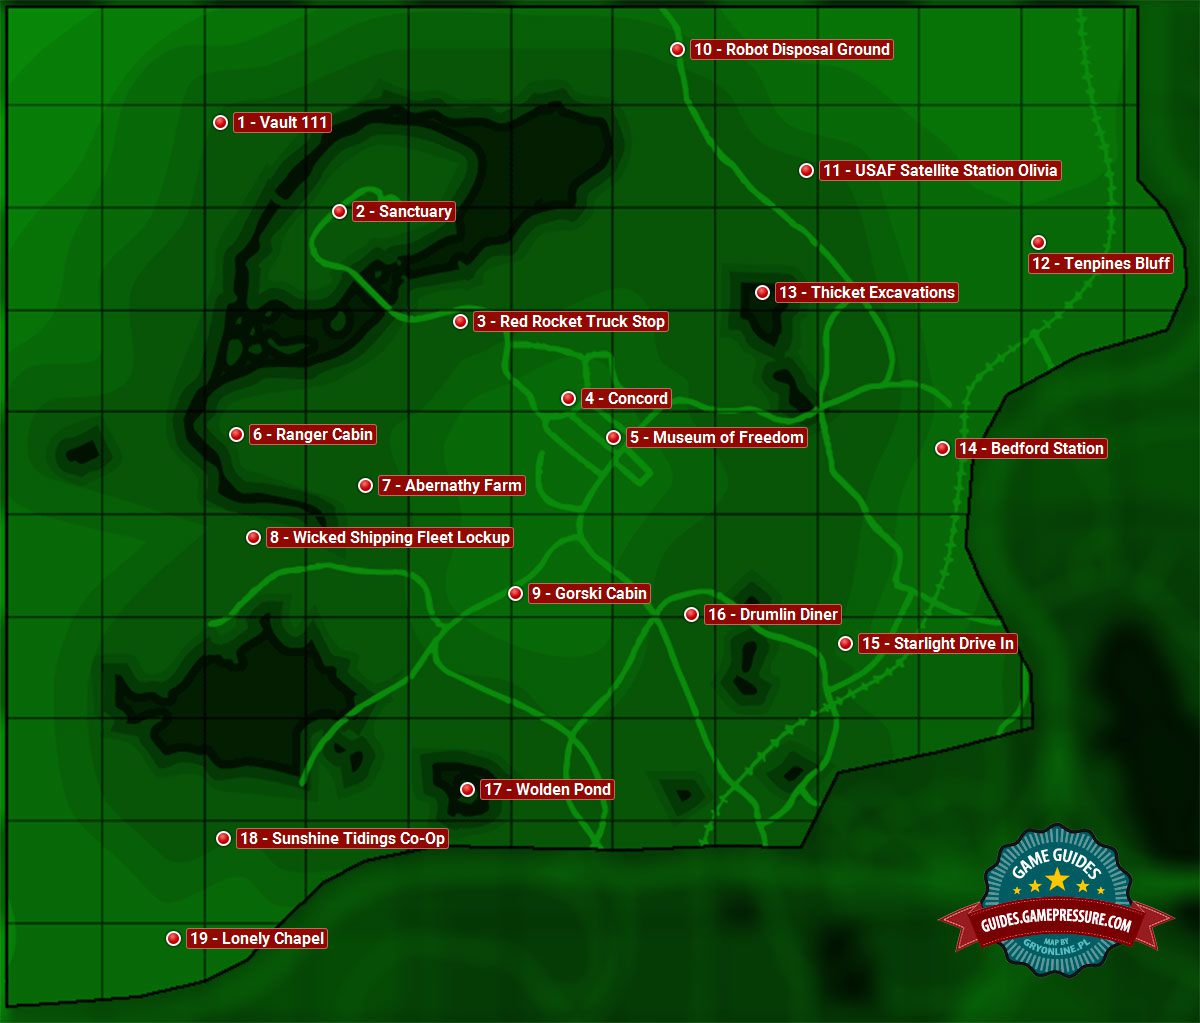
Locations on the map
Locations on the map
1 - Vault 111 � You start your first main quest (Out of Time) in this location and its objective is to leave the vault. You can return to Vault 111 later in the game and use this opportunity to gain access to previously inaccessible containers.
There are very weak radroaches inside the vault and you won't encounter other people.
2 - Sanctuary � Sanctuary was the original home of the main character's family and you return here while completing the first main quest (Out of Time). Sanctuary becomes the first settlement for the Minutemen later in the game. In you main character's house there is a magazine Grognak the Barbarian (+5% to hit with malee weapons or unarmed). You can find Codsworth, the robot, which can be your follower.
3 - Red Rocket Truck Stop � You'll find Dogmeat here. It is a unique canine companion you can "recruit" him simply by interacting with the animal. The truck stop is infested with mole rats. You can build a settlement here. Near the Truck Stop you will find cave and several mole rats and safe in there.
4 - Concord � You visit the Concord as a part of the first main quest (Out of Time). There are plenty of empty buildings here and the only significant one is the Museum of Freedom.
There are bloodbug hatchlings on the outskirts of the town and when you'll arrive here for the first time you'll also encounter plenty of raiders. After your fight with Deathclaw, you can go under the city - there's a fusion core.
5 - Museum of Freedom � This building is a part of the city of Concord and you explore it while completing the second main quest (When Freedom Calls). This quest will require you to deal with a new group of raiders occupying the ruins of the museum and you'll also meet with a group of Minutemen led by Preston Garvey. On the second floor you can find a perception bobblehead and Robco Fun magazine on the dest.
There's a power armor on the roof of the museum and you'll be allowed to use it while clearing the town of hostile units.
6 - Ranger Cabin � There are bloatflies near the cabin. The building itself holds a few valuable objects including a Wasteland Survival Guide (you receive 5% less melee damage).
You will find the chemistry station here.
7 - Abernathy Farm � You can pick up fruits from the farm. You'll also find a workshop here.
You can trade with Conny, but she hasn't anything interesting.
After talking to the farmer you will get "Returning the Favor" quest. After completing it the farm will transfer into settlement.
8 - Wicked Shipping Fleet Lockup � This location is occupied by several feral ghouls. You can find a trailer key on one of the desks and use it open a large container. The inside of the trailer suffers from high radiation, but if you manage to deal with that you'll find some crates (one of them holds a lot of ammunition).
9 - Gorski Cabin � There are a lot of feral ghouls near the cabin and inside it. Once you've cleared the area you can search the cabin for goods and use a chemistry station.
10 - Robot Disposal Ground � You can find a T-45 power armor a little to the south of this location. The disposal ground itself offers a chance to use a weapons workbench and you'll also find a fusion core here. In building you'll find Hot Rodder magazine (new paint job to your power armor). Near the car wrecks you can find Fat Man, nimi nukes thrower.
11 - USAF Satellite Station Olivia � There's a large group of raiders on the station's grounds and you'll also encounter mole rats here. You can enter the station building and also use an armor workbench. You'll be able to collect here a fusion core. In closed room in the underground you will find book, which increase permamently your sneaking skill.
12 - Tenpines Bluff � There are a few friendly settlers here. You can help them out as a part of a side quest received from Preston Garvey in Sanctuary (The First Step). Doing that will make them join your cause and you will be able to build a settlement here.
Watch out for radroaches in the fields.
13 - Thicket Excavations � This location features a large excavation site with a pool of irradiated water. You can meet with Sully Mathis here to start a side quest (Pull the Plug). There are also some additional interactive objects to be found in the area, and Taboo Tatoos magazine.
14 - Bedford Station � There are a lot of feral ghouls inside the station and around it. The station itself holds plenty of interactive items, including a trunk hidden by the roof which contains ammunition and weapons.
15 - Starlight Drive In � The drive in is booby-trapped and you can easily die if you're not careful. Once you disarm the traps you can explore the building and use a workshop. You can build here your settlement.
There are mole rats and rabid mole rats in the parking area and around the drive in. You also have to watch out for high radiation in some areas.
16 - Drumlin Diner � You will witness a heated argument between Trudy and Wolfgang when you arrive here for the first time and you can resolve it as a part of a side quest (Order Up). The stand off can end with someone/everyone dying or with everyone surviving.
If Wolfgang and/or Trudy are still alive after all of this you will be allowed to trade with them - Wolfgang will be selling chems and Trudy will be selling various goods.
17 - Wolden Pond � There are raiders in the caves near the pond and eliminating them is a part of a side quest received in Sanctuary (The First Step) - you can access the caves through a drainage pipe or by opening a locked gift shop door.
18 - Sunshine Tidings Co-Op � This area is inhabited by feral ghouls and radroaches. Once you've killed all monsters you can collect loot from the buildings and also reprogram Mr. Handy robot by hacking into a terminal.
You can also find a workshop and a chemistry station here. You can build here your settlement.
19 - Lonely Chapel � Inside you'll find entrance into secret shelter. There're a lot of Raiders on pretty high levels. Fight with them to obtain a lot of weapons and ammo (also other supplies). On opposite site of hideout there's opponent with power armor.
In hideout you can find a fusion core, and magazine: U.S Covert Operation Manual, which gives you better ability of sneaking.
The map seen above shows the first sector of the world map which is its north-western part. The map has icons of locations you can discover while visiting this sector. Each location has its description on the map and more important locations have their separate pages in the atlas with more info. The most important locations in this part of the world are Vault 111 (you will begin your game here), Sanctuary (it'll be your first base) and Concord town (you'll visit it while completing the first main quest).
Locations with secrets
Sanctuary - Grognak the Barbarian magazine (+5% to melee damage);
Museum of Freedom - Perception Bobblehead;
Museum of Freedom -Robco Fun magazine (Unlocks game on Pip-Boy);
Ranger Cabin - Survival Guide (You receive 5% less melee damage);
USAF Satellite Station Olivia - Covert Operations Manual (permanently increases your stealth skills);
Robot Disposal Ground - Hot Rodder Magazine (new paint job for the power armor);
Wolden Pond - Magazine (Tales of Junktown Jerky Vendor) (better prices in shops);
Thickets Excavations -Taboo Tattoos Magazine (Unlocks face tattoo).
Locations with legendary items
Sunshine Tidings Co-Op - Hunter's Board. You will find it near the legendary radroach. The weapon increases damage dealt to animals by 50%.
Walden Pond -Big Jim. This weapon increases the chance to damage enemy legs by 20%. You will find it on the table in the main room of the tunnel next to the pond.
New potential companions
Dog - Red Rocket Truck Stop. Simply talk to the dog and it will join you.
Codsworth - Your servant robot, met before the apocalypse. You will find him in the Sanctuary. He will join you when the Minutemen will enter the settlement.

