Zelda TotK: All Shrines in Central Hyrule Zelda Tears of the Kingdom guide, tips
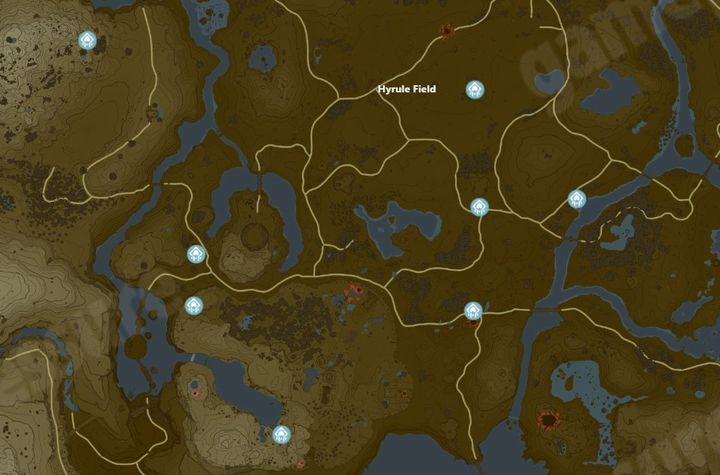
There are several rather difficult Shrines in Hyrule Field. In our map and guide to Zelda TotK you will find useful tips on how to solve them.
Last update: 18 September 2023
Central Hyrule is one of the first regions in the game, so you'll reach it very early on. On this page of our guide to Zelda Tears of the Kingdom you'll learn how to solve Shrine puzzles in Teniten Shrine, Tajkiats Shrine and many others.
- Tajikats Shrine
- Teniten Shrine
- Kamizun Shrine
- Riogok Shrine
- Tsutsu-Um Shrine
- Jiosin Shrine
- Sinakawak Shrine
- Mayachin Shrine
- Kyokugon Shrine
- Tadarok Shrine
- Serutabomac Shrine
- Sepapa Shrine
- Ren-iz Shrine
Tajikats Shrine
Related map marker: Shrine #1 Tajikats - Central Hyrule @ Zelda Tears of the Kingdom Interactive Map
- Use Ultrahand to place the log vertically, then climb it.
- Then, connect two logs and place them vertically to cover the hole. Climb it and continue on.
- Then, connect the logs to each other again and place them on the water to move on.
- The next step is to build a structure from several logs so you can place it on the water and climb up to the upper floor. To do this, put two logs on the ground and connect them, then place one of them vertically to make a makeshift ladder. If the structure is tilting, support it with the previous two logs by placing them on the side.
- The last step is to build a raft. Connect several logs (preferably four) together, place two fans at their ends and throw the finished vehicle into the water. Hit the fans to get to the other side.
- There is a chest to the left. When you reach the other end of the shore, set up the raft towards it using Ultrahand to get there. Inside, you'll find a Spiky Shield.
Teniten Shrine
Related map marker: Shrine #2 Teniten - Central Hyrule @ Zelda Tears of the Kingdom Interactive Map
- Defeat the Zonai robot by throwing a weapon found on the left. Hold down R and let go once you're sure you'll hit.
- After the first hit, the robot will start moving left and right, stopping briefly when it reaches an edge of the platform. Hit it again to beat it. This opens the gate and unlocks a chest holding a Zonaite Spear.
Kamizun Shrine
Related map marker: Shrine #3 Kamizun - Central Hyrule @ Zelda Tears of the Kingdom Interactive Map
- This trial tasks you with defeating all enemies within the Shrine using only the equipment found in front of the arena.
- Equip a new weapon and shield, then Fuse something to it to make your sword stronger. You can shoot the robots' eyes with your bow - this deals more damage than melee hits.
- Weapons can break easily, so pick up another one when needed.
- At the end of the corridor, there is a wooden stick and a spiked ball. Fusing these two objects together creates a powerful weapon.
- Defeat all Constructs to open the gate. Get through it and open the chest. You'll get a Spring Shield.
Riogok Shrine
Related map marker: Shrine #4 Riogok - Central Hyrule @ Zelda Tears of the Kingdom Interactive Map
- Once inside the Shrine, use Ultrahand to pick up a log and place it as pictured here.
- Hit the mechanism located to the right of the cogwheel.
- Go to the other side and use Ultrahand to attach the log to the mechanism. It must turn left.
- There is another log behind the opened gate. Lift it up with Ultrahand. Above, on the left side, there is a chest. Attach it to the log to drop it down. Inside you'll find a Mighty Construct Bow.
- Now use Ascend at the stone blocks to get to the top. Take the log with you as well, you'll need it higher up to attach it and climb up.
Tsutsu-Um Shrine
Related map marker: Shrine #5 Tsutsu Um- Central Hyrule @ Zelda Tears of the Kingdom Interactive Map
- First, attach a square platform to the spike on the left. Next, jam another spiked platform into the vertically moving structure.
- Jump to the other side and use Ultrahand to change the position of one of the platforms. Place it on the other side. This will give you access to the chest. Inside, you'll find five arrows.
- Now approach the gust, jump and glide to reach the other side.
- The sphere will begin to toll down from the highest floor. Now you have to adjust the position of one of the spikes so the sphere stops and falls onto the rocking bench.
- Thanks to the spikes, the ball should stop. Then, with Ultrahand, you need to remove the upper spike so the ball falls down.
- Finally, use Ultrahand to place one of the spikes on the mechanism that rotates around its own axis. Thanks to this, it will move the sphere so it lands in the funnel, which will open the exit gate.
- Jump to the other side and head to the exit.
Jiosin Shrine
Related map marker: Shrine #6 Jiosin - Central Hyrule @ Zelda Tears of the Kingdom Interactive Map
- The puzzles require arranging stone structures into a pattern than can pass through a hole with a specific symbol. First, use Ultrahand, lift the structure and place it as pictured here.
- Next, place it over the pit to cross to the other side.
- Later, to the right, you'll see two stone blocks. Once again, place them to match the symbol on the wall (pictured).
- Before proceeding to the room to the left, set the blocks in the hole in the middle of the room. You'll be able to access a chest holding a Hasty Elixir.
- Use Ultrahand to move the structure to the left side of the room. Rotate the blocks into a diamond shape. The bottom one must pass through the hole earlier.
- Finally, set up the stone blocks so you can scale them and reach the exit.
Sinakawak Shrine
- First, attach a balloon to the plank. Then pick up the torch and ignite it on a burning candle. Step onto the plank holding the burning torch (don't sprint, the fire will go out). This will let you rise into the air.
- In the new room, you must connect two candles vertically and attach a balloon above them. All this can be done with Ultrahand. Now, place the newly built structure in the middle, above the button you must press.
- Build a similar baloon as before, but place the small sphere inside. Step onto the wooden plank, holding a lit torch. Once you're high up, put out the torch and use the Paraglider to land safely.
- Again, stand on the wooden plank attached to the balloon, then use Recall. This will raise the balloon again. Quickly jump to the upper floor while keeping Recall active and use Ultrahand to pull the balloon towards yourself.
- Drop the small sphere into the hopper to open the gate. This opens the Shrine exit.
- Before you leave, you can drop the large sphere into the larger hopper to open the gate covering a chest.
- Climb the ladder up and move the balloon with the sphere to the larger hopper to open the gate. The chest holds an Opal.
Mayachin Shrine
Related map marker: Shrine #8 Mayachin - Central Hyrule @ Zelda Tears of the Kingdom Interactive Map
- Jump to the other side and stand on the button.
- Go down and use Ultrahand to jam a spike into the device pictured here. Later, connect two logs to the spike.
- Go back up and stand by the pictured crystal. When the sphere reaches the second-last white line, attack the crystal. This will send the sphere flying towards the target.
- To open the chest, first use Ultrahand to drive a spike into the hanging bar. Next, attach the hanging piece of the wall to the spike.
- Go back to the crystal and hit it when the sphere's near the pit. Go right to open the chest, which contains an Energizing Elixir.
- Go to the exit on the left to complete the quest.
Kyokugon Shrine
Related map marker: Shrine #9 Kyokugon - Central Hyrule @ Zelda Tears of the Kingdom Interactive Map
- After entering the Shrine, you'll find four hoppers, and three more to the left and to the right. On the ceiling you'll see lights, which indicate where to put spheres into. When the gate opens, open the chest and take the Light of Blessing.
Tadarok Shrine
Related map marker: Shrine #10 Tadarok - Central Hyrule @ Zelda Tears of the Kingdom Interactive Map
- After entering the Shrine, use Ultrahand to lift the spheres from the water and safely put them away. This will prevent you from getting electrocuted. Carry the stone block across the water.
- In the next room, look for another water pool and a lava pool. Take a sphere out of the pool and grab the second stone block. Put them both in the lava pool to create a way through.
- To reach the exit, you must connect the stone blocks and set them up vertically. Attach a wooden box to them, making sure it slightly sticks out to the side. Put this structure next to the wall leading to the exit, making sure the wooden box doesn't get burnt. Stand underneath and Ascend to reach the exit.
Serutabomac Shrine
- This Shrine is behind Hyrule Castle. In the first room, reach the higher-level door. Use Ultrahand on a metal platform and place it on the beams above. Stand under the platform and Ascend.
- In the second room, lift the long metal platform and rotate it to stand upright on its shorter end, then lean it against a beam by the door. Attach a small square platform to the top, into a T-like shape. Ascend up.
- Finally, attach three stone platforms to each other and place them on the beams protruding from the wall. Ascend to reach the exit.
Sepapa Shrine
Related map marker: Shrine #12 Sepapa - Central Hyrule @ Zelda Tears of the Kingdom Interactive Map
- Enter the first room and wait for the moving platform to pass under the barrier. Use Recall and jump onto it to reach the elevator.
- In the next room, you must use Recall on the sphere. First, lift it with Ultrahand and drop it into the lower hopper to open the first gate. Now use Recall on the sphere and cancel it once the sphere is above the upper hopper. It'll fall in, opening the second gate.
Ren-iz Shrine
Related map marker: Shrine #13 Ren-iz - Central Hyrule @ Zelda Tears of the Kingdom Interactive Map
- In the first room, you'll find a descending ramp. Hit the shining part to release a sphere that must leap over the pit to the right and land in the basket. Lean the metal platform on the glowing element to make it act as a ramp.
- There's a similar puzzle in the second room. Raise another long metal platform and use the glowing object as a support. Activate it to release a sphere. Next, use Ultrahand on the short metal plate and rotate it, setting it up at an angle. Attach it to the previous platform to turn them into a ramp.