Pillars Of Eternity 2: Sea Cave - Map Pillars Of Eternity 2 Guide and Walkthrough
Last update: 20 November 2022
Key points of Pillars of Eternity 2 Deadfire M2 - Sea Cave
Important areas on the map
Exits from locations
Locked doors or chests
Traps
Important NPC's (quest givers, traders etc.)
New potential team members
Dangerous enemies (bosses, elite monsters etc.)
Exits from locations
M1 � Exit to: Vilario's Rest.
Important areas on the map
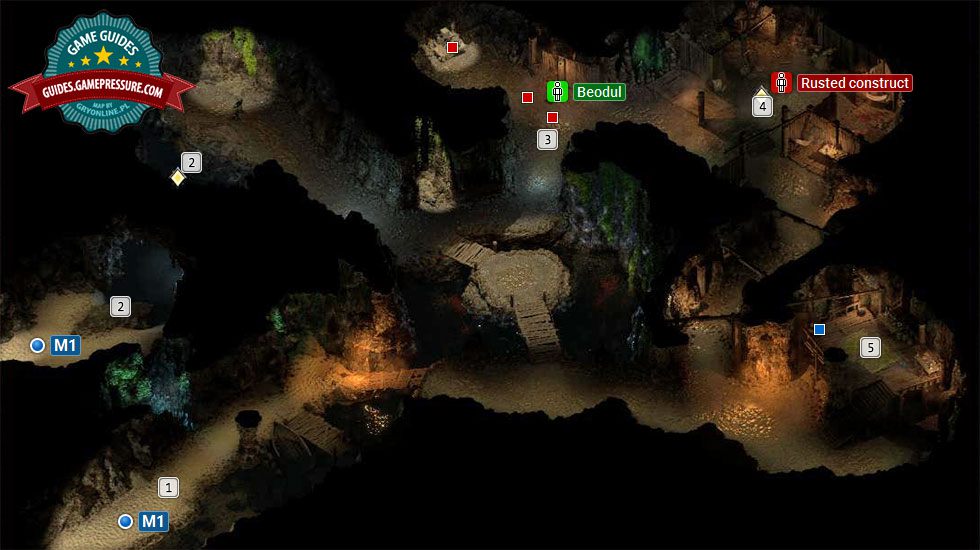
Starting area Area where you begin exploring the cave after using the passageway next to the waterfall (M1). There are torches in the chest at the pier.
Underwater passage. You can use Athletics and swim through it to reach the alternative exit from the cave.
Beodul. Dwarf Beodul is surrounded by a lot of traps which you must avoid or disarm. You can help Beodul in getting out of the cave. There's a treasure chest to the north-west, but you must first disarm the trap on the chest.
Abandoned hideout. It's guarded by a hostile rusted construct. There's a corpse nearby with a Ring of Minor Protection and lockpicks.
Small room. There are two skeletons here. After the battle you can find a corpse with lockpicks and a note. There's also a locked chest with an armor among other things.
The map shown in the picture above presents the layout of the location known as the Sea Cave. This is one of the locations that you will visit at the very beginning of Pillars of Eternity 2 Deadfire. Exploration of the cave is primarily focused on finding one of the missing crew members. You can encounter several types of monsters here (most of the opponents will be quite weak) and stumble upon various pieces of treasure (mostly gained from chests).
- Important locations in the Sea Cave
- Quests that are continued in Sea Cave
- Important NPCs in the Sea Cave
- Types of opponents and monsters in the Sea Cave
- Other information related to the Sea Cave
Important locations in the Sea Cave
1. The starting position. By default, you start at the bottom entrance to the cave. The upper passage becomes available only if you reach the underwater corridor (point 2) and use Athletics correctly in order to swim through it (after the cutscene appears, it is worth choosing the option of finding places where you can breathe in some air along the way).
3. Beodul. Finding Beodul the Dwarf is part of the Helping Hands side quest. The character in question is surrounded by a large number of traps that you have to avoid or disarm. You can then help Beodul with getting out of the cave.
To the north-west of Beodul's whereabouts, there is a treasure chest, but you must first disarm a trap to be able to acquire its riches.
4. Abandoned hideout. A Rusted Copper Construct guards this location - it is the most resilient opponent of all those which you will come up against in the cave. There is a corpse with a Ring of Minor Protection and lockpicks in the vicinity.
Quests that are continued in Sea Cave
[Missions] Helping Hands (M1) - Beodul (M2,3) is one of the characters who must to be found during this quest.
Important NPCs in the Sea Cave
Beodul (M2,3) - You can help him with getting out of the cave and thus complete the Helping Hands side quest. Beodul is surrounded by traps. Be sure not to activate any of them, as they can deal a lot of damage.
Types of opponents and monsters in the Sea Cave
Cave Beetle
Skeleton - they are resistant to poison, among other status effects; be vigilant when entering the room (M2,5) where two skeletons will appear at once.
Sea Bat - they are resistant to diseases.
Rusted Copper Construct - Constructs are very durable, and so your fight against them will take longer, making victory a more demanding goal; keep the weaker group members away from their melee attacks.
Other information related to the Sea Cave
It is best to explore the cave while staying in stealth mode. This will allow you to surprise many of your potential opponents. Be sure to remain extra wary in the part of the cave where Beodul is located (M2,3). It is best to send the member of the team with the highest Perception stat to uncover all of the surrounding traps. It is also worth trying to disarm them all. If the statistics of your team do not allow you to execute this plan, be very careful when trying to deal with the traps.

