Pillars Of Eternity 2: Crookspur Island - Map Pillars Of Eternity 2 Guide and Walkthrough
Last update: 20 November 2022
Key points of Pillars of Eternity 2 Deadfire M37 - Crookspur Island
Important areas on the map
Exits from locations
Locked doors or chests
Traps
Important NPC's (quest givers, traders etc.)
New potential team members
Dangerous enemies (bosses, elite monsters etc.)
Important areas on the map
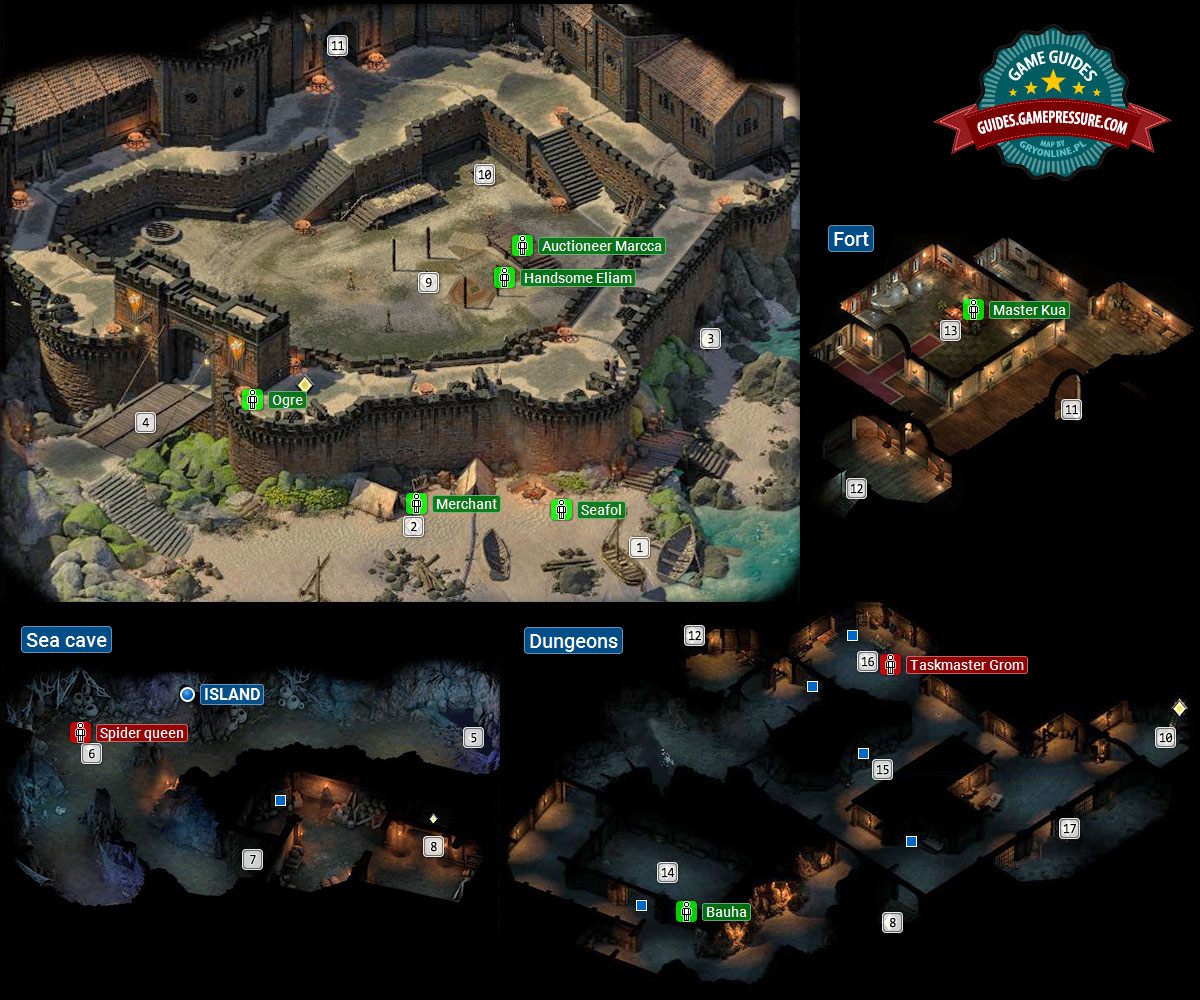
Starting area. You begin the exploration of the island here and you can use the boat to return to your ship. Seafol is working for Captain Aeldys and you can meet with her about releasing the slaves as a part of "A Shrewd Proposition" quest.
Crookspur Shore. The Merchant is selling a unique Helm of the Falcon, a unique Patinated Plate, a unique Grave Calling sabre, supplies for the ship, tools, high quality weapons, shields and armors, bombs and alchemy ingredients. You can steal some of his most precious items from the nearby crates.
Passageway to the sea cave. You must complete a scripted interaction to get to (05). While travelling through the flooded cavern make sure to choose the brighter tunnel.
Portcullis. You must convince the ogre to lower the bridge (the best method is to confirm participation in the slave auction).
Passage leading from the beach. You will begin exploring the sea cave here if you've completed the scripted interaction on the beach in (03).
Crystal-eaters Nest. Crystal-eater spiders along with their powerful queen can be found here. The northern passageway allows to access the map of the island. To the south of the nest you'll find more spiders and a corpse with high quality armor.
Locked iron gate. In order to open the gate you can use a prybar, pass one of the skill tests (like a Might test for example) or use a corrosive spell. In the room behind the gate you can find a lvl 8 locked container (clothing and jewel) and other containers (ship supplies and minor loot).
Passageway connecting the sea cave and the dungeons.
Auction Yard. After arriving in the fort you will witness a slave auction taking place which will be overseen by Auctioner Marcca - "A Shrewd Proposition" quest. You can attack the slavers, try to stop the auction or bid on your own slave (for at least 1200 gold). Handsome Eliam is one of the slaves - you can release him if you've attacked the slavers and recruit him to work on your ship (he's a helmsman and a cook).
Passageway connecting the auction yard in the fort and the dungeons. Watch out - using it can result in your team being attacked by the slavers!
Entrance to the fort. After entering the fort make sure to check the eastern corridor. You can steal a unique large shield Shining Bulwark from the stand.
Passageway connecting the fort and the dungeons. Watch out - using it can result in your team being attacked by the slavers!
Master Kua's office. Master Kua is in charge of the slavers. You can kill him or meet with him as a part of "A Shrewd Proposition" quest. Master Kua can give you the "Tip of the Spear" side quest. There's a hidden compartment in Kua's desk (ring).
Wahaki cell. You can rescue the Wahaki tribesmen to fulfill Captain Aeldys' request - "A Shrewd Proposition" quest. The cell has a lvl 13 lock, but you can use the key taken from Taskmaster Grom in the Torture chamber (16). After freeing the tribesmen you can convince them to escape (preferably through the sea cave in 08) or allow them to attack the slavers. There's a hidden stash in the cell - sapphire.
Corridor guarded by ogres. You must defeat an ogre cutthroat and an ogre sniper. One of the ogres drops a Crane-crested key which can be used with all of the chests in the dungeons. The chest contains a war bow and gems.
Torture chamber. You will encounter a large ogre Taskmaster Grom here and he's accompanied by slavers. Grom drops a Large iron key which you can use to open the cells with the slaves. There are containers here with valuable weapons and one of them is a unique morning star The Willbreaker.
Slaves cell. You can use a key taken from Taskmaster Grom in the Torture chamber to open the cell (16). It's best to send the rescue slaves ("A Shrewd Proposition" quest) to the sea cave entrance (08).
The above map presents the Crookspur Island. This is one of the most important locations that you can visit in the game Pillars of Eternity 2 Deadfire. This island is the headquarters of slave traders and depending on the decisions you make, you can buy into their favors, murder them or bring them to release, kept in the dungeons of slaves. You can also find many treasures or trade on the island.
- Important places on the Crookspur Island
- Quests to unlock on Crookspur Island
- Quests continued on Crookspur Island
- Important independent characters on Crookspur Island
- Types of opponents and monsters on Crookspur Island
Important places on the Crookspur Island
1. Place of start. You start exploring the island here and you can, after settling all matters, return with your boat to your ship.
Seafol works for Captain Aeldys and you can meet her about the release of slaves as part of the A Shrewd Proposition.
3. The passage to the sea cave. You must pass the paragraph scene to reach (M37,5). During the crossing through the flooded cave, choose a brighter tunnel (the darker tunnel is a dead end). After reaching the Sea Cave, you can return to the beach in the same way.
4. A dropped gate. You must persuade the ogre to leave the bridge. The best method is to confirm participation in the slave auction (M37,9), so you will not have to help yourself with Streetwise, or choose to pass through the Sea Cave (M37,3) in a situation where you will not be let in.
6. A crystal-eaters nest. There are crystal-eating spiders here together with a stronger queen.
The northern passage allows you to reach the map of the island (optional locations to explore). To the south of the lair, you will find new spiders and cadavers with high-quality armor.
7. Closed iron gate. To open it, you can use a crowbar, pass a skill test (eg Force) or use a spell with a corrosive effect.
In the room behind the gate, in addition to the passage to The Dungeons, you will find a container with the eighth level lock (clothing and jewel) and a few open containers (supplies for the ship and smaller loot).
9. Auction square. After arriving at the fort, you will be a witness to the slave auction, supervised by Auctioneer Marcca, quest A Shrewd Proposition. You can attack slave traders, try to stop the auction or auction your own slave (for at least 1200 gold).
Handsome Eliam is one of the slaves - you can save him if you've attacked the slavers and recruit him to the crew of the hero's ship (he will work as either a helmsman or a cook).
13.Office of Master Kuy. Master Kuy is at the forefront of slave hunters. You can kill him (beware - there are other characters in the room who also have to be killed) or meet him as part of quest A Shrewd Proposition. Master Kuy outsources the side quest Tip of the Spear.
There is a secret box in the Kuy's desk (ring).
14. Wahaki' cell. You can free Bauha and other natives of Wahaki, at the request of Captain Aeldys - quest A Shrewd Proposition.
The cell gate has a level 13 lock, but you can use the key obtained from Grom Overlord in the Torture Chamber (M37, 16). After releasing the natives you can get them to escape (preferably through the sea cave from (M37,8) or let them attack the slavers.
There is a secret cache in the cell - sapphire.
16. Torture chamber. There is a huge garden here, the Grom Overlord, accompanied by slavers. Grom leaves behind A large iron key to the target with slaves.
There are containers with several valuable weapons, including unique ones like The Willbreaker.
Quests to unlock on Crookspur Island
[Missions] Tip of the Spear - You must meet Master Kuy (M37,13) and take on the task of murdering the natives.
Quests continued on Crookspur Island
[Principi] A Shrewd Proposition (M36) - You must help the slavers, at the request of Captain Furrante (M36,10), or thwart their plans, at the request of Captain Aeldys (M34,17).
Important independent characters on Crookspur Island
Seafol (M37,1) - She works with Captain Aeldys. You can talk to her about the slave release plan.
Merchant (M37,2) - He offers for sale, among others, the unique Falcon Helm, unique armor, unique Sepulcher's Sew, supplies for the ship, tools, high quality weapons, shields, armor, bombs and alchemical components. Some of its most valuable items can be stolen from nearby chests - you have to sneak very well or help yourself by being invisible, because in case of detection the merchant will attack the team.
Ogre (M37,4) - Talk to him to be admitted to the fort - it's best to confirm your willingness to participate in the auction so that you do not have additional problems.
Auctioneer Marcca (M37,9) - She oversees the auction of slaves. After participating in the auction, you can talk to her and get permission to meet Master Kuy.
Master Kuy (M37,13) - He is at the head of slave hunters. You can kill him or talk to him and pick up a side quest Tip of the Spear.
Bauha (M37,14) - She represents imprisoned natives. You can help her and other prisoners escape.
Types of opponents and monsters on Crookspur Island
Crystal-Eater Spider - Small and medium spiders do not pose a very big challenge. You have to be careful, however, on a much stronger queen from the Sea Cave. It is immune to dexterity and insensitive to power ailments. Spiders can poison the team thanks to Petrifying bite skills.
Slaver - The battles will only come if you provoke them or if you get caught in the dungeons. In the first place, kill magic-wielding hunters.
Ogre - The battles will only come if you provoke them or if you get caught in the dungeons. Ogres deal strong melee damage (except for snipers who use ranged weapons). They are sensitive to physical condition and immune to power ailments.
Taskmaster Grom - This is the strongest garden that you meet in the Torture Chamber in the dungeons. Defeating him, lets you get the key to the target with slaves. First, deal with the slave hunters accompanying Grom.
Other information related to the Crookspur Island
Traveling around the island is difficult, because unauthorized people do not have access to selected parts of the fort. After arriving to the island, try first of all, correctly conduct a conversation with the ogre at the drawbridge (M37,4), i.e. confirm your participation in the slave auction. This will unlock your access to the auction site and in addition, thanks to the meeting with the auctioneer Marcca (unlock the quest A Shrewd Proposition earlier in Dunnage), you will be able to enter the fort and reach the office of Master Kuy (M37,13).
The dungeons, unfortunately, remain forbidden all the time, even if you "made friends" with slavers. The easiest way is to sneak to them from the side of the Sea Cave (M37,8). They offer the possibility of sneaking and reaching slaves, without fights. However, if you are caught and forced to deal with slavers, murdering them will lead to the deterioration of the hero's relationship with this "faction".

