Guides & Walkthroughs New Guides Popular RPG Action Strategy Adventure YouTube Guides Mobile App
Download Game Guide PDF, ePUB & iBooks

Hitman 3 Guide by gamepressure.com

Hitman 3 Guide

Table of Contents
Hitman 3 - Dartmoor - Important locations
Mission starting area. There's a road here leading to the manor. You'll also find agent 47's motorcycle here and you can use it to leave the mission area (it's required while completing the mission for the first time).
Manor grounds gate. There are 2 guards here and one of them can recognize Agent 47 even in the default suit. A private eye hired by Alexa appears here and once he's searched he will start walking towards the main building. You can easily avoid the guards by climbing a brick wall to the left or to the right of them.
River crossings. Agent 47 can't swim and you have to keep using these crossings to reach other areas of the manor grounds.
Cemetery. There's an opportunity here to murder Alexa, but you must first destroy bird nests (the best method is to use a silenced pistol). Agent 47 can distract the Undertaker in one of few ways to get his diguise. The undertaker has a hearse key on him (13 on the map). There's an open grave here - you can push Alexa and bury the grave (a shovel is nearby). There's emetic rat poison here.
Boat. You can use it to leave the mission area, but you need to have the keys. They're inside the locked greenhouse (10 on the map).
Photographer in the garden. He can't shoot any photos until a Fuse Cell is delivered. You can claim his identity for the purpose of murdering Alexa and it's best to turn on the radio so he'll go there. You can sabotage the fountain to create a pool of water by the chair in front of the photographer. You can find a wrench and a screwdriver nearby.
Fuse box. You can open it (crowbar is required) to obtain a Fuse Cell needed to do the photos in the garden (6 on the map). The fuse cells are also in several other places.
Emetic rat poison. You'll also find a note about the safe.
Bridge. This is one of the available areas to end the mission. You can distract nearby people by throwing a coin.
Greenhouse. All of the doors are locked. You can poison nearby people to make it easier to use a crowbar (it can be found nearby). The inside is a forbidden area and Emma shows up here later - she may be tied to one of the ways of murdering Alexa. You can find poisonous emetic plants and keys to the boat (5 on the map), as well as repair the distillation kit (wrench is required). Emma has the greenhouse key and a poisonous plant.
Main entrance to the manor. There are 2 guards here and everyone who's not a security person has to be frisked. You can avoid this problem by entering through one of the open windows.
Unicorn horn. It's tied to one of the minor challenges. Horns can also be found in other places on the map.
Hearse. You can use it to leave the mission area, but you need to have the keys to the car. The Undertaker from the graveyard has them (4 on the map).
Bodyguards. You can listen in on their conversation about tokens, poison one of them and easily obtain a bodyguard disguise. This disguise allows to explore most of the map freely. You will find a Hackl 9S Covert silenced pistol here and a Fuse Cell needed to do the photos in the garden (6 on the map).
Delivery area. You can find a staff locker key (23 on the map) and a crowbar. The radio allows to distract nearby people.
Foyer. There are two sets of stairs leading to level 1 in the back. There are containers for body disposal behind the stairs. The guests of the manor (including the private eye) are being welcomed by the butler here.
Library - lower level. In the early part of the mission Patrick is playing pool here. In the later part of the mission Alexa stops here from time to time to talk over the phone and to stand by the fireplace.
Bathroom. All of the nearby characters you've poisoned with emetic poisons may end up here (including Alexa).
Trophy room. In the later part of the mission Patrick and Rebecca Carlisle are here. You can poison Rebecca (watch out for the guard) to obtain Rebecca's key and her token (one of two tokens tied to the Arthur Edwards case file).
Sitting room. A large group of NPC's is here by default - they are Carlisle family members and the private investigator. Once the private eye's investigation is over Alexa will have a family meeting here. You can poison Alexa by interacting with the whisky glass (Alexa can also be poisoned by Emma from the greenhouse). Gregory has the key to the room upstairs (28 on the map).
Corridor with gun displays. You can break the glass of one of the displays and collect a rifle - it unlocks a minor challenge. This is also a good place to attack the private investigator and the butler. There are many places to hide the body here. Check the small room at the end of the corridor to find a screwdriver, an unused mansion staff disguise and a Fuse Cell needed to do the photos in the garden (6 on the map).
Mr. Fernsby's Office. He's the butler. There's a fuse box near the office and you can shut down the power (an opportunity to gain a disguise). The doors to the office are locked - you can use a lockpick/crowbar or attack the butler found somewhere on the ground floor and take his key. You will find lethal poison and a master key which can unlock all doors in the manor. Fernsby has a token on him (one of two tokens tied to the Arthur Edwards case file).
Staff room and kitchen. You will find emetic rat poison, a wrench and propane flasks (you can throw them into holes found above fireplaces). You can open a locker - lockpick/crowbar or a key from the delivery area is needed (15 on the map). Inside you will find an unused mansion guard disguise.
Dining room. You can poison Edward Carlisle who plays the piano. You can also pacify him (in any way) and unlock a minor challenge.
Corridors above foyer. Watch out for a single guard who patrols the area - he can recognize Agent 47 even if you're wearing a bodyguard disguise. There's an exit to the southern balcony here.
Library - upper level. There are good opportunities here to murder Alexa - you can drop a huge chandelier on her when she's talking on the phone and throw a propane flask into a hole above the fireplace.
Secret room 1. You can open it only using a walking cane obtained in Emma & Gregory's room (28 on the map). Use the walking cane on the mysterious switch. There's a letter inside (quest item).
Emma and Gregory's room. You can open the door using a master key (22 on the map) / Gregory's key (20 on the map) / lockpick / crowbar, or you can get inside from the balcony (small climb). You will find a walking cane here which allows to open some of the secret rooms.
Rebecca's room. You can use the master key / Rebecca's key (19 on the map) / lockpick / crowbar. You can check Rebecca's laptop.
Secret room 2. You can access this room by interacting with a painting in Rebecca's room (29 on the map) or with a book in the small office with the lawyer (31 on the map).
Small office. The corridor to the office is being guarded, however you can reach the office by going through the secret room (30 on the map). You will find a lawyer and his bodyguard here. You can kill the lawyer and wear a unique disguise. You can also check lawyer's laptop (minor challenge).
Zachary's room. The corridor to the bedroom is being guarded, however you can reach the office by going through the small office (31 on the map). Zachary's corpse can be found on a large bed. You can examine the laptop and the suicide note. You can go to the balcony and drop down the ladder - it will unlock a permanent shortcut.
Secret room 3. You can unlock it with a cane take from Emma & Gregory's room (28 on the map) or by interacting with a book in Zachary's room (32 on the map).
Stairs connecting levels 1 and 2. Expect a guard next to the stairs on level 2. You can also reach level 2 by climbing the building wall.
Main corridor. There's a guard where who can recognize Agent 47 in a disguise - you can sneak past him when he's talking to the house staff.
Alexa Carlisle's bedroom. You can listen to the messages and poison the coffee (Alexa shows up here in the first part of the mission). There's a balcony exit here. You'll find a letter to Rebecca in the bathroom.
Alexa Carlysle's office. There's a single guard here. You can press a button on a chair next to the desk to uncover a secret safe - the combination is 1975. Inside the safe you can find Arthur Edwards case file (main objective). There are guards on the large balcony, but you'll also find places to climb / descend.
Secret room 4. You can unlock it with a cane take from Emma & Gregory's room (28 on the map) or by pressing a button in the private room (39 on the map). You will find a unicorn horn here tied to one of the minor challenges. You can also spy on Alexa and kill here when she shows up in the secret room (2 different challenges).
Private room. Alexa may show up here. You can easily get to here by sneaking through a secret room (38 on the map).
Shotgun. You'll also find a telescope (tied to the safe puzzle) and an exit to the balcony.
Roof of the manor and a shortcut. You can get here for the first time from the upper level of Alexa's office (40 on the map) - you need to go through the window. There's a shortcut here - you can lower a ladder.
River crossings. Agent 47 can't swim and you have to keep using these crossings to reach other areas of the manor grounds.
Stairs connecting levels 1 and 2. Expect a guard next to the stairs on level 2. You can also reach level 2 by climbing the building wall.
Enlarge this map

Hitman 3: Means, Motive and Opportunity - Dartmoor, mission story, walkthrough Hitman 3 guide, walkthrough

Last update: 29 January 2021

Key points of Hitman 3 - Dartmoor - Important locations

Important locations

On this page of the Hitman 3 game guide, you will find a walkthrough for the Means, Motive and Opportunity mission story in Dartmoor. You can learn how to disguise as a private investigator, how to find all the traces, and how the final meeting with Alexa will turn out.

The different ways of killing the main objective of the mission in Dartmoor - Alexa Carlisle - are described on a separate page of our guide.

Disguising as the private investigator

The task is to disguise yourself as a private investigator who was hired by Alexa to investigate the circumstances of Zachary Carlisle's death - Hitman 3: Means, Motive and Opportunity - Dartmoor, mission story, walkthrough - Death in the Family - Dartmoor - Hitman 3 Guide

The task is to disguise yourself as a private investigator who was hired by Alexa to investigate the circumstances of Zachary Carlisle's death.

At the beginning of the mission, the private detective stands in front of the mansion's entrance (point 2 on the map), close to where Agent 47 also starts his job. Do not try to attack him now, as you would get into an unnecessary fight with the guards at the gate.

The best place to attack the investigator and remain unnoticed is to lure him to the side hallway with the showcases adjacent to the foyer(point 21 on the map) - Hitman 3: Means, Motive and Opportunity - Dartmoor, mission story, walkthrough - Death in the Family - Dartmoor - Hitman 3 Guide

The best place to attack the investigator and remain unnoticed is to lure him to the side hallway with the showcases adjacent to the foyer(point 21 on the map). No one should notice your attack, and in the same corridor, his body can be hidden in a closet.

Note - Don't wait too long to steal the detective's identity, as he may meet with Alexa. This may lead to the failure of the story mission.

Investigating Zachary's bedroom

After you put on the detective outfit, head to the foyer (point 16 on the map) - Hitman 3: Means, Motive and Opportunity - Dartmoor, mission story, walkthrough - Death in the Family - Dartmoor - Hitman 3 Guide

After you put on the detective outfit, head to the foyer (point 16 on the map). Wait for Alexa Carlysle to appear and talk to her. Don't try to attack her right now, as there are plenty of guards around.

Talk to the butler - Mr. Fernsby, and follow him to Zachary's bedroom (point 32 on the map), which is the place of Zachary's suicide death. This is the first of five locations to explore during the investigation.

There are 6 traces to be found - Hitman 3: Means, Motive and Opportunity - Dartmoor, mission story, walkthrough - Death in the Family - Dartmoor - Hitman 3 Guide

There are 6 traces to be found:

  1. Take out camera and scan Zachary's corpse.
  2. Use the camera to scan the bottle and glass of whiskey next to the bed.
You can now return to the butler and talk to him - Hitman 3: Means, Motive and Opportunity - Dartmoor, mission story, walkthrough - Death in the Family - Dartmoor - Hitman 3 Guide
  1. Look at the Suicide Note lying on the table next to the fireplace.
  2. Check out Zachary's laptop.
  3. Pull the book from the picture above - this will lead to unlocking the secret room(point 33 on the map) adjacent to the bedroom.
  4. In the secret room, examine the Mansion Floor Plan.

You can now return to the butler and talk to him. You will be tasked to question the suspects in Zachary's death case and to find more clues. This is optional, and you can request an audience with Alexa right away if you want.

Interviewing suspects

Agent 47 can interview four characters - Hitman 3: Means, Motive and Opportunity - Dartmoor, mission story, walkthrough - Death in the Family - Dartmoor - Hitman 3 Guide

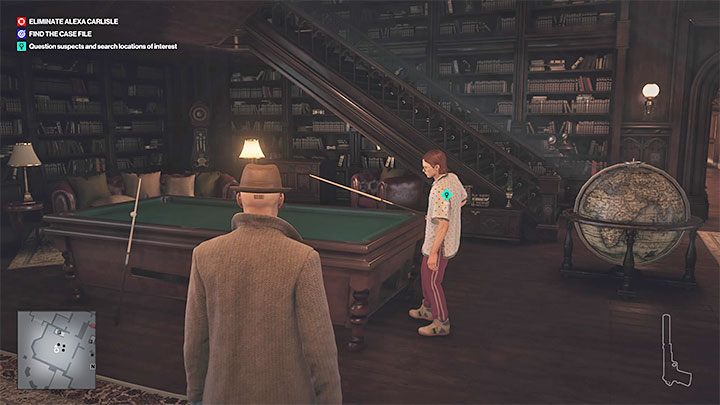
Agent 47 can interview four characters. During these meetings, you won't choose the dialogue options. Ask each character all the questions you can - about the alibi, Zachary, and any additional information that may help in the investigation.

  1. Gregory Carlisle sits on the sofa in the living room(point 20 on the map)
  2. Edward Carlisle is playing the piano in the dining room, and you have to wait until he finishes playing(point 24 on the map)
  3. Rebecca Carlisle moves between the living room and the trophy room (point 19 on map)
  4. Emma Carlisle is in the living room
  5. Patrick Carlisle plays billiards in the library(point 17 on the map)

Finding all the traces

You can now additionally explore four more rooms - Hitman 3: Means, Motive and Opportunity - Dartmoor, mission story, walkthrough - Death in the Family - Dartmoor - Hitman 3 Guide

You can now additionally explore four more rooms. This is required to 100% complete the investigation. You can, of course, search the rooms in any order.

At first, it is best to search Mr. Fernsby's office( point 22 on the map). It is locked, but you can use one of the crowbars found in the mansion (e.g. at point 15 on the map). There are 3 tracks to find in the butler's office:

  1. Mr. Fernsby's List - it lies on the desk.
  2. Lethal Poison Pill Jar by the window.
  3. Zachary's Half-Burnt Diary in the fireplace (shown in the picture above).

Additionally, take the Mansion Master Key, which can open all doors in the building.

The second place to explore is Rebecca's room on level 1 (point 29 on the map) - Hitman 3: Means, Motive and Opportunity - Dartmoor, mission story, walkthrough - Death in the Family - Dartmoor - Hitman 3 Guide

The second place to explore is Rebecca's room on level 1 (point 29 on the map). Use the master key from the butler's office to open the room. There are 2 traces to be found:

  1. Examine Rebecca's laptop.
  2. Use the camera to scan Rebecca 's Notebook.
The third place to explore is Emma and Gregory's room on level 1 (point 28 on the map) - Hitman 3: Means, Motive and Opportunity - Dartmoor, mission story, walkthrough - Death in the Family - Dartmoor - Hitman 3 Guide

The third place to explore is Emma and Gregory's room on level 1 (point 28 on the map). Again, use the master key, although the room can also be accessed from the balcony. There are 4 tracks to be found:

  1. Use the camera to scan the heels.
  2. Take the Greenhouse Key Chain hidden next to the suitcases (shown in the picture above). It does not include the key to the greenhouse, but it is an important discovery nonetheless.
  3. Pick up the Walking Cane.
  4. Look at the Letter from Emma's Mother on the bedside table.
The fourth place to explore is the Greenhouse located at the back of the gardens behind the mansion (point 10 on the map) - Hitman 3: Means, Motive and Opportunity - Dartmoor, mission story, walkthrough - Death in the Family - Dartmoor - Hitman 3 Guide

The fourth place to explore is the Greenhouse located at the back of the gardens behind the mansion (point 10 on the map). The greenhouse is locked, but you can use the crowbar found on the back of it. Just make sure not to be seen while breaking in, and sneak around while exploring the inside of the greenhouse. You can find 2 tracks here:

  1. Investigate Distillation Kit.
  2. Use the camera to scan the Poison Dosage Table (the picture above).
There is another completely optional location to explore on the property that is nonetheless related to the investigation - Hitman 3: Means, Motive and Opportunity - Dartmoor, mission story, walkthrough - Death in the Family - Dartmoor - Hitman 3 Guide

There is another completely optional location to explore on the property that is nonetheless related to the investigation. It is a secret room next to the library on level 1 (point 27 on the map). You can get there with the help of the walking cane taken from Emma and Gregory's room. You have to put it in a secret switch.

In the secret room, you can find Montgomery's Long Lost Letter, from which you can learn more about Alexa and Zachary (watch it in the inventory).

Final meeting with Alexa

You have to meet the butler again, and you can do this at the first opportunity or only after you have completed the investigation and found 100% of the traces - Hitman 3: Means, Motive and Opportunity - Dartmoor, mission story, walkthrough - Death in the Family - Dartmoor - Hitman 3 Guide

You have to meet the butler again, and you can do this at the first opportunity or only after you have completed the investigation and found 100% of the traces. Together you will head out to Alexa Carlisle's office on level 2 (point 37 on the map).

Sit in the chair. If you have investigated thoroughly, then you can make one of three statements:

  1. Zachary committed suicide.
  2. Mr. Fernsby (the butler) murdered Zachary.
  3. Emma murdered Zachary - she is the murderer.

Note - It is worth repeating the meeting with Alexa 2 more times, as there is a separate challenge associated with each of the available investigation results.

Regardless of the outcome of the investigation, Alexa will ask you to choose a reward - Hitman 3: Means, Motive and Opportunity - Dartmoor, mission story, walkthrough - Death in the Family - Dartmoor - Hitman 3 Guide

Regardless of the outcome of the investigation, Alexa will ask you to choose a reward. It is worth asking her for the Arthur Edwards file (Case File) related to the second mission objective. Agent 47 will reveal his identity that way, but Alexa should still hand over the file after all. You can take the documents from the safe Alexa opened. The woman will go out on the balcony afterward and commit suicide (this will be classified as an unfortunate accident, so you will not lose the rank of Silent Assassin).

If you ask for a standard payment, you will not reveal your identity. Alexa will also go out on the balcony and you can push her. Unfortunately, you will be required to obtain the files on your own.

See/Add Comments

You are not permitted to copy any image, text or info from this page.

This site is not associated with and/or endorsed by the IO Interactive or IO Interactive. All logos and images are copyrighted by their respective owners.

Copyright © 2000 - 2024 GRY-Online S.A. for gamepressure.com, unofficial game guides, walkthroughs, secrets, game tips, maps & strategies for top games.