

Hitman 3: Death in the Family, Dartmoor - map, mission information Hitman 3 guide, walkthrough
Last update: 22 January 2021
Key points of Hitman 3 - Dartmoor - Important locations
Important locations
This page of the Hitman 3 guide has a map of Dartmoor and the most important information about the second mission story called Death in the Family. You will find out the main areas on the map of Dartmoor, what are the objectives and unique features of this mission, how to unlock shortcuts, and what are the rewards for reaching the next levels of England mastery.
- Information about Death in the Family mission
- Dartmoor - Key Locations
- Walkthrough - table of contents
- Dartmoor - Shortcuts
- Mastery levels and rewards
Information about Death in the Family mission

The action of this mission takes place in Thornbridge Manor, which is located in the Dartmoor region in England. The Carlisle family is meeting here. The reason for that is an internal investigation into the alleged suicide of a member of the Carlisle family, Zachary.
The mission area consists of:
- A small road leading to the manor's gate - The starting point is nearby.
- Areas surrounding the property - There is a lot of open space here. Agent 47 has to watch out for, among other things, two-man patrols. You can avoid them by, for example, hiding in the bushes.
- The main building of the property - It has three floors. There are numerous rooms on each floor except the top one. There are also secret rooms inside the building that may go between some public rooms.
- Gardens at the rear of the property - A greenhouse is there but the building is locked.
- Cemetery on the property - An undertaker resides there. Burial is also scheduled there.

This mission is reminiscent of, e.g. the Colorado level from Hitman 1 and that's because almost the entire map is a restricted area. Agent 47 can only move freely near the place where you start the mission. Once you reach the main gate, you will encounter guards standing near the entrance.
There are a few ways in which you can deal with these restricted areas:
- Sneak a lot - You can hide in bushes, behind hedges, and other large objects.
- Use unique disguises - Agent 47 can assume the identity of, among others, a private investigator hired by Alexa to investigate the death of a family member, a photographer, or an undertaker. A bodyguard outfit also gives you a lot of freedom.
- Climb gutters and ledges - this will help you avoid, for example, using guarded stairs. Additionally, you can unlock shortcuts in several places – this will help you reach the upper floors more easily in subsequent playthroughs.

This mission requires you to assassinate only one person – Alexa Carlisle. She is one of the partners (high-ranking leaders) of Providence, which is a secret and very influential group that rules the world from the shadows.
Alexa can perform several unique activities, including meeting with a hired private investigator, talking to a butler, or de-stressing in a private room. While the private detective (real or Agent 47) investigates, Alexa will move through levels 1 and 2 of the mansion. After the detective completes his investigation, Alex he will hold a family meeting in the living room. From this point, the woman will move through various rooms on the first floor of the building. The woman is accompanied by a single bodyguard throughout the majority of time.
The mission has three story missions – they are about eliminating Alexa under unique circumstances. Apart from that, you can deal with other challenges related to eliminating the woman in different ways.

An additional mandatory objective is to obtain Case File on Arthur Edwards. Agent 47 may deal with this before or after assassinating Alexa.
The game allows you to get the files in three different ways - by taking them out of Alexa's safe, getting them from Alexa after completing the investigation, or by obtaining two tokens belonging to Rebecca Carlisle and the butler.

An optional mission objective requires you to photograph tracks. These are marked on the map with camera icons. You must take the camera out of Agent 47's inventory and stand in the correct spot to take the picture. Doing this may complete some of the challenges for taking certain photos.
The map has several different exits but not all of them are available by default – you may need to, e.g. obtain a boat key. Additionally, when going through the mission for the first time, you must return to the starting point (to the motorcycle).
Dartmoor - Key Locations
Below you will find a summary of the most important locations, which we have marked on our map of Dartmoor. References to these and other areas can be found in the following pages of the walkthrough description for the mission in England.
1 - The starting location of the mission. There is a road leading to the mansion. Agent 47's motorcycle is also here. You can use it to leave the mission area (this is required when completing the mission for the first time).
2 - Gate of the property grounds. It is patrolled by 2 guards. One of them can recognize Agent 47 even in the default outfit. A private investigator hired by Alexa appears here and after a search will head off towards the main building. You can easily bypass the guards by climbing the wall to the left or right of the gate.
4 - Cemetery. Here you get an opportunity to kill Alexa, but first you must destroy the birds' nests (the best method is to use a pistol with a silencer). Agent 47 can distract the gravedigger in several ways and take his disguise. The gravedigger is carrying the key to the hearse (13 on the map). There is an open grave here - you can throw Alexa into it and bury the grave (the shovel is nearby). You can find rat poison here too.
6 - Photographer in the garden. He cannot take pictures until the Fuse Cell is delivered. You can steal the identity of the photographer with the intention of murdering Alexa. It is best to turn on the radio to make him approach it. You can sabotage the fountain to spill water by the chair in front of the photographer. You will find a wrench and a screwdriver nearby.
10 - Greenhouse. All greenhouse doors are closed. You can poison the surrounding people to make it easier to use the crowbar (you will find it nearby). Inside is a forbidden zone and Emma shows up here later - she may be connected to one of the ways Alexa was murdered. Here you can find poisonous plants (poison) and to the boat (5 on the map), as well as repair the distillation device (French key required). Emma is carrying a key to the greenhouse and a poisonous plant.
11 - The manor main entrance. It is patrolled by 2 guards and non-security personnel must submit to a search. You can avoid this problem by entering through one of the open shutters.
14 - Security guards. You can eavesdrop on their conversations about tokens, poison one of them, and easily obtain a guard disguise. It allows you to explore most of the map without any obstacles. There are the Hackl 9S Covert suppressor pistol and the Fuse Cell needed for the photos in the garden (6 on the map).
17 - Library - lower level. In the initial part of the mission, Patrick is playing pool. Later in the mission, Alexa shows up here from time to time to talk on the phone and stop by the fireplace.
19 - Trophy Room. Later in the mission, Patrick and Rebecca Carlisle come here. You can poison Rebecca (watch out for the bodyguard) to get her key and token (one of two linked to the Arthur Edwards file).
20 - Lounge. By default, a large group of NPCs reside here - members of the Carlisle family and a private investigator. After Detective completes his investigation, Alexa he will hold a family reunion here. You can poison Alexa by pouring poison into a glass of whiskey (Alexa can also be poisoned by Emma from the greenhouse). Gregory is carrying the key to the upstairs room (28 on the map).
21 - A corridor with display cases of weapons. You can smash one of the display cases and take the rifle - this unlocks a minor challenge. It's also a good place to launch a surprise attack on a private investigator and butler. There are plenty of places to hide bodies in the area. In the small room at the end of the corridor you will find a screwdriver, an unused servant's disguise, and the Fuse Cell needed to take pictures in the garden (6 on the map).
22 - Mr. Fernsby's Office. He is a butler. At the entrance to the office, you can open the fuse box and turn off the power supply (an opportunity to get a disguise). The door to the office is locked - you can use the crowbar/lockpick or attack the butler walking around the first floor and take his key. In the office, you will find the deadly poison and the master key to open all the doors of the mansion. Fernsby is carrying a token (one of two linked to the Arthur Edwards file).
26 - Library - upper level. There are good opportunities to murder Alexa here - you can drop a large chandelier on her while she's talking on the phone, and you can throw a propane cylinder into the hole above the fireplace.
27 - Secret Room 1. You can only open it with the staff obtained in Emma and Gregory's room (28 on the map). Use the cane on the mysterious switch. Inside you will find a letter (a quest item).
28 - Emma and Gregory's Room. You can open the door with the master key (22 on the map) / Gregory's key (20 on the map) / lockpick / crowbar, or get inside from the balcony (after some climbing). You will find a cane that allows you to unlock some secret rooms.
29 - Rebecca's Room. You can use the master key / Rebecca's key (19 on the map) / lockpick / crowbar. You can examine Rebecca's laptop.
30 - Secret Room 2. You can get inside by interacting with the painting in Rebecca's room (29 on the map) or the book in the small office with the lawyer (31 on the map).
32 - Zachary's Room. The way to the bedroom is patrolled by guards, but you can get here from the small office (31 on the map). Zachary's corpse is on a large bed. You can examine the laptop and the suicide note. You can go out on the balcony and lower the ladder - this will unlock the shortcut permanently.
33 - Secret Room 3. You can open it with the cane taken from Emma and Gregory's room (28 on the map) or by interacting with the book in Zachary's room (32 on the map).
37 - Alexa Carlysle's Office. It is protected by a single security guard. You can press the button on the chair by the big desk and discover a secret safe - the code is 1975. In the safe you will find Arthur Edwards' file (the main objective of the mission). There are guards and climbing/descending areas on the large balcony.
38 - Secret Room 4. You can open it with the cane taken from Emma and Gregory's room (28 on the map) or by pressing the button in the private room (39 on the map). You will find a unicorn horn associated with one of the minor challenges. You can also peek and surprise Alexa when she appears in the secret room (2 different challenges).
39 - Private Room. Alexa might show up here. You can easily eliminate her by sneaking in from the secret room (38 on the map).
41 - Mansion roof and shortcut. You can first get to the roof from the upper level of Alexa's office (40 on the map) - you need to go through the window. There is a shortcut here - you can lower the ladder.
Walkthrough - table of contents
The Death in the Family mission in Dartmoor is very extensive. We have described it in detail on the following pages:
- Means, Motive and Opportunity - This is one of the three story quests of the mission, and it allows you to get rid of Alexa pretending to be a private investigator.
- A Day to Remember - This is one of the three story quests of the mission, and it allows you to get rid of Alexa pretending to be a photographer.
- Her Final Resting Place - This is one of the three story quests of the mission and it allows you to get rid of Alexa pretending to be an undertaker.
- Assassinating Alexa Carlisle - On this page, we have compiled other variants of eliminating Alexa that are not related to mission stories.
- Obtain the Arthur Edwards Case File - This is the second obligatory mission objective. You can obtain files in three different ways.
- Poison - how to get it? - In Dartmoor, you can find different varieties of rat poison as well as a deadly poison that can kill Alexa.
- The puzzle with the hidden safe - On this page, we described a puzzle in Alexa's office. Solving it allows you to get to the safe.
- Secret rooms - how to open them? - Learn what you have to do to open secret rooms in the mansion.
- Best Disguises in Dartmoor - We've put together some unique disguises that will make it easier for you to navigate the map and kill Alexa.
- Camera Scanning Locations - On this page, you will find a unique secrets / collectibles map and a list of locations where you can use a camera and scan tracks, documents, etc.
- Dartmoor map - how to leave? - Learn how to leave the estate after completing both mandatory mission objectives.
Dartmoor - Shortcuts
There are 2 shortcuts on the Dartmoor map - these are 2 ladders which you can lower down. You can permanently unlock them, i.e. make them available during all subsequent missions playthroughs. You need a crowbar to lower the ladders - you can find it, for example, at the back of the greenhouse (point 10 on the map) or in the delivery zone (point 15 on the map).

Shortcut 1 - The ladder on Zachary's bedroom balcony (Zachary's Balcony Ladder).
This shortcut is definitely easier to unlock. Reach Zachary's bedroom (point 32 on the map), preferably disguised as a bodyguard or private investigator. Go out to the balcony where a single security guard is (you can ignore him). On the right, you can lower the ladder.
Unlocking this shortcut will allow you to access more easily the more guarded rooms on level 1, including Zachary's room and the room with the lawyer. You can also look in this area for places to climb to level 2.

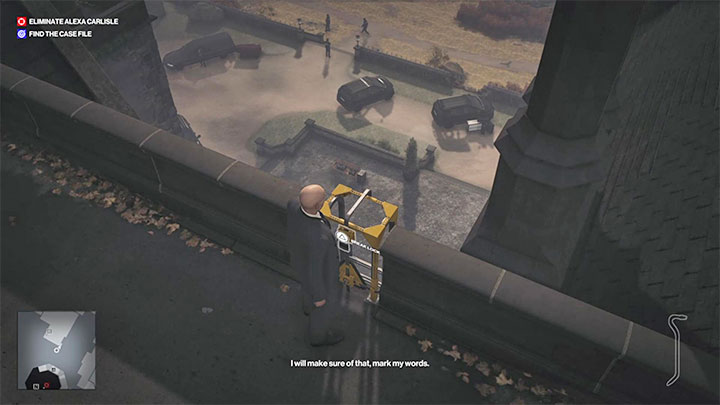
Shortcut 2 - Maintenance Ladder on the roof.
This shortcut is definitely more difficult to unlock. The ladder is on the roof of the mansion (point 41 on the map), and you can spot it by positioning yourself near the western wall of the building (above image). Unfortunately, you cannot unlock it from the ground (for example, by shooting the blockade). You need to reach it from the roof.
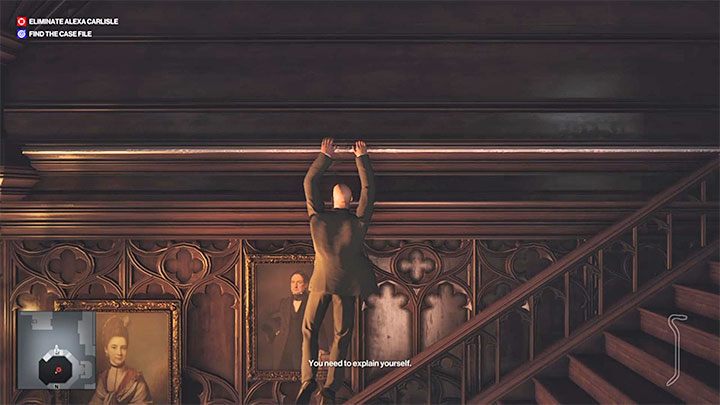
You have to go to Alexa Carlisle's office on level 2 of the mansion(point 37 on the map). The office is two-story high. Walk up to the stairs, but stop halfway. You have to face the wall and grab the edge over the hanging paintings.

Move to the left until you reach a shutter. Climb up and walk through it.
You can now approach the ladder and use a crowbar to lower it.
This is an excellent shortcut for completing the mission while in the suit, as you will be able to complete the (long) climb from the bottom. It is also extremely helpful in assassinating Alexa with the sniper rifle, as the assassination challenge involves using the sniper rifle while standing on the roof of the mansion.
Mastery levels and rewards
Dartmoor is one of the larger maps in Hitman 3 and its maximum mastery level is 20. You gain XP needed to advance to the next mastery levels by doing the challenges associated with the Dartmoor map. Below you can find the full list of rewards for advancing to the next mastery levels.
LEVEL | REWARD AND COMMENT |
2 | Stash - Deliveries. It is located on the side of the mansion and is adjacent to the kitchen, among other things. This is not a particularly helpful place to be, as there is at least 1 guard as well as service personnel in the area. |
2 | Lockpick Mk III. This is a very helpful gadget that will make it much easier for you to gain access to locked rooms. This is especially helpful for the greenhouses in the garden – you can open the doors inside the mansion using the Master Key from Mr. Fernsby's (the buttler's) office. |
3 | Large stash - Bathroom. The bathroom located on the first floor of the building. |
4 | New starting location - The Garden. Agent 47 can start the mission disguised as a gardener. This can make the mission take less time to complete. You will not have to complete the long journey from the default starting point to the main part of the mansion. In the garden, you can get a "better" disguise by assaulting a guard, service worker or photographer. |
5 | Stash - Greenhouse. Placing an item there can help you, for example, if you want to get to the greenhouse more efficiently. The cache is not inside the (closed) greenhouse, but behind it. |
5 | ICA19 Shortballer pistol. A pistol with a suppressor that is well suited for single-shot eliminations. |
6 | New starting location - Staff Room. Agent 47 can start disguised as a Mansion Guard. This disguise is not quite as good as a bodyguard's, but it will still allow you to move around more freely than when playing as a gardener or service worker. |
7 | Large stash - Changing Room. This is one of the rooms reserved for employees. |
7 | Poison - Sedative Poison Vial. It has a different effect from e.g. a rat poison because the poisoned person loses consciousness immediately. This may mean a greater risk of being detected. |
8 | New starting location - Back of the mansion. You will start in Agent 47's default outfit, but near the greenhouse. It can make the mission easier if you plan to do some activities in the garden area or want to reach Emma from here. |
9 | Large stash - Cemetery. The case can be placed near one of the gravestones. This can be helpful if you're planning to assassinate Alexa in the graveyard (smuggle the rifle there, get rid of the birds, and climb up to the roof of the mansion), or if you just want to smuggle a large piece of equipment without passing the guards at the entrance gate. |
10 | ICA Remote Audio Distraction Mk III. It is remotely activated. The device may come in handy when completing missions with the default Agent 47 outfit. |
11 | New starting location - Library. Agent 47 can start disguised as a member of the Mansion Staff. Not a particularly helpful disguise unless you intend to get rid of Alexa in the library. However, there are many security guards around the library – you can get the outfit from one of them. |
12 | Stash - Library. A small item can be hidden between books. |
13 | Kukri Knife. It is not a particularly useful weapon. However, it has a unique look and description. |
14 | Large stash - Hallway. The hallway upstairs. This can help you if you plan to do some actions related to assassinating Alexa from somewhere higher or reaching the safe. |
15 | Explosive Proximity Duck. It responds to movement and features a unique design. |
16 | New starting location - Zachary's Bedroom. Agent 47 can begin the mission disguised as a Private Investigator. It is a great starting location. Not only can you easily meet Alexa by claiming to be a detective, but you can also start in the harder to reach part of the mansion. |
17 | Stash - Laundry Room. This is one of the rooms on the first floor of the mansion. |
18 | New starting condition - Main Road. This variant differs in that it skips the first part of the mission - the private detective's investigation. The family meeting in the living room will start when the mission begins. This allows you to get to Alexa quicker while she's moving on the first floor, and to "help" Emma prepare the poison in the greenhouse faster. |
18 | Weapon - Walking Cane. This is the same walking cane that you can find in the mansion. You can use it to open secret rooms. Take the cane on the mission and open secret rooms faster. |
19 | New starting conditions - Behind Mansion. This variant differs in that it skips the first part of the mission - the private detective's investigation. The family meeting in the living room will start when the mission begins. This allows you to get to Alexa quicker while she's moving on the first floor, and to "help" Emma prepare the poison in the greenhouse faster. |
20 | Agent 47 costume - Classic Cut Long Coat Suit with Gloves. This suit does not have any unique properties. It simply allows you to change the appearance of Agent 47. |
20 | Bartoli Woodsman Hunting Sniper Rifle. If you want to take a sniper rifle with you on the mission, you will need to place it in the briefcase. Agent 47 can start the mission with the briefcase or it can be delivered to one of the large stashes. |