Map and statistics | Mission 7 - Pont Du Fahs Airfield Sniper Elite III Guide
Last update: 11 May 2016
Key points of Sniper Elite III - Mission 7
Important locations visited during the mission
Collectibles
Sniper Nests
Important locations visited during the mission
Area where you start the mission.
Hangar 4.
Hangar 3.
Airport's runway.
First pair of snipers.
Control tower tied to a side mission objective.
Hangar 1.
Hangar 2.
Bomb dump.
Second pair of snipers.
Area where you can find the radio operator.
Entrance to a small bunker.
Area where you unlock access to the bunker network.
Passageways leading to the underground bunkers.
Cell where the prisoners are being held.
Area where you find the map of the Ratte Factory.
Sniper point from which you must cover your allies.
Areas where enemy soldiers appear during the final part of the mission.
Evac point.
Sniper Nests
Snipers Nest. Aside from unlocking the nest you can also perform a Long Shot here.
Snipers Nest.
Snipers Nest.
Collectible card.
Collectibles
War diary - Survival Notes: Sandstorms.
War diary - Letters to Martin.
War diary - Allied War Story: Last Defense.
War diary - Survival Notes: Desert Sniping II.
Collectible card.
Collectible card.
War diary - Axis Account: Desperation.
War diary - Missives from Home. Important - The diary can be found in the bunker network.
War diary - Axis War Story: Infantry Change. Important - The diary can be found in the bunker network.
War diary - Survival Notes: Clothing. Important - The diary can be found in the bunker network.
War diary - Vahlen's Journal: Threat to Completion. Important - The diary can be found in the bunker network.
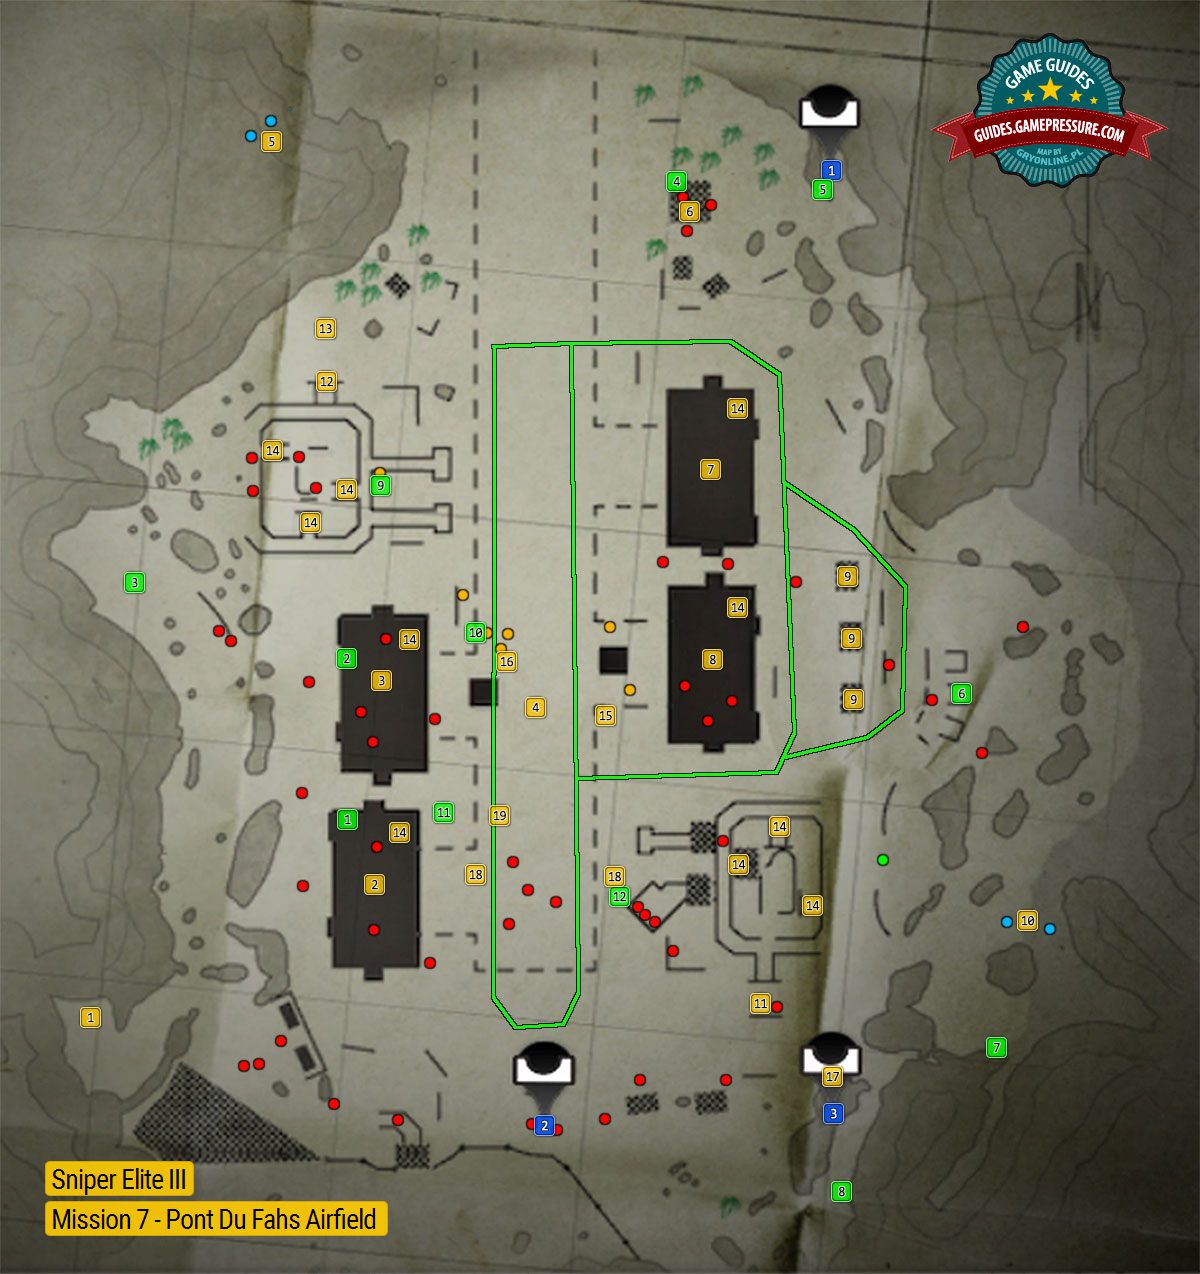
The above screenshot presents the map of the location, where there seventh mission of the game takes place. It is the airfield, taken over by the enemy, which consists of the airstrip, several hangars and a number of the underground bunkers, which you access later into the mission. On the map, there have been the most important places marked (mission objectives, main paths, etc.), as well as the whereabouts of the collectibles.
Apart from that, you there are colorful lines and dots on the map:
- The red dots symbolize the whereabouts of the enemies on the surface. Note - some of the enemies patrol around the area, instead of staying put in one place. The enemies from the final part of the mission (protecting the allied vehicle, have not been marked on the map. This is so, because they are automatically alarmed and they take random positions.
- The orange dots signify the whereabouts of the enemies in the underground bunkers, which you explore later into the mission. Note - some of the enemies do not stay put and they patrol the bunkers.
- Blue dots signify the places where you encounter the enemy snipers. Note - the snipers may appear on the map only after some time into the mission so, try to check put on the marked places, on a regular basis.
- The green dot symbolizes the spot in which you find the only "stationary" armored vehicle.
- The green lines symbolize the routes of the enemy vehicles (armored vehicles, the tank), which you deal with during the mission.
Mission preparations
During this mission, you will have to destroy the highest, so far, number of enemy vehicles. It is a good idea, of course, to take dynamite along, as well as landmines. Still, you do not need to overload yourself with explosives only, because there are many ammo crates all around the airfield, and just as many Panzerschreck RPGs. You definitely need to arm yourself with a sniper rifle with the best available scope, because you are going to need it, e.g. to take the Long Shot.
Mission statistics
Optional tasks and challenges:
- You need to kill an enemy from atop the airfield's control tower. The enemy is staying in point 6 on the map.
- You need to sabotage the bomb depot, located in the Eastern part of the airfield (three points 9 on the map).
- You need to kill the radiotelegraph operator, in a small bunker in the South-Eastern part of the airfield (point 11 on the map).
- You need to rescue the prisoners from their holding cell. It is point 15 on the map and you can reach the prisoners only after you have gained access to the underground bunkers (to learn more about this, see the walkthrough for the mission).
- You need to visit three Sniper Nests.
- You need to take one Long Shot. You take this shot after you take your position in the sniper nest on the hill, in the North-Eastern part of the map (blue point 1 on the map).
Collectibles:
- You need to find nine War Diaries.
- You need to find three Collectible Cards.

