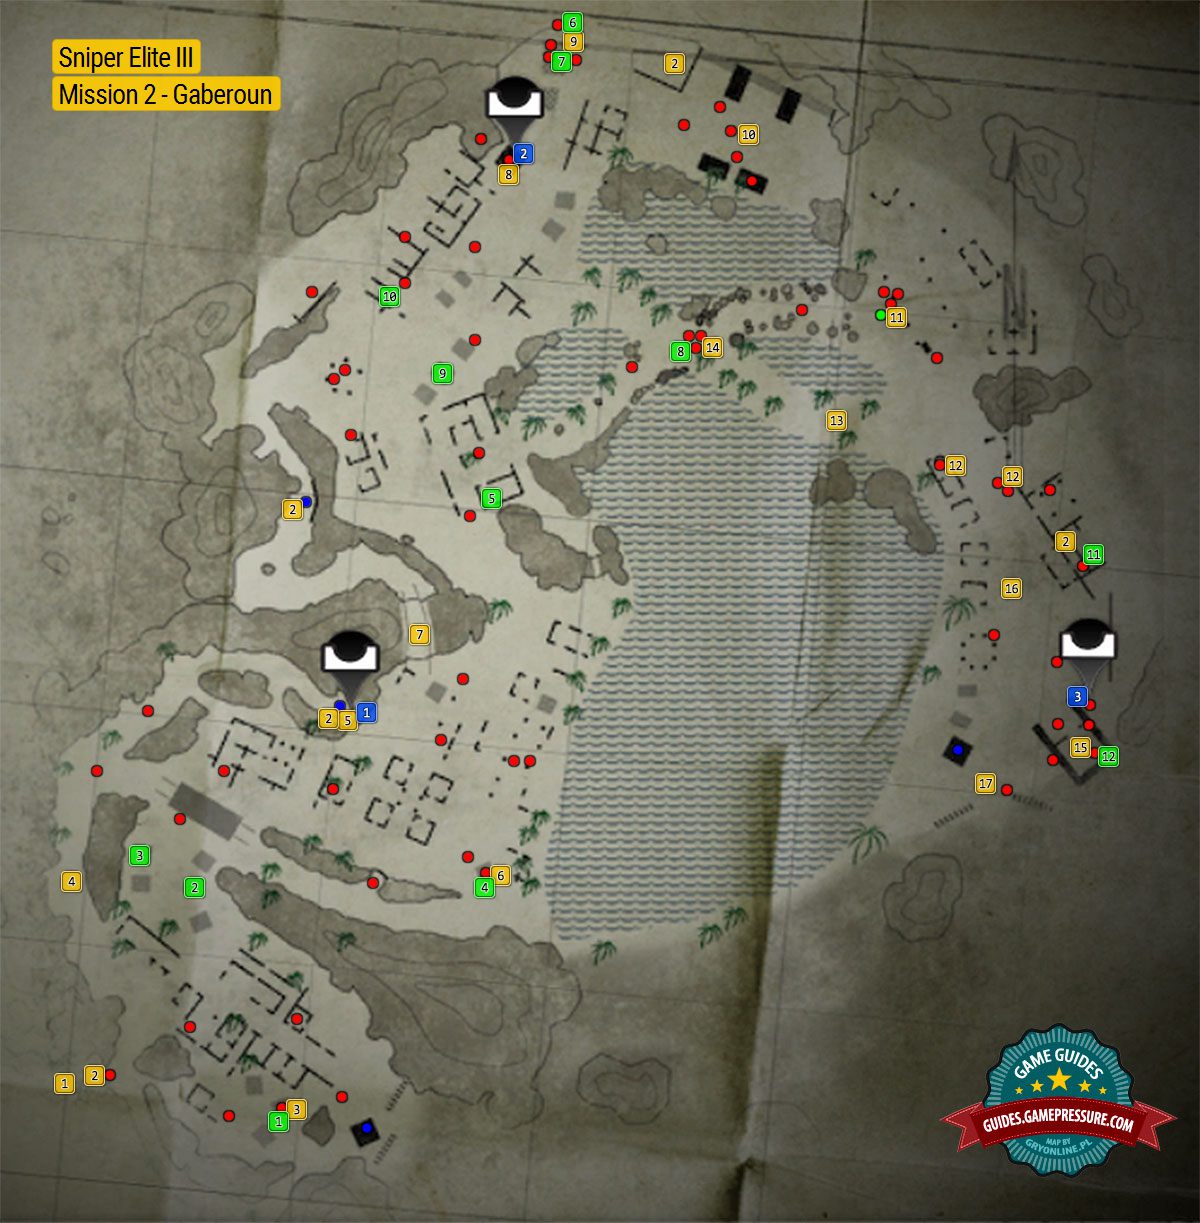
Map and statistics | Mission 2 - Gaberoun Sniper Elite III Guide
Last update: 11 May 2016
Key points of Sniper Elite III - Mission 2
Important locations visited during the mission
Collectibles
Snipers Nests
Important locations visited during the mission
Area where you start the mission.
Generators which can be used to hide the noise when using a rifle.
Enemy inside a tent. This person has a document with the information about the base.
Path leading to the first snipers nest.
Sniper nest which should be used to eliminate the first officer.
Location of the first officer.
Side mountain path.
Observation tower with the searchlight.
Campsite with the second officer.
Motorpool with five trucks which need to be destroyed.
Area where a truck with reinforcements shows up.
MG turrets.
Suggested path leading to the third officer.
Location of the third officer.
Location of the fourth officer.
Suggested area where you should place a land mine.
Area where you end the mission.
Snipers Nests
Snipers Nest.
Snipers Nest. Aside from unlocking the nest you can also perform a Long Shot here.
Snipers Nest.
Collectibles
War diary (it's carried by one of the enemies) - Intel: Officer Assignments.
War diary - Axis Account: Reclaiming Tobruk.
War diary - Discipline and Obedience.
War diary (it's carried by one of the enemies) - Intel: Recruitment Drive.
War diary - Axis Account: Vahlen's Presence.
War diary (it's carried by one of the enemies) - Intel: Vahlen's Project.
War diary - Axis Was Story: Tobruk's Defense.
War diary (it's carried by one of the enemies) - Intel: Threat Assessment.
War diary - Vahlen's Journal: Welcome to Africa.
Collectible card.
War diary - Survival Notes: Relocation.
War diary (it's carried by one of the enemies) - Intel: Report for Reassignment.
The above image presents a map of location, in which the second mission of the campaign takes place. It's the Gaberoun oasis and the surrounding ruins, and enemy encampments. There are various markers on the map, showing the most important places (goals of the mission, the main routes, etc.), as well as the location of collectibles (secrets).
In addition, there are varicolored dots visible on the map:
- The red dots symbolize the places in which you can encounter the "standard" enemies. Caution: some of those enemies aren't stationary and will patrol the surrounding area.
- The blue one symbolizes the places in which you can encounter enemy snipers (they can be found on observation towers and vantage points).
- Last but not least, the green one symbolizes the place in which you can encounter a single enemy vehicle, carrying troops on its deck, in this mission (excluding an armored vehicle with a general, passing through the large portion of the map, which is one of the last tasks of this mission).
Preparation for the mission
In contrast to the first mission, where you couldn't prepare beforehand, this one offers you the possibility of modifying your character's equipment. You don't have to change a single thing if you want to, as you can start the mission with the exact same equipment that you have on you during your previous mission.
Mission stats
Optional tasks and challenges:
- You must eliminate one of the enemy officers from a Sniper Nest. The nest itself is the 5th point on the map, and the officer is the 6th point on the map. More on that matter can be found in the main walkthrough.
- You must destroy a headlight in one of the enemy encampments. The tower with the headlight is located in the 8th point on the map. More on this matter can be found in the main walkthrough.
- You must destroy five trucks located in the Motorpool. The trucks are located in the 10th point on the map. More on this matter can be found in the main walkthrough.
- You must visit three Sniper Nests.
- You must perform a Long Shot. It can be done by taking place in a Sniper Nest, located in the northernmost part of the location, near the whereabouts of the second officer (the blue dot 2 on the map).
Secrets:
- You must find eleven War Diaries.
- You must find one Collectible Card.

