Interface in The Division 2 The Division 2 guide, tips
Last update: 15 March 2019
This chapter is dedicated to the interface (the game's interface, equipment, and the map) in Tom Clancy's The Division 2. Check this chapter if you have just started playing the game.
In-game
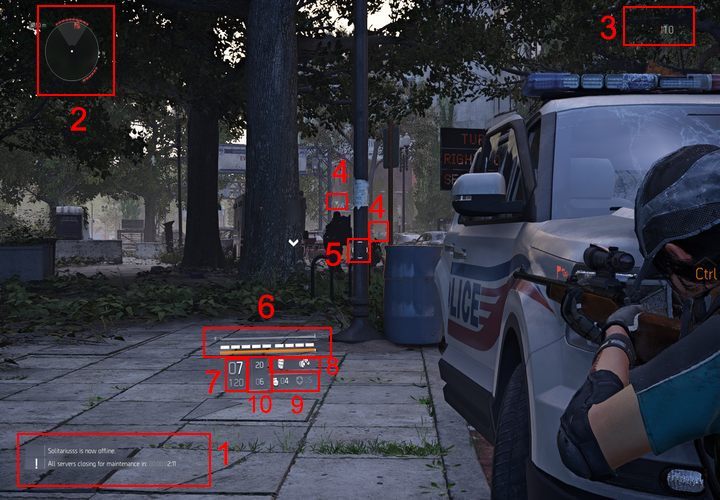
1. Notifications
The game displays all information about collected items, nearby events, possible technical breaks, and your friends' activities.
2. Radar
Used for GPS navigation, detecting activities, items and enemies - red rectangles around the radar show enemies that aren't aware of your presence.
3. Character level
Your current level and progress.
4. Enemy type
Enemies are marked with different colors. Those with yellow health bar are much tougher than those with regular or purple health bars. You can mark enemies by aiming at them for a moment.
5. Crosshair
Besides showing you where your bullets will hit, a crosshair also gives you additional information - informs you about a hit and your clip.
6. Armor and health points
Armor is marked with the upper bar (the white rectangles). Armor and health are replenished automatically outside a battle. When you are during a fight, replenish Armor by pressing V.
7. Ammo
The number on the top shows how many bullets you have left in your current weapon. The bottom number shows the overall number of bullets for this weapon.
8. Abilities
Your current abilities - those that were used are marked with a gray bar. It will inform you about the cool down time.
9. Number of grenades and armor
The game shows you how many grenades you have. The next number informs you about armor kits.
10. Ammo for holstered weapons
These numbers inform you how much ammo you have in the holstered weapons (starting with the top - secondary weapon, sidearm).
Inventory
- 1. Notifications
- 2. Radar
- 3. Character level
- 4. Enemy type
- 5. Crosshair
- 6. Armor and health points
- 7. Ammo
- 8. Abilities
- 9. Number of grenades and armor
- 10. Ammo for holstered weapons
- 1. Achievements
- 2. General stats
- 3. Tabs
- 4. Weapons
- 5. Equipment
- 6. Skills
- 7. Tips
- 1. Activity information
- 2. District information
- 3. Safe Houses
- 4. Base of operations
- 5. Unknown activity
- 6. Control Points
- 7. Known activities
- 8. Settlement
- 9. Your current position
- 10. Main missions
- 11. Side Quests
- 12. Dark Zone
- 13. Stronghold
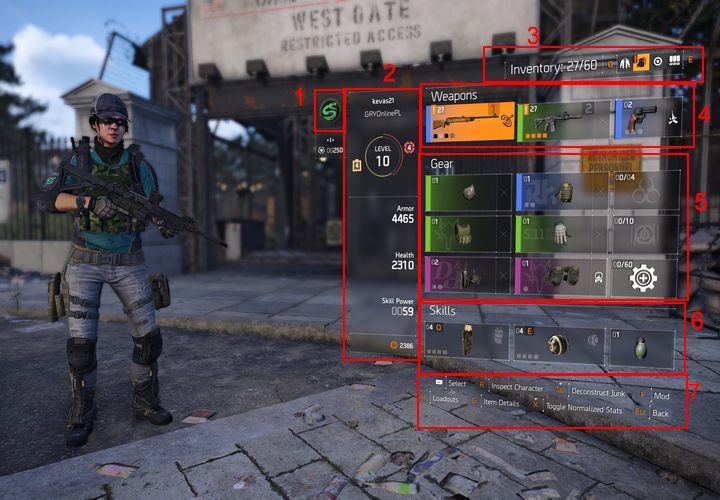
1. Achievements
You can check your badges here - choose one in the progress screen.
2. General stats
Here you can find your general stats - level, improved stats (by wearing certain items), number of armor, health, level of your skills and amount of money. Colors around your character level are for bonuses granted by pieces of your gear (red increase damage, blue is for defense, yellow is for skills - read the details of your equipment to know exactly what each of the pieces offers your character).
3. Tabs
Press Q and E to switch tabs - the tab on the left allows you to change clothes (cosmetic elements), the tab on the right shows the detailed stats, amount of resources and items for crafting. Space in your backpack is next to the tabs.
4. Weapons
Choose which weapon you want to use. You can use up to 3 weapons (2 primary and 1 sidearm). Here you can also install weapon modifications (choose a weapon and press F).
5. Equipment
Here, you can find the rest of your equipment - mask, backpack, bulletproof vest, gloves, holsters, and kneepads. Each of these items has stats that have an impact on your character. The middle row on the right shows Field Proficiency Caches - you get them each time you level up.
6. Skills
This part shows your skills that can be used during fights. Skills can be upgraded and modified.
7. Tips
This part of the interface shows tips helpful in navigating the inventory screen.
Map
- 1. Notifications
- 2. Radar
- 3. Character level
- 4. Enemy type
- 5. Crosshair
- 6. Armor and health points
- 7. Ammo
- 8. Abilities
- 9. Number of grenades and armor
- 10. Ammo for holstered weapons
- 1. Achievements
- 2. General stats
- 3. Tabs
- 4. Weapons
- 5. Equipment
- 6. Skills
- 7. Tips
- 1. Activity information
- 2. District information
- 3. Safe Houses
- 4. Base of operations
- 5. Unknown activity
- 6. Control Points
- 7. Known activities
- 8. Settlement
- 9. Your current position
- 10. Main missions
- 11. Side Quests
- 12. Dark Zone
- 13. Stronghold
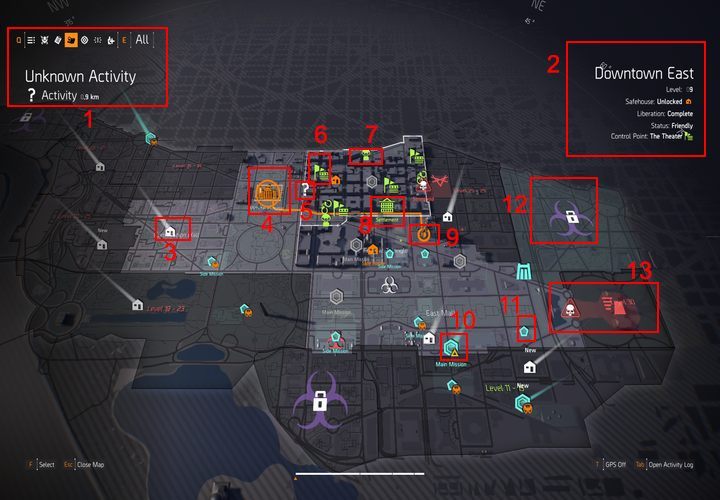
1. Activity information
Here you will find reliable information about the chosen activity - affiliation, recommended level, whether it's a mission - as well as rewards (items and experience points).
2. District information
Here, you will find general information about the area - whether it was liberated, which faction controls it, if the cache there was found, what is the level of opponents.
3. Safe Houses
The liberated safe houses are marked in orange (occupied are marked in white). The safe houses allow you to liberate the area and earn some SHD points. After the liberation of the area, you will be able to perform the mission of Bounty.
4. Base of operations
You begin your adventure here - you will find everything, shops, the quartermaster, inventory stash, tools for crafting items and a team that you will assemble as you progress through the game.
For more information on the activities, refer to the section entitled the White House.
5. Unknown activity
Unknown activities are marked with a white color and a question mark. Various activities (known or unknown) appear randomly on the map.
6. Control Points
Control point - are places where enemy units station. Capturing them yields items such as raw materials, weapons, and equipment. Red control points are captured by the enemy, green, by friendlies.
7. Known activities
They have a specific icon (in this case, it's an ally supply drop). Completion of activities is always rewarded with experience points and equipment.
For more information on the activities, refer to the section entitled Additional Activities.
8. Settlement
Settlements operate on the same principle as the base of operations. In the first settlement, the theater, you will find future members of the operating base, who will expand your capabilities (they will, for example, add the ability to create a clan).
9. Your current position
The icon and figure show your current location.
10. Main missions
They are marked with a turquoise hexagon and affect the plot - these missions push the story forward.
11. Side Quests
Side quests are marked with a smaller turquoise pentagon. You can start them in the Settlements.
12. Dark Zone
The Dark Zones are very dangerous, but also a great source of new weapons and equipment.
13. Stronghold
A Stronghold is a place that's heavily guarded by opponents; only high-level characters should go there.