
Food Buildings | Buildings Stronghold: Crusader II Guide
Last update: 11 May 2016
One of the most important groups of buildings in the game. Without an efficient food production, you practically won't be able to run your castle - a sudden but temporary shortage of food isn't a problem, because you can counteract it by lowering taxes or increasing ale / religion distribution, but a long-term deficiency of food is brutal to your economy.
From this building tab you can access buildings such as: Granary, Apple Orchard, Pig / Sheep Farm, Hop Farm, Brewery, Wheat Farm, Mill and Bakery.
Granary
An equivalent to the Stockpile described in the last section, with only a slight difference - it serves the purpose of food storage only. It's the second building (immediately after the Stockpile) which must be built before you can continue expanding your castle. You should locate it as close to the oasis as possible, to decrease the distance your workers need to cover in order to deliver their goods.
Given the fact, that all the food is stored in this tiny building, you must protect it at all costs. If the enemy destroys it, or if it's burned to the ground, you will be charged with a huge popularity penalty because of shortage of food. More on the food topic and its distribution can be found in the proper section of this guide.
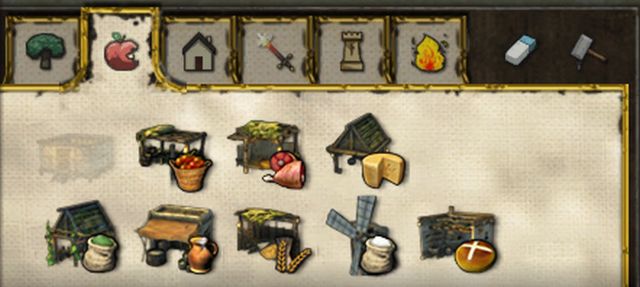
Apple Orchard
Cost: 20 wood, 1 peasant
Produces: 8 apples
The first food production building available, and at the same time being the cheapest of all. After construction and then some time, the peasant working at the orchard will start gathering the apples, which then will be transported back to the Granary, making them available to all your people. Apple Orchards can only be placed on fertile ground - in other words, in an oasis.
Apple Orchard requires the least amounts of resources, it starts to give fruits the fastest, but it has one major drawback, as it produces the least food from all the food production buildings - the peasant working at the orchard will deliver 8 apples to the Granary. Apple Orchards are the most effective as a startup building, at the beginning of the mission / skirmish, when you need a fast, remotely reliable food source, and you lack the resources to build more advanced buildings. In the 'late game' it's more profitable to just buy apples off the market instead of building additional Apple Orchards.
Pig Farm / Sheep Farm
Cost: 50 wood, 1 peasant
Produces: 12 meat
Both of those buildings are mostly the same - the only difference is that the Pig Farm is available to the 'Crusader' side, while the Sheep Farm is reserved for the 'Arabic' side. Both of those buildings manufacture the same good - meat. After placing the building you will need to wait several dozens of seconds until it reaches its 'peak', and then the peasant working inside will start transporting meat to the Granary.
Pig Farm / Sheep Farm is more expensive than Apple Orchards, but at the same time is more efficient - it produces 50% more food during roughly the same time. However, just like the previous building, Pig Farms / Sheep Farms should only be constructed at the first several minutes of the mission / skirmish - when your population goes beyond 100 they won't be able to keep up and building additional farms won't change that situation. It's better to just buy meat off the market and focus on bread.
Dairy Farm
Cost: 60 wood, 1 peasant
Produces: 10 cheese
Dairy Farms allow you to make cheese. As usual, you will have to wait a certain amount of time after you've placed the building before it starts its production. Afterwards, a peasant will carry cheese to the Granary. In contrast to the previous building, Dairy Farms produce slightly less food while the building is more expensive, but they need less time before another delivery can be made, making this building more effective in a long run.
Dairy Farm is, like all the previous buildings, only effective during early game, when you need a quick and cheap source of food - like apples and meat, cheese's production effectiveness drops significantly with the increase in population. By then you should just focus on buying cheese off the market and make more bread instead.
Hop Farm
Cost: 25 wood, 1 peasant
Produces: 4 hop
One of the two buildings allowing you to manufacture "exclusive" good - ale (the other being the Brewery). Hop Farms, like the name suggests, allows the production of hop, which is then transported to Breweries, ending up as ale. As most of the buildings from this group, Hop Farms must be placed on fertile grounds (oasis).
Hop Farms are mandatory - the prices of hop on the market all way too high for you to be able to buy enough of them, and the ale itself is a perfect way to increase your popularity. Each one of your Hop Farms can maintain up to 4 Breweries, provided that your peasants won't have to walk through the whole map to deliver hops.
Brewery
Cost: 50 wood, 1 peasant
Produces: 1 ale for 1 hop
Breweries, as it was previously mentioned, allow you to 'convert' hops into ale, which has a huge impact on the popularity in your castle.
Breweries can be placed anywhere on the map, but the best place for them is near your Stockpile, to minimize traveling distance, thus maximizing the efficiency. The amount of ale you need depends on your own preferences, but if you want to keep ale distribution on a relatively high level (+2 or even +3), an unwritten rule states that you need 1 Brewery for each 10 peasants in your castle (5 Breweries with a population of 50, 12 with 120, etc.), which should allow you to keep the distribution relatively high and you should still end up with some surplus, which can be sold on the market.
Wheat Farm
Cost: 60 wood, 1 peasant
Produces: 4 pieces of wheat
Wheat farm is one of the three buildings (together with the Mill and Bakeries) which form the most efficient food production chain in the game. Wheat Farm, as the name suggests, allows you to grow wheat, which is transported to the Mill, and then, in the form of flour, ends up in a Bakery, where it's processed into bread. Wheat Farms can only be placed on fertile grounds (oasis).
You should consider building Wheat Farms as soon as you have the proper wood production set up, as well as a couple of Apple Orchards and Pig / Sheep / Dairy Farms constructed. The reason for that, is that it takes some time to set up an efficient bread production, not to mention that it will require you to spend several hundred pieces of wood to construct the required buildings, which isn't the easiest things to achieve at the beginning of a mission / skirmish (you can change that by buying wood off the market). Each Wheat Farm is able to support 3-4 Bakeries, provided that you set them up near your Stockpile (wheat and flour is delivered to the Stockpile, not to the Granary).
Mill
Cost: 200 wood, 1 peasant
Produces: 1 piece of flour for 1 piece of wheat
The Mill serves the purpose of turning wheat into flour, which is then used in Bakeries to make bread. The Mill is one of the most expensive buildings in the game, so it's crucial to set it up as close to the Stockpile as possible, to maximize its efficiency. A single Mill should be able to support 3-4 Wheat Farms. It will be able to provide flour to about a dozen of Bakeries. If you are planning to set up more Bakeries (10+), you should consider constructing an additional Mill.
Bakery
Cost: 50 wood, 1 peasant
Produces: 36 bread
Without a doubt the most effective food producing building in the game - it can generate up to 36 pieces of bread in one single go. It requires you to build several expensive buildings, on which you will be forced to spend hundreds of pieces of wood, but it's definitely worth the pay.
Bakeries should be located either near the Granary, or the Stockpile (the best solution would be close to both of those buildings) to maximize production. Bakeries are effective during the whole mission - it's the only food type which is profitable to manufacture even when you have hundreds of peasants in your castle.