
Path of Ascension | Challenges SC II: WoL Guide
Last update: 11 May 2016
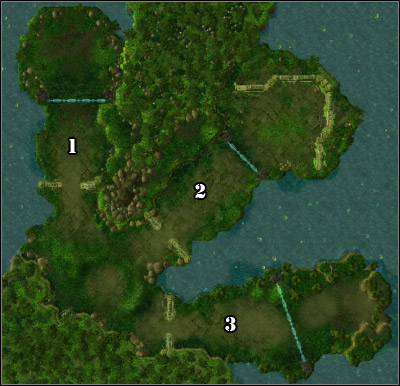
Round 1
Location 1
Units used: Stalkers
Predicted number of units lost: 0-1
Place the Stalkers in a line and they will shoot the enemies almost at once, though they won't be in debt. Keep your eyes for any highly damaged units (orange, red level) and move them to the back, preferably using Blink. Don't teleport them too far though, so they return to the fight on their own. Retreat completely only those who are barely alive (reds).


Location 2
Units used: 4 Colossuses, Sentry
Predicted number of units lost: 0
The whole trick is to use the Sentry's force fields (four times) as the Marines are coming in and fortify the path. The Colossuses should then stand far enough to not get hit, but close enough to attack themselves. It won't be hard, I assure you.
If you make a mistake while placing the force field and the Marines will find a gap, you can still win without any losses. Just keep an eye on the attacked Colossus' health and retreat if needed.


Location 3
Units used: Colossus, Zealots
Predicted number of units lost: 0-3
If this case losing a few units is quite probable. Make sure the Colossus is standing in front of the Zealots and draws the Marauder's rage. Move in the infantry, which will reach the enemies with no problems thanks to the tanking Colossus.
Afterwards it all depends on luck. Try to retreat Zealots which are nearing death and support them with the Colossus. If you can't make it, consider taking one more giant from where you were fighting the Marines.


Round 2
Location 1
Units used: Carriers
Predicted number of units lost: 0-1
Fighting the Thors will require you to retreat the damaged Carriers, so that the Terran machines focus on the other ones. If the unit isn't hurt badly, withdraw it a little so that it returns to the fight afterwards. Just like with the Stalkers in the previous round. As you see, mastering this manoeuvre is vital in the challenges. The problem with Carriers is that they're relatively slow, so keep that in mind.


Location 2
Units used: Immortals
Predicted number of units lost: 0-2
Wait for the tanks and move forwards. You'll destroy them with ease, at least until they enter siege mode. When they do, retreat even slightly (physically) damaged units. Immortals without armor are quite mortal indeed.
Optionally you can bring in a Templar, who will aid you with his Psi attacks.


Location 3
Units used: Void Rays, High Templar
Predicted number of units lost: 0-1
The templar can be used in two ways here. You can send him forward and use Feedback on the incoming Battlecruisers or wait for the battle to begin and use Psi Storms on the enemies. Both solutions are similarly effective.
With the Void Rays, attack only a single, chosen target. You will destroy it quicker that way and gain an advantage. The fact that the longer you attack an enemy the larger the damage gets also matter here. Unfortunately you won't do without retreating damaged units, but you've done it so many times before that it should be second nature by now. If you take the Templar (to location 2), things will of course get more difficult, but you can win without any losses nevertheless.
A little hint for hardcore gamers - if the Rays' power goes up with time, why don't you charge them... on yourself?


Round 3
Location 1
Units used: Archons, High Templar
Predicted number of units lost: 0
A relatively easy task. Attack the enemy squadron with the Archons and use the Templar's Feedback on the Battlecruiser. Afterwards call in Psi Storms while having in mind your own units.
Archons have just 10 health points, so keep an eye on their armor.


Location 2
Units used: 2 Colossuses, Stalkers, Sentry
Predicted number of units lost: 0
A replay from the Marines challenge. Block the path with the Sentry by placing force fields. The Stalkers set before the Colossuses will be the only ones exposed to danger, so keep an eye on their health.


Location 3
Units used: Colossus, Immortals, Phoenixes, Zealots
Predicted number of units lost: 0-4
This is the last test in the whole challenge, so you know how much units you can lose. Generally I'd completely give up on Zealots, which seem weak like Zerglings against the Terran artillery.
Note the Phoenixes' location. They have an interesting ability of picking up units, which can be very useful. Firstly however, let the Tanks meet the Immortals and Colossuses. After a few shots, pick up the four tanks, which will make the task easier for you main forces. Of course you have to keep in mind that once they fall back down (the Graviton Beam lasts for 10 seconds), the enemy units will attack them again.
Keep an eye on the Immortals' health. Once they lose their armour and show the first signs of corrosion, immediately retreat them from the battlefield.

