Map [M3] | Training Facility Basement Walkthrough Resident Evil Zero HD Guide
Last update: 02 February 2017
Key points of Resident Evil Zero HD - Map M3: Basement
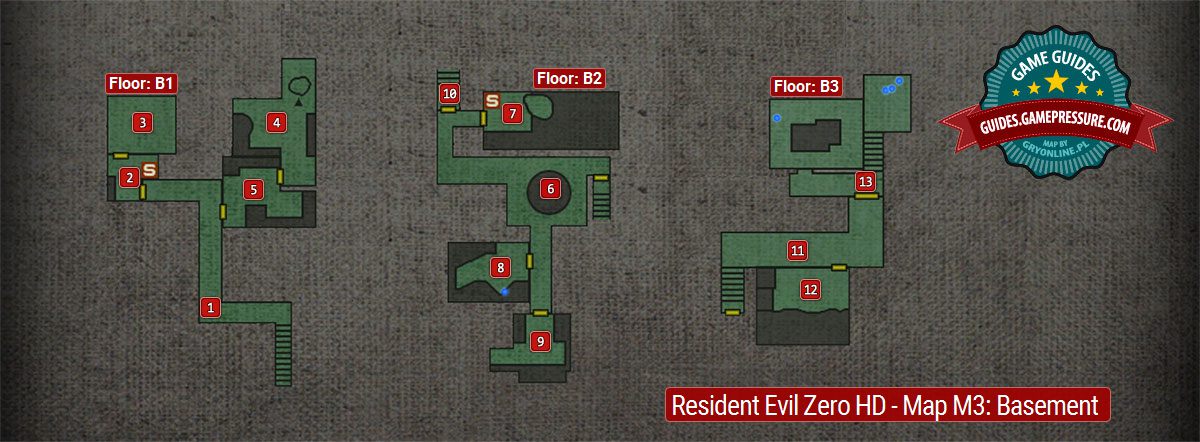
Descriptions of the rooms from the map
Descriptions of the rooms from the map
Corridor with spiders. You access the basement aftr solving the main hall puzzle (M2,3).
Room with the typewriter. A monkey appears here later on.
A room where you boost Rebecca and allow her to reach (M3,4).
Rebecca solves a puzzle here involving setting the correct voltage.
Monitor room - it becomes accessible after solving the puzzle in (M3,4). You'll find zombies and ammunition here.
Room with the monkeys that you can reach from (M2,15).
Animal statues puzzle must be solved here.
Area where Rebecca needs to be saved. A typewriter is in here.
Room accessible after solving the puzzle in (M3,6). Unity Tablet is here.
Room accessible after solving the puzzle in (M3,6). Zombies and a document are in here.
Passageway leading to (M3,11).
Corridor filled with giant spiders.
Room with insects and a locker key.
Room with two levels. The upper level offers a chance to use a key from (M3,11) to collect handgun parts and to press buttons.
The lower level is the test area and you must explore it to collect a new key.
Above, you can see a map of the three-level Basement of the training facility. You can reach it by solving the puzzle in the main hall (the statue with the scales). Later in the game, you also unlock another passage, in the corridor behind the generator. Some of the rooms in the Basement are unavailable at first - you have to solve a puzzle or find a key to unlock them. The walkthrough describes a suggested order of visiting the areas in the Basement. There are references to the map in the text. For example (M3,4) means that you should look at point 4 on the map of the Basement (M3).

