
Mass Effect 3: Priority, Thessia - walkthrough Mass Effect 3 guide, walkthrough
Last update: 13 October 2022
On this page of the Mass Effect 3 game guide you can find the walkthrough for the main quest Priority - Thessia. Our guide explains, among other things, when Thessia will be attacked by the Reapers, how to deal with the Banshee, how to solve the prothean beacon puzzle and how to defeat the Kai Leng boss.
- Landing on the planet Thessia
- Meeting with Lieutenant Kurin
- Fights with Reapers
- Defeating first banshee and further battles in the temple
- Prothean beacon puzzle
- Conversations with Prothean VI and Illusive Man
- Kai Leng boss fight
- Return to Normandy
Landing on the planet Thessia
Received from: Asari councillor [Citadel: Citadel Embassies]
Unlocked by: Received automatically after completing Priority: The Citadel #3.

Return to the Normandy, open the galaxy map and travel to the Athena Nebula. Once you're there (Parnitha system), fly to the planet Thessia (screen above) and confirm that you wish to land on its surface.
Watch a new cut-scene in order to find out that Thessia has already been attacked by the Reapers and notice that Liara will have to take part in the upcoming mission (thankfully she won't be a burden, because her biotic powers will come in handy). Wait until you're transported to [Thessia: Temple Route], listening to a conversation with Liara during the flight.
Meeting with Lieutenant Kurin

Head towards the asari after you've landed, however your first order of business should be to look around near the landing site. You can find an armor fragment [Umbra Visor] and supplies [4500 credits].
Once you're done exploring approach lieutenant Kurin in order to initiate a conversation with her. Notice that a nearby biotic barrier was attacked and as a result you will be asked for help in defending this camp. Quickly approach a stationary turret found nearby.
Fights with Reapers

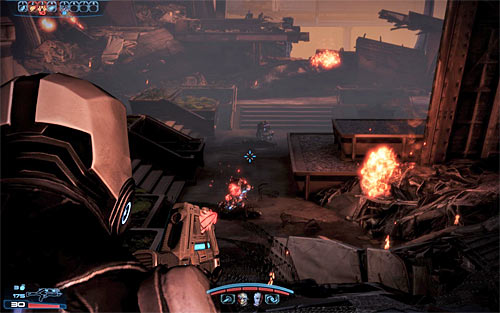
As soon as you've taken control of the turret destroy a nearby barrier engine (screen above) so that enemy units won't receive additional defense. Brutes will begin appearing near the barrier engine very soon. Use longer bursts to kill them and reload your weapon each time you've dealt with a new wave. You must also pay attention to a bridge located to your left, because husks will start using it in the near future and if you ignore them they will have an easy job getting close enough to the defended biotic barrier to weaken it.
Continue fighting until you've dealt with the attacking forces and listen to a new conversation with Kurin. You won't be allowed to influence the outcome of this meeting [450 EXP].

Proceed towards the newly unlocked passageway on the bridge. Ignore the harvesters seen in the distance, because they won't be of any threat to you at this moment. You will on the other hand be forced to eliminate a group of cannibals and marauders. Notice that they've appeared far away from your team, so killing them should be easy. Move on to the next section. You'll be travelling through linear corridors in the building's ruins.

The next battle will take place after reaching a larger and partially destroyed city square. The first part of this battle will require you to go against cannibals and marauders. They shouldn't be a major threat to you, but since this is a large square you must monitor their movements, so that you won't allow any enemy units to make a surprise attack from one of the flanks.
Keep pushing towards the designated exit from the square and don't forget about destroying spore pods, because swarmers will be coming out of them and if you ignore them you can suffer major injuries.
Defeating first banshee and further battles in the temple

A slightly more difficult battle awaits you once you move closer to the exit from this square, because aside from a new group of marauders a single banshee will also join the fight. Thankfully you don't have to use conventional weapons to take out this creature (it is of course possible if you're persistent), because you can find a rocket launcher [M-560 Hydra] on the ground to your left (screen above). One precise hit from the launcher should get the job done and kill the banshee (plus marauders if you're lucky).
Once it's safe here again look around to find two med-kits [100 EXP] [100 EXP].
You may proceed towards the passageway where the banshee appeared not long ago. Continue your journey through destroyed buildings and make sure to interact with a terminal [7500 credits] along the way.
You'll soon come across a closed door and you must use your omni-tool to unlock it. Ignore the harvester and focus on attacking a small group of cannibals that occupy a nearby square. Once they're gone find a damaged shotgun [3000 credits] and notice that asari snipers are fighting in the area. You should know that you won't be allowed to save them and therefore some of the snipers will die in an upcoming attack.

Head towards the balcony where the asari snipers are defending themselves. Start off by searching the area for a weapon mod [Sniper Rifle Concentration Module], a med-kit [100 EXP] and a sniper rifle [M-98 Widow].
You may now take cover near one of the balustrades. Destroy a barrier engine seen in the distance and then start attacking the Reaper forces. The sniper rifle you've just collected may come in handy here, however using it is not mandatory. Don't leave the balcony until you've secured the area below you.

Slide down the ladder and continue your journey to the Kyris outpost. Once you're there you'll automatically watch a longer cut-scene [450 EXP]. As soon as the cut-scene has ended destroy a barrier engine located on the left wall. You should also know that a new rocket launcher [M-560 Hydra] can be found on the ground and I would recommend using this weapon to defeat a banshee heading your way. If you didn't succeed, then you must quickly move back, so that the banshee won't get too close to your team.
You don't have to worry about other monsters present in the area (including a ravager), because they should all be eliminated by the asari gunship.

You may resume your journey by heading to your right. Don't forget about destroying spores from a safe distance. You'll also find a new weapon mod [Assault Rifle Extended Barrel]. Get ready to eliminate a group of husks running towards your team (preferably before they move too close).
Save your game before moving closer to the temple entrance, because it's going to be a guarded by a large group of Reaper units.

Immediately take cover and make sure that you're far away from enemy units. Just like in all other main battles in this quest, you should begin by destroying a barrier engine seen in the distance (screen above).
As for the enemy units, the biggest threat here are the two harvesters and a single ravager. The good news is that you won't have to defeat them yourself, because an asari gunship will join the battle once again and take care of them for you. As a result you should focus on standard monsters heading your way, preventing them from performing melee attacks. Don't forget to keep using cover, because otherwise you'll find yourself under heavy fire and you can die very quickly.

The asari gunship is going to be shot down very soon, however despite what you might think it doesn't mean trouble, because the harvesters will leave this area along with it and the ravager should already be dead.
Deal with the remaining Reaper units and once they're gone explore the area to find a weapon mod [SMG Heat Sink]. After you've done exploring interact with the force field terminal and wait for Liara to unlock the entrance to the temple [900 EXP].
Prothean beacon puzzle

Once you're inside the temple you may look around, listening to Liara's comments on some of the artifacts stored here. You'll also find a group of dead asari scientists. The only way to move on with the mission is to examine a plate found in front of the big statue (screen above).
Watch a new cut-scene which will reveal the first connection between the right manuscript and the statue. Your next task will be to discover other connections in order to uncover a prothean beacon - it's a puzzle. The table seen below lists all the objects you must interact with:
 | 1. A manuscript found to the left of the statue. |
 | 2. A shield found near the entrance to the temple. |
 | 3. A bust found to the right of the statue. |
 | 4. A terminal located under the newly uncovered prothean beacon (originally the big statue). |
Conversations with Prothean VI and Illusive Man
It's VERY IMPORTANT that you save your current progress before interacting with the protean beacon, because doing that will trigger several events.
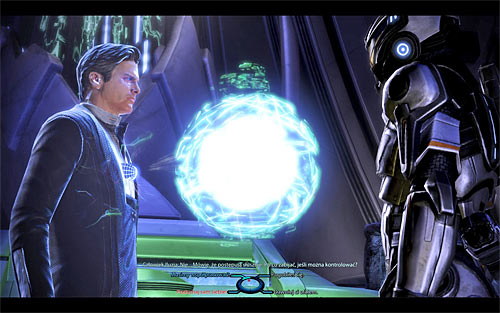
The first one is a conversation with a Prothean VI, however it will be interrupted by Kai Leng's appearance.
In this case you'll have to talk to the hologram of the Illusive Man. The game will allow you to act in a similar way to the mission on Mars, so you can choose one of the standard dialogue options or a special paragon/renegade dialogue option (only if you've sufficiently developed your reputation) which won't change the outcome of this meeting. Get ready, because as soon as the final cut-scene has ended you'll be forced to take part in a duel with Kai Leng [1200 EXP].
Kai Leng boss fight

The most important thing you should know about this battle is that you won't be allowed to defeat Kai Leng, because the duel is "only" about destroying his shields (they're very strong and he can regenerate them). This means you should be using ammunition, grenades and offensive powers (Overload!!) which are useful when it comes to weakening tech shields.
Obviously you must also avoid Kai Leng's attacks. He can perform ranged attacks by sending out projectiles, but he's even more dangerous in close combat. You should be moving all the time, especially since Kai Leng can "teleport" himself and this means you can't feel completely safe anywhere in the temple.

Each time you've severely weakened Kai Leng he should move back to the entrance to the temple. DON'T pursue him, because he'll order a Cerberus gunship to begin firing. You MUST avoid getting shot and this means staying in cover until the gunship has left the area, resulting in Kai Leng's return.
The rest of the battle is the same, so you'll have to continue attacking Kai Leng and avoid the gunship each time he leaves the temple. Keep fighting until you've depleted Kai Leng's shields.

Return to Normandy
Defeating Kai Leng will trigger a new chain of cut-scenes. Don't worry that Kai Leng has escaped the temple with the data, because you couldn't stop him.
Wait until you're transported back to the Normandy and listen to the conversation which will be about figuring out the next step. Specialist Traynor will inform everyone about finding a facility on Horizon which may be used by Cerberus. As you've probably suspected, exploring this base will be your next job. Before you leave the war room area consider contacting admiral Anderson (it's optional, of course).
Prizes for completing the mission:
- Mission unlocked: Priority: Horizon
- [15000 credits]