
Stage 6 (Over Hill and Under Hill) | Main Stages - Collectibles LEGO The Hobbit Guide
Last update: 11 May 2016
Schematic 1/1
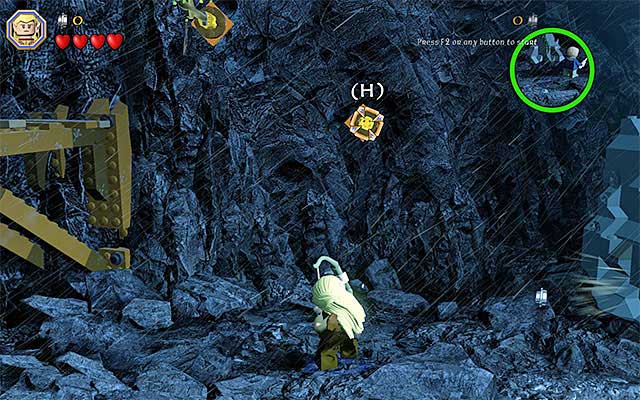
Requirements: bow (e.g. Kili or any elf), long jumps (any elf)
Way to obtain: Explorer the left part of the upper path, i.e. the vicinities of the starting point. Use the bow against the interactive slot shown in the above screenshot. After the arrow connects to the wall, switch to any elf. Start reaching the successive catches and take a jump towards the small ledge o the left, where the schematic is.
Reward: Mithril Flail Schematic
Minikit 1/10

Requirements: staff (any wizard)
Way to obtain: Examine the left side of the upper path, i.e. the vicinities of the starting point. You need to locate a small, dark cave and enter it as a wizard, or any other character that can light up dark areas.
Minikit 2/10
Requirements: -
Way to obtain: You need to smash five skeletons (with any weapon) and some sort of handicap here is the fact that you encounter them within long distance of each other. The first skeleton is to the left of the starting point and you can take to him straight away. As for the remaining skeletons, you need to remember about them, along your path. Their locations have been presented below.
The second skeleton is on the left side of the bottom path, at the point at which the main path is blocked, at first.

The third skeleton is halfway through the upper path, where large boulders fall down.

The fourth skeleton is near the chasm, towards the end of the path, i.e. in the spot in which you push the cart over.

The final, fifth, skeleton is in the right part of the bottom path.
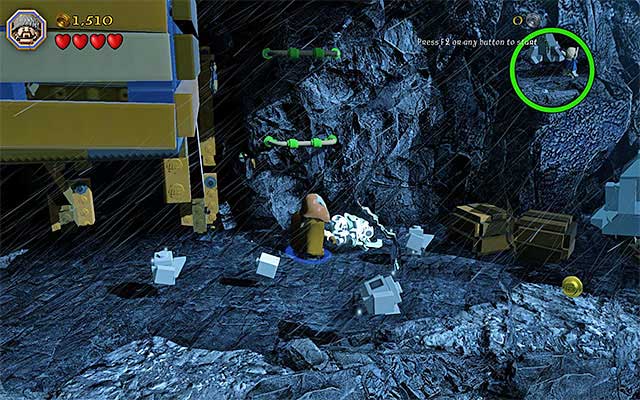
Unique Treasure 1/4
Requirements: Saruman's staff
Way to obtain: After you start the sixth stage of the game, switch to the characters on the bottom path and remain there. Switch to Saruman and use his staff to smash the mithril object on the left. Interact with the newly-revealed knob and, carefully, jump over to the ledge on the left, to collect the unique treasure.
Reward: Yo-yo - the purpose of this item is identical as the flail's and, apart from that, makes the attacked characters drop more loot.
Minikit 3/10

Requirements: axe (any dwarf)
Way to obtain: Examine the left part of the bottom path and find the fragment of the wall, through which you can cut with axe. The minikit is behind the wall. Note- if you are playing in the story mode, it will be necessary to Buddy-Up to smash the wall!
Minikit 4/10

Requirements: flail (e.g. Dori)
Way to obtain: You need to reach the right part of the upper path. After you push over the cart, using the Warhammer (this is required for the storyline to progress) approach its upper part, which detached from the rest. This time, use the flail. Wait for the cart to be destroyed and collect the minikit.
Unique Treasure 2/4

Requirements: staff (any wizard)
Way to obtain: While on the bottom path, look around for the rocks shown in the above screenshot. Smash the rocks with any melee weapon. Then, use one the wizard staffs to get rid of them completely. Thanks to this, you will gain access to the manhole, through which to walk,, as a dwarf or the hobbit. The manhole will take you to the ledge below, where there is the unique collectible.
Reward: Workman's Axe - the use of this item is identical with the regular axe
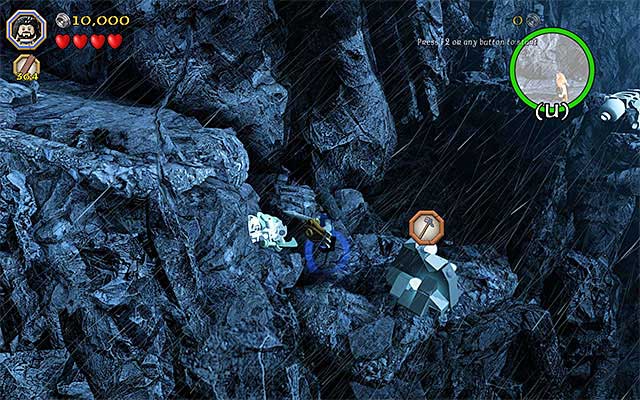
Minikit 5/10

Requirements: Saruman's staff
Way to obtain: You need to reach the right end of the bottom path. Start by switching to Saruman. Use Saruman's Staff to destroy the mithril padlock on the chest here.

After you have smashed the chest, hold down the building key/button, thanks to which you will build an unique vehicle. Mount the machine and drive up to the rocks shown in the above screenshot. Each time, you need to press the action key/button to set the huge hammer into motion and smash a rock. Destroying all of the interactive rocks will result in the appearing of the minikit.
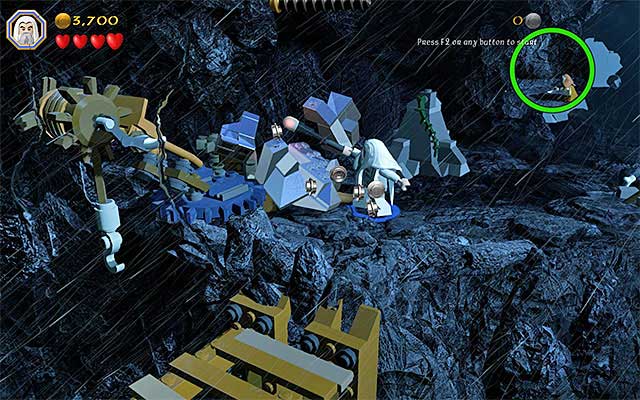
Gain access into the stone giant

While completing the sixth stage in the story mode, you will not be capable to explore the interior of one of the stone giants, over which the main characters need to climb. While completing it again, in the Free Play mode, you can do that and it is even required, because you will then reach a cavern housing several of the collectibles that you are looking for. Stop after you see the first cutscene with the giants fighting. Locate the big mithril element of the environment, shown in the above screenshot, switch to Saruman and use the Saruman's Staff to unlock a new location.
Minikit 6/10

Requirements: -
Way to obtain: Explore the left side of the cavern inside the stone giant. Smash the elements around and build the two pressure plates. On the plates, you need to position two different characters. Wait for the minikit to be revealed.
Minikit 7/10

Requirements: The Ring
Way to obtain: Explore the left side of the cavern inside the stone giant. Smash the elements around and switch to Bilbo. Select the Ring, put it on and build a ladder. After that, take the ring off and climb up the ladder to the balcony. Use the rotary mechanism, which will set the map on fire and reveal the minikit.
Minikit 8/10

Requirements: spade (e.g. Fili), axe (any dwarf)
Way to obtain: Examine the central part of the cavern inside the stone giant, thanks to which you will locate the spot where to use the spade. After you dig out the stone plate, switch to any character with axe. Jump and, while in mid-air, press the action key/button to slam against the stone plate. After a while, a minikit will appear here.
Unique Treasure 3/4

Requirements: fishing rod (e.g. Bilbo)
Way to obtain: Explore the right side of the cavern inside the stone giant. Smash the objects around and hold down the building key/button. Walk onto the pier now and complete the fishing minigame, as the character with the fishing rod active. Wait until you fish out the unique collectible from the water.
Reward: Misty Mountain Shield
Unique Treasure 4/4

Requirements: slingshot (e.g. Ori)
Way to obtain: Explore the right side of the cavern inside the stone giant. Turn your attention to the three targets that you need to hit with pebbles fired from the slingshot. The solution to this puzzle has been shown in the above screenshot - above the left target, there needs to be a green circle, a red over the middle target and a blue over the right target.
Reward: Stone-giant Gloves - raises strength
Minikit 9/10

Requirements: axe (any dwarf)
Way to obtain: While climbing over the stone giant, stop after you reach the ledge shown in the above screenshot. Smash the objects here, on the left, which will reveal a cracked plate. You now only need to smash the plate with axe.
Minikit 10/10

Requirements: Morgul Blade
Way to obtain: Towards the end on the sixth stage, you need to take cooperative action on one of the limbs of the stone giant. DO NOT DO THAT and go left instead. Stop after you reach the dark object shown in the above screenshot. You need to destroy that object using the Morgul Blade, used by Sauron.
Master Burglar
To obtain the Master Burglar Status, you need to collect, at least 80000 studs. It is difficult to do in the story mode, especially that in the Free Play mode, you receive the opportunity to explore an additional cavern. Apart from that, try to complete the building minigame, as well as possible, and switch to goblin at the right moment, thanks to which you will be able to reach the cave with blue and violet studs.