
Mithril bricks locations (1-15) | Middle Earth - Mithril LEGO bricks LEGO The Hobbit Guide
Last update: 11 May 2016
Brick 1
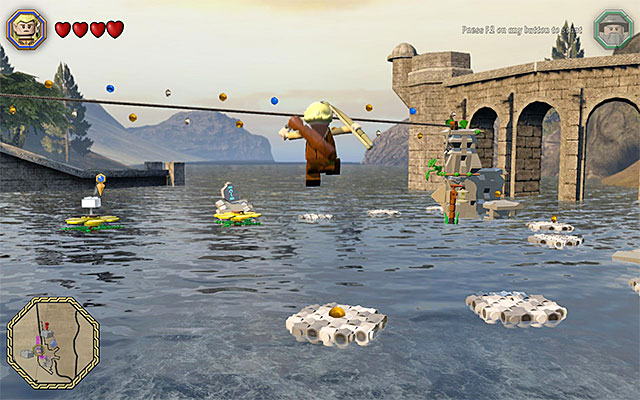
Location: Elven harbor
Description: Stand at the water and start jumping over to the successive platforms. You need to hurry, while doing that, because the platforms will immerse in water, soon after you jump onto them. Ultimately, you need to make it over to the stable ledge and grab on to the rope extended over the water. Make it over the rope to the left and let go after you are directly above the floating platform with the mithril brick on it.
Brick 2
Location: Elven Harbor
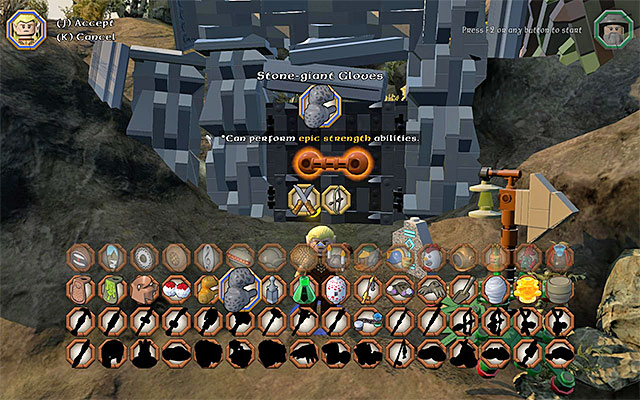
Description: Locate the gate with orange catch, which you need to rip off. You can do that as one of the strong characters that you purchased, or by using one of the unique treasures with similar properties. An example of such a treasure would be the Stone-giant Gloves; the above screenshot, which you can obtain in the sixth main stage of the game. Regardless of your method, tap rhythmically the indicated key/button to rip the gate off.

Take the path that you have just unlocked. After you reach the red blanket, switch to Bombur and lie down on the blanket. Now, switch o another character, approach Bombur and feed him - you need 20 Carrot, 15 Bread, 10 Meat and 10 Fish. You can now start bouncing off Bombur's belly, thanks to which you will be able to grab the mithril brick in mid-air.
Brick 3

Location: Elven Harbor
Description: Mark the brick as your destination, thanks to which the trail of yellow studs will take you to the harbor. Jump into the boat here (the character swap key/button) and steer Northwards/ The collectible is in a small side cavern.
Brick 4

Location: Hobbiton
Description: To the South of the collectible, find the door. Switch to the character that can sow plants (e.g. Sam) and interact with the point on the ground, to the left. Thanks to this, a yellow flower will grow. Another important step, is connected with the wizard (any one). Use the staff to smash two blue objects above. You can now bounce off the abovementioned yellow flower and go right. Along your path, jump down to a rope below and move to the left, to grab the collectible.
Brick 5

Location: Hobbiton
Description: Start by locating an inaccessible gate, which is overgrown with lianas. Switch to the character that can start fire (e.g. Sam) and set the lianas on fire, thanks to which you will gain access to the cave. Switch to any elf now and start jumping onto the moving. Of course, you need to wait each time before they are in the horizontal position. This way, you will reach the balcony with the mithril brick on it.
Brick 6

Location: Hobbiton
Description: The brick is in the chest on an islet. Start by destroying the plants surrounding the chest. Switch then to Saruman and use the wizard's staff, to smash the mithril padlock.
Brick 7
Location: Hobbiton
Description: Locate the gate with orange catch on it, which you need to rip off. You can do that by playing as one of the strong characters that you purchased, or by using one of the unique treasures with similar properties. An example of such treasure are the Stone-giant Gloves, which you can obtain in the sixth main stage of the game. Regardless of your method, you need o tap, rhythmically, the indicated key/button to rip the gate off.
Brick 8

Location: Bree
Description: The brick is hovering among the trees and to reach it, you need to use the ropes hanging around here. Switch to any elf and locate the spot where you can jump and reach the first rope. Make it over the ropes, until you get under the mithril brick. You will be able to grab it in mid-air.
Brick 9

Location: Bree
Description: Locate the gate with orange catch on it, which you need to rip off. You can do that by playing as one of the strong characters that you purchased, or by using one of the unique treasures with similar properties. An example of such treasure are the Stone-giant Gloves, which you can obtain in the sixth main stage of the game. Regardless of your method, you need o tap, rhythmically, the indicated key/button to rip the gate off. Enter the cave and switch to Radagast. Healing the mole (the wizard's unique ability) will reward you with another mithril brick.
Brick 10

Location: Bree
Description: The brick is in the cave, but you will be able to obtain it only after you solve the puzzle connected with this location. Start by switching to a character with slingshot (e.g. Ori) and hit the target on the right, several times. After there appears the first piglet in the cave, mount it and lead it to the pen on the right (the one with food in it).

Smash the objects at the bottom level of the left part of the cave. Thanks to this, you will unlock the manhole, which it is best to cross as a hobbit or a dwarf. After you reach the upper-left balcony, select a character with slingshot and hit the target several times. Now, explore the right side of the cave. In the spot show in the above screenshot, switch to the character that can sow seeds (e.g. Sam) and bring about the appearance of a flower here. Start bouncing off the flower, thanks to which you will reach the balcony above. Jump onto the second piglet here and take it to the pen below.

Return to the balcony above, where you have just found the second piglet. Interact with the mechanism here and use the slingshot on the target, on the right. Switch to any elf now and jump towards the small ledge on the right (the above screenshot). Walk over the wooden beam and jump onto the last piglet. Now, you need to take it back to the pen.
Brick 11

Location: Bree
Description: Reach the red blanket and switch to Bombur. Lie down on the blanket. Switch to another character now and approach Bombur to feed him - you need 2 Carrot, 1 Bread, 1 Meat and 1 Fish. Switch to the elf now and bounce off the stomach of the fed Bombur. You need to land on the pole on the left and activate the pressure plate here.

Switch, now, to the character with long melee weapon (e.g. Bifur) and locate the interactive spot, where you need to stand, as that character. Switch to another character now and climb onto the ally, next to the pole. The purpose of that is to reach the second pressure plate. The ending is very simple - jump over the protruding blocks, thanks to which you will get near the mithril brick.
Brick 12
Location: Weathertop
Description: Locate the gate with orange catch on it, which you need to rip off. You can do that by playing as one of the strong characters that you purchased, or by using one of the unique treasures with similar properties. An example of such treasure are the Stone-giant Gloves, which you can obtain in the sixth main stage of the game. Regardless of your method, you need o tap, rhythmically, the indicated key/button to rip the gate off.
Brick 13
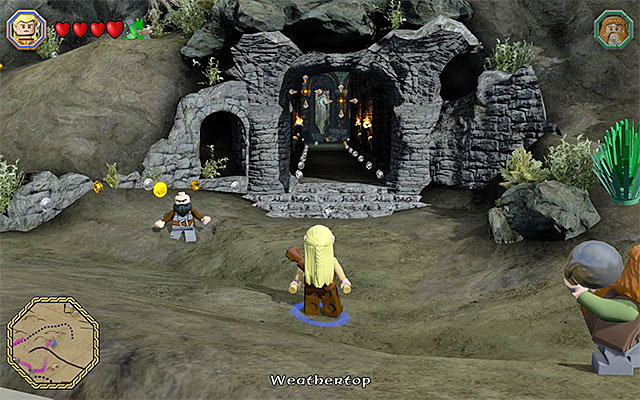
Location: Weathertop
Description: Explore the area to the South-West of this mithril brick's marker. You need to find the tomb entrance shown in the above screenshot. Take the entrance and walk into the main chamber in that location, immediately. You need to push over three stone blocks and each time, you need to use a character with warhammer (e.g. Dwalin). You do not need to rack your brains too much, here, because the paths over which you need to push the blocks is linear and it ends where they are automatically "swallowed" by the ground.

After you have pushed all three blocks into their places, the other stone plates will appear. Start climbing over them, thanks to which you will make it over to the location above, where there is a new character to recruit (King Thror), among others. Turn your attention to the chest here and collect the mithril brick from it.
Brick 14
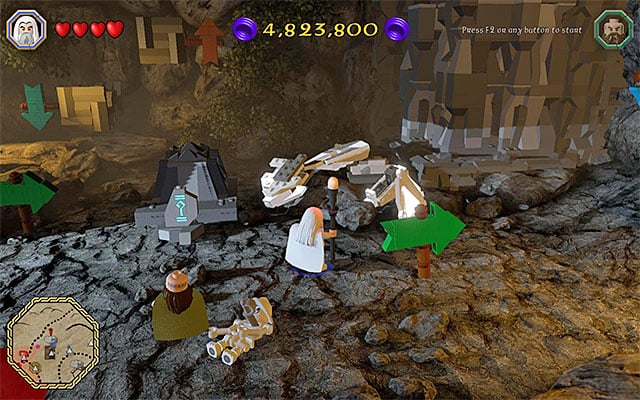
Location: Weathertop
Description: The brick is in the cave and the entrance is located a bit to the South of the collectible's marker. After you access the cave, start by smashing all of the objects in the area. An important piece of information is that some of the elements can be smashed only by certain characters. You need to switch to a character with flail (e.g. Dori) here, to rip off the golden catch, and Saruman to smash the heaps of mithril bricks.
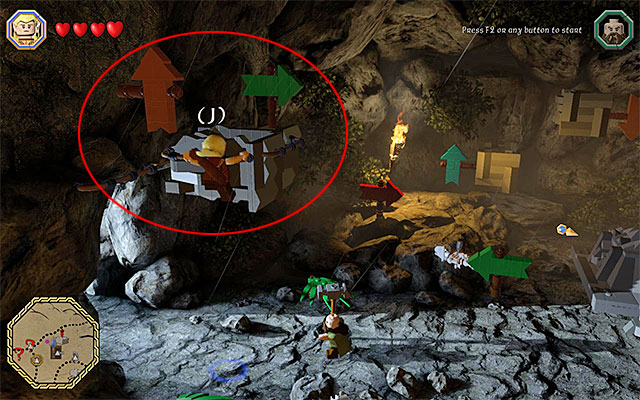
Only then, start solving the puzzle, which consists in turning the colorful arrows in the correct way:
- all of the golden arrows need to be pointing downwards
- all of the blue arrows need to be pointing upwards
- all of the green arrows need to be pointing left
- all of the red arrows need to be pointing right
You should experience little to no problems reaching the individual arrows and you can also turn them, using a ranged weapon. The only exception are the two arrows shown in the above screenshot, which are located near the ledge above. If you want to reach them, you need to bounce off the plant, hidden behind the rock, several times.
Brick 15

Location: Weathertop
Description: The brick is in the cave and the entrance to that cave is directly under the Weathertop. After you enter the cave, stand in the first pressure plate. Now, run to the right, QUICKLY, reach the second pressure plate, before spikes stick out of the ground again. You can now collect the crank from the nearby chest and put it in the mechanism on the left. Finally, start a simple climb and reach the mithril brick under the ceiling.