
Stage 14 (The Necromancer) | Main Stages - Collectibles LEGO The Hobbit Guide
Last update: 11 May 2016
Schematic 1/1
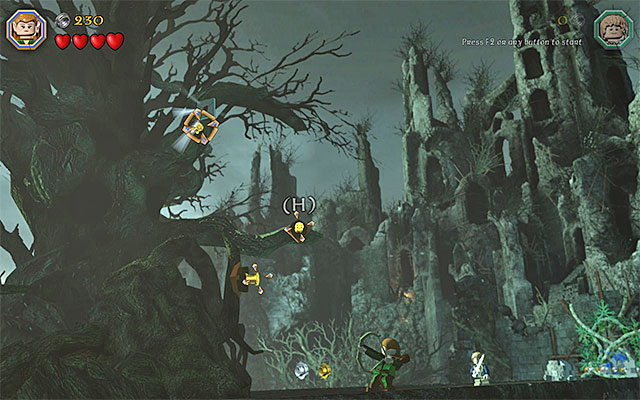
Requirements: bow (e.g. Kili or any other elf), long jumps (any elf)
Way to obtain: Right after the fourteenth chapter starts, instead of going right, go left. After you reach the edge of the map, use the bow against some of the nearby interactive slots. Switch then to any of the elves and climb over the bars, thanks to which you will reach the location of the schematic.
Reward: Mithril Wraith Armour Schematic
Minikit 1/10
Requirements: bow (e.g. Kili or any other elf)
Way to obtain: In total, you need to fire the bow at five different targets, located inside the stronghold. A handicap here is that they are spread all around. You should run into the first target close to the starting point, i.e. on a big bridge. Unfortunately, you need to keep in mind that you need to fire at the remaining targets. Their whereabouts have been provided below.
You will notice the second target on the right, soon after you cut through the first barricade.

You will notice the third target in the distance, on the left, soon after you cut through the first barricade.

You will find the third target in the left side of the area with the three poles that generate the energy streams.

You will find the fifth target in the right side of the area with the poles that generate energy streams.
Minikit 2/10

Requirements: flail (e.g. Dori)
Way to obtain: Soon after the stage starts, you will reach a location where you need to build the first pole for energy transmission. Before you do that, switch to any character with flail and use the item against the interactive catch on the right.
Minikit 3/10
Requirements: climbing walls (e.g. goblin)
Way to obtain: Explore the yard balcony on the left, where you build three more poles. Smash all of the interactive objects around, thanks to which you will reveal the climbing wall. You can now switch to the goblin and reach the minikit.
Minikit 4/10

Requirements: Buddy-Up
Way to obtain: Examine the balcony on the right, where you build three more poles. There is a large cracked plate here and you need to Buddy-Up to smash it. Pair up two of the characters and, after you position yourself at the plate, press the action key/button. Note - if the game does not allow you to combine two playable characters, make sure that you have selected the "standard" ones, e.g. two dwarves.
Minikit 5/10

Requirements: staff (any wizard)
Way to obtain: Explore the yard's right balcony, where you build three more poles. You need to find a blue gate here and smash it with the staff. Illuminate the area past the destroyed gate and jump to grab the minikit.
Unique treasure 1/4

Requirements: The Ring
Way to obtain: Explore the yard's right balcony, where you build three more poles. Smash all of the objects in the right side of the balcony and switch to Bilbo. Put on The Ring and hold down the building key/button to build a... hot-dog stand.
Reward: Hot Dog Shield
Minikit 6/10

Requirements: long jumps (any elf)
Way to obtain: After you enter the keep, switch to any of the elves and go left. Stop close to the Save Statue. You need to take a precise jump here, in order to grab on the ledge shown in the above screenshot. Jump then, towards the second ledge and to the minikit.
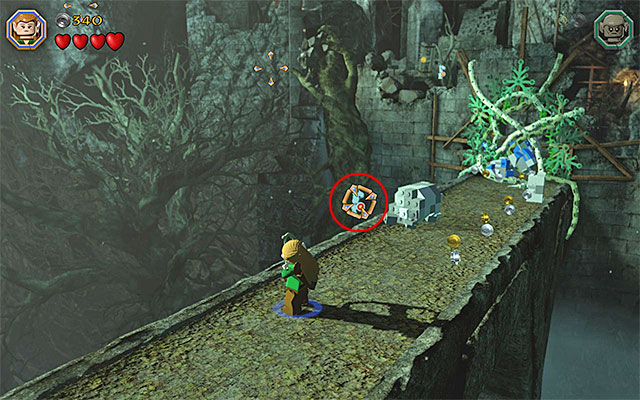
Unique treasure 2/4

Requirements: Morgul Blade (Sauron)
Way to obtain: After you enter the keep, examine the right side of the yard. Switch to Sauron here and walk into the small area under the balcony on the right. After you smash the objects here, you will be allowed to pick up the collectible.
Reward: Morgul-blade - it is a weapon identical with the one that Sauron has.
Minikit 7/10

Requirements: spade (e.g. Fili), The Ring
Way to obtain: After you enter the keep, explore the right side of the yard. Locate the area where you can use the spade. After you dig up all of the interactive elements, switch to Bilbo and put on his ring. You only need to hold down the building key/button, thanks to which you will build the minikit.
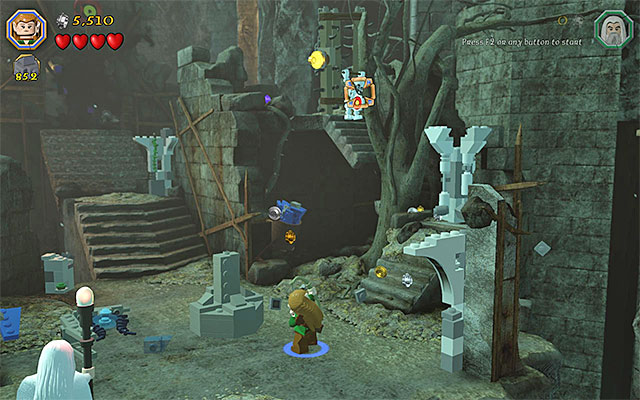
Gain access to the tomb

While completing the fourteenth chapter of the game in the story mode, you have been unable to explore the tomb neighboring the external yard. While replaying the fourteenth mission in the Free Play mode, this is available and even required, because there are several collectibles in the tomb. After you make it into the inside of the keep, take all of the steps necessary to get to the upper-right balcony. Switch to Saruman here and prepare the Saruman's Staff. Enter the aiming mode (hold down the action key/button) and aim at the mithril gate shown in the above screenshot. You can now enter the tomb.
Minikit 8/10

Requirements: long jumps (any elf)
Way to obtain: You need to explore the left side of the tomb and stop in the spot marked with green and yellow leaves. Switch to any elf here and jump to reach the bar above.

Jump over to the neighboring bar and then, to the small ledge in the corner of this chamber. walk over the chain, carefully. Towards the end, take a jump. Grab on to the chains hanging down from the ceiling and, finally, jump towards the slightly visible ledge in the right corner. This is where the minikit is.
Unique treasure 3/4

Requirements: slingshot (e.g. Ori)
Way to obtain: explore the central part of the tomb and note the three targets. You need o hit them with pebbles, fired from the slingshot. The plan is that the colors need o match the flowers at the sarcophagus. The solution to this puzzle has been presented in the above screenshot - above the left target there needs to be a red circle, green above the middle one and blue above the right one.
Reward: Marching Baton
Minikit 9/10

Requirements: ability to set fire (e.g. Sam)
Way to obtain: Explore the right side of the tomb and walk onto a small plate. You need to switch to the character that can start fire. wait for the flames to appear and for the reward.
Minikit 10/10

Requirements: -
Way to obtain: While escaping the monsters (after you have fought with Azog) keep to the upper path, thanks to which you will obtain the tenth minikit, along your way.
Unique treasure 4/4

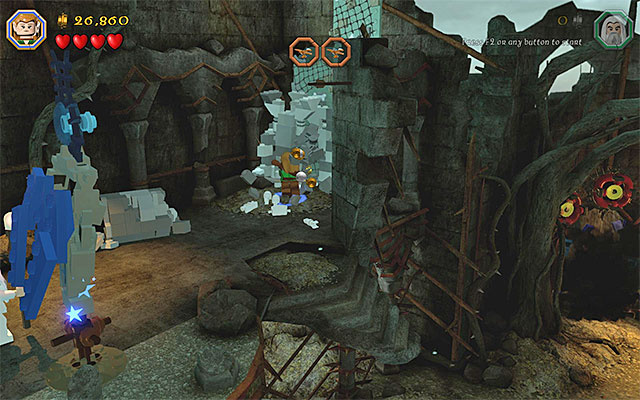
Requirements: spade (e.g. Fili)
Way to obtain: After you start the battle with Sauron, ignore the boss initially and explore the area on the right. In the area shown in the above screenshot, you can use spade to dig up a single brick.
Note - If you find it difficult to set the appropriate camera angle, move the two available characters to the right.

Wait for Sauron to finish one of his attacks, pick up the brick that you dug up and throw it at the skeleton on the right, shown in the above screenshot. You only need to collect the treasure now, which dropped to the arena.
Reward: Whistling Flail - the use of this item is identical to that of a regular flail, where this one whistles when it is used.
Master Burglar
In order to obtain the Master Burglar Status, you need to amass, at least, 30000 studs. It is an easy requirement, which you should be able to meet still before you fight the final battles. If, however, you failed to do that in the story mode, in Free Play, turn your interest to the gate on the left of the keep's interior. Destroying it (Saruman's staff) will grant you access to several blue and violet studs.