
Assassins Creed Valhalla: The Man Behind the Man Assassin's Creed Valhalla guide, walkthrough
This page of the guide to AC Valhalla contains a walkthrough of the main story mission The Man Behind the Man. During this quest, you will go to the Rouecistre Blockade to disable the blockade completely, and then capture Tedmund.
Last update: 12 January 2024
This page of the Assassin's Creed Valhalla guide has a detailed walkthrough for The Man Behind the Man quest.
The Norman woman told Eivor that Gaedrik's boats will get stuck on a dam at the Rouecistre Blockade. Eivor goes there to deal with the blockade and then capture Tedmund.
Rewards: 3,400 XP.
- Release the naval chain
- Regroup with your allies
- Breach the gate
- Escort the ram
- Shoot the links to lower the Drawbridge
- Breach the gate
- Find and capture Tedmund
- Follow Basim

Release the naval chain

The mechanisms holding the naval chain are in the tower by the river, behind closed doors.

To get there you need a key that one of the guards is carrying. You need that key to open the door to a locked room on the left side of the tower.

An alternate path leads through a hole at the top of the tower. You just have to climb up there and then break the boards at the top and on the floor. You will jump into the closed room.

Once you are inside, look through the bars and aim at the blockade that prevents access to the room on the other side of the tower. Then go to that room.

Go down the ladder to the lower level of the tower and shoot two locks on the sides of the reel to lower the naval chain. Now Gaedrik's boats will be able to pass through the dam without any problem.
Regroup with your allies

Go to the camp by the river to talk to Norman warriors. After a short while, Basim and Gaedrik will get there. It is time to start the assault on the Rouecistre Blockade.
Breach the gate

While your allies are trying to smash the gate with a battering ram, go and neutralize the springalds. Aim at the weak point of the structure and then shoot to make your opponent's weapon completely useless.

You can also climb the fortress's walls and finish off enemies and destroy their siege weapons with melee attacks. Your companions should be able to break through the gate themselves.
However, if the opponents manage to kill the warriors operating the battering ram, you will have to help them to smash the gate. Remember to move away from the gate to get the right momentum and then charge at the gate.
Escort the ram

Norman warriors will try to move the ram to another obstacle – you have to cover them. Destroy the oil cauldrons placed on both sides of the main road, just outside the gate. You can quickly move to the other side by walking on the wooden beam.
You can destroy the cauldrons in several ways: personally (an option to sabotage), hit the weak points of the structure, or shoot the jugs with oil that lie next to them. The third option is definitely the best and fastest solution.

Then climb the defensive walls located a little further and destroy the next cauldrons. There are two cauldrons on each side of the path. The enemy guards will of course try to stop you.

Once the oil cauldrons are destroyed, you will have to clear the path by finishing off any guards standing on the ram's route.
Shoot the links to lower the Drawbridge

The drawbridge has two weak points on the sides - handles connecting the bridge with chains. Aim at them (you have to stand on the slope) and then destroy.
Breach the gate

While your warriors move the ram to another blockade, shoot the red jugs standing on the wall above the gate to eliminate a few guards. You can also climb the wall and finish the enemies in the traditional way.

Then enter the room on the right or left and descend to the level below. You will encounter soldiers spilling boiling oil on your warriors – eliminate them and destroy the cauldrons. In the meantime, your warriors should be able to deal with the obstacle - if not, help them.
Alternatively, you can climb the walls, eliminate a few enemies, and then jump on the other side of the gate and destroy its supports. You will have to open the gate manually.
Find and capture Tedmund

Tedmund is hiding in the main tower, at the very top. The access to it is defended by an entire squad of enemies. You can use the main stairs of the fortress and fight every opponent you meet, or you can simply climb to the top of the tower and face Tedmund right away.

Tedmund fights with a flail and uses a heavy shield to block and parry attacks. He can also switch to using two flails. We recommend starting the duel by shooting at his weak points: right knee, left elbow, right elbow. When the opponent is stunned, you can launch a powerful attack that can kill him instantly or deplete around 2/3 of his health bar.

Tedmund is not a demanding opponent and has no dangerous attacks. All of his more devastating attacks are indicated by a yellow flash and can be blocked.
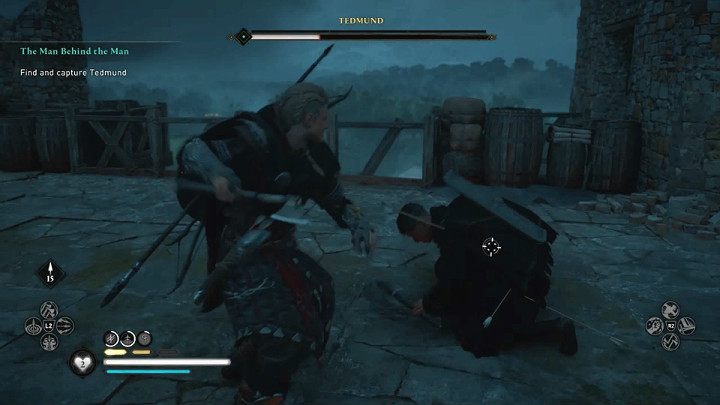
Just block his attacks and counter. You should be able to defeat him pretty fast. If you want, you can attack with the bow – the opponent shouldn't be able to block arrows.
Follow Basim

After a while, Cynebert will come with his army to save Tedmund. Get on your horse and follow Basim, then watch the show. Unfortunately, the abbot's plan will not succeed, because somebody had previously poisoned Tedmund – the man is dying.

Talk to Gaedrik to release him from his oath and complete the mission. As a reward, you will receive 3,400 XP.