Building your base | How to start?
The order of constructing each outpost is random, as each focuses on other elements and offer access to different technology/abilities that will come to be useful in the different phases of the gameplay. Nevertheless, plan your growth, as the space is limited and some of the installations are utilized from the early days of the campaign, while the add-on itself has introduced three new rooms and removed one.
War of the Chosen introduces three new rooms and removes Advanced Warfare Center. The new buildings (Infirmary, Training Center, and Resistance Ring) enable you to lower the recovery time of your soldiers and remove any negative effects that they may have received during missions, reset ability trees and unlock additional skills, and finally send your soldiers to Convert Ops. The new buildings were described in detail in "Available Rooms".
Key Rooms
Similarly to the previous entry in the series, there is a number of installations that should be constructed at the beginning of each game. These are as follows:
- Power Relay - Powers the remaining rooms. You can send an engineer that will increase the amount of generated energy, as well as make room for a second engineer or increase the overall amount of received energy.
- Guerilla Tactics School - Offers upgrades for your soldiers. Start with the upgrade that increases the amount of squad mates (from 4 to 6) and continue by buying upgrades for each class to increase their efficiency.
- Resistance Comms - The installation increases the amount of resistance contacts, enabling you to have better control over the situation on the world map, as well as increase the amount of acquired resources. The room can be upgraded by introducing two engineers who will additionally increase the amount of available contacts.
- Proving Ground - Used to unlock new armament - guns, armor, grenades, or ammunition. You'll also be able to procure plot items, as well as receive access to SPARK, a robot who serves as the ninth class found in game.
- Training Center - A new building that offers the ability to reset heroes' ability trees as well as unlock additional abilities which previously were restricted to other classes. The features mentioned above were partially realized by the Advanced Warfare Center, but the Training Center offers every possible ability seen in game - see the section on ability points to learn more. Moreover, the Training Center enables the soldiers to form bonds - see the chapter "Relationships" to learn more.
- Resistance Ring - A new addition and a very important one at that. Building a Resistance Ring unlocks access to a menu used to send soldiers on convert ops. Moreover, upgrading the building leads to an increased number of resistance orders and can lower the duration of convert ops by 33%.

Workshop also received a number of changes. Previously a key structure in each campaign now has an increased build cost and is less useful, as there is a new structure that takes some of the features seen in the classic Workshop. You can acquire additional engineers by engaging in convert ops and/or normal missions. Additionally, you can raise a Workshop in the initial stage of the campaign to pick-up additional engineers, then get rid of it to make room for a different structure.
Growth Plan
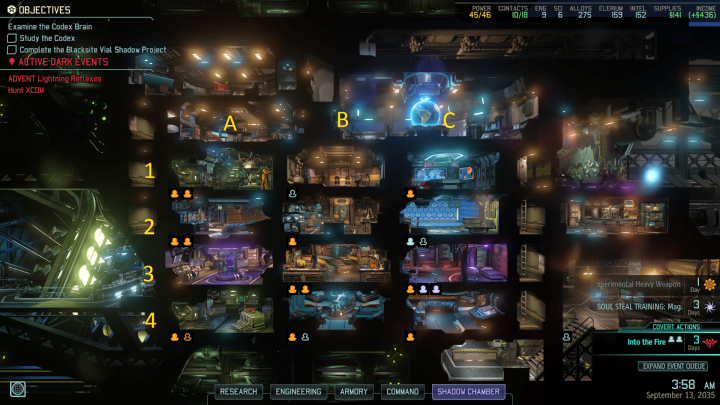
A plan for early development of the Avenger base is a must, as the base has limited space. The guide follows the following order: columns (3 - A, B, and C) and rows (4 - 1, 2, 3, and 4) (shown on screenshot above)
- Build a Power Relay in A1 - additional power supply is a must, as energy deficiencies can easily hamper your development.
- Build a Guerilla Tactics School in A2 - construct the installation, then buy the squad size upgrade that increases the amount of team members (from 4 to 5). Continue by upgrading one of your soldiers to receive access to six-man squads.
- Build a Resistance Ring in A3 - for better control over the convert ops. Activate both upgrades as quickly as you can, as you'll receive access to additional Wildcards (2 and 3). Visit the "Resistance Orders" section to learn more.
- Build Resistance Comms at B1 - additional resistance contacts will appear useful after a few weeks e.g. to keep tabs on ADVENT outposts.
- Build a Proving Ground at B2 - used to procure new items, including plot items that are a pre-requisite to certain assignments.
- Build a Training Center at B3 - your soldiers have probably gathered enough ability points to unlock additional skills offered by the Training Center by the time of its construction. Additionally, the building will enable you to develop the relations between soldiers.
As can easily be imagined, raising all the installations shown above will take at least 12 to 15 game weeks - remember to follow the chart, as the aforementioned rooms will enable you to increase the firepower and survivability of your soldiers, as well as control the outcome of the AVATAR project. Avoid building any additional rooms beside the one listed, as you may fall behind and lose the whole campaign, either by the hands of the Chosen, lack of control over the AVATAR project, or your soldiers' incapability to fight against more powerful opponents.
Further Growth

Further growth is completely optional and should reflect the situation on the battlefield. Start with upgrading every room to increase their efficiency. Focus on Resistance Comms - a fully upgraded outpost offers 7 additional contacts, + additional 2 with the Renegade orders - enough to establish links on the whole map. Moreover, establish a Psi Lab (Psi Lab) to unlock a new class (Psi Agent). The outpost is even more desirable, as the growth of this class (new levels and abilities) is established simply by placing a soldier in the building - the soldiers are trained simply by staying in the base.
Continue with the following rooms:
- An additional Power Relay;
- Shadow Chamber - a pre-requisite to some of the story missions;
- Infirmary - lowers the recovery time of your soldiers, as well as enables you to remove the negative traits received during missions;
- Laboratory - lowers the research time. Moreover, War of the Chosen introduces a system of Breakthrough and Inspiration - view the dedicated section to learn more.

You are not permitted to copy any image, text or info from this page. This site is not associated with and/or endorsed by the 2K Games or Firaxis Games. All logos and images are copyrighted by their respective owners.
Copyright © 2000 - 2025 Webedia Polska SA for gamepressure.com, unofficial game guides, walkthroughs, secrets, game tips, maps & strategies for top games.