Valorant: Best crosshair - Movement Error, Firing Error, options, tips Valorant guide, tips
Last update: 20 April 2020
The right crosshair is the key to success in FPS games. It is no different with Valorant. A well-designed crosshair will allow for more accurate shooting, which in turn will translate into better performance during gameplay. This page of the guide describes how to adjust the crosshair in Valorant to fit your needs. This chapter also includes examples of crosshair that the player can use immediately and move on to the gameplay.
Best crosshair in Valorant - settings
The crosshair in FPS games should be of the right size to avoid covering the target and the right color to be easily distinguished from the surroundings. A good crosshair will also inform the player at which point he has the best possible precision, and when it is better not to shoot - e.g. during movement. Below the player will learn how to modify the crosshair in Valorant and how to customize it. We also explain some of the targeting options that can be a bit confusing for new players.
- Movement Error
- Firing Error
- Crosshair in Valorant - available options
- Example of a crosshair in Valorant
Movement Error
By enabling this option, your crosshair will change dynamically as the character moves. This will allow you to easily know at which point your character has the best accuracy and you can easily shoot the target.
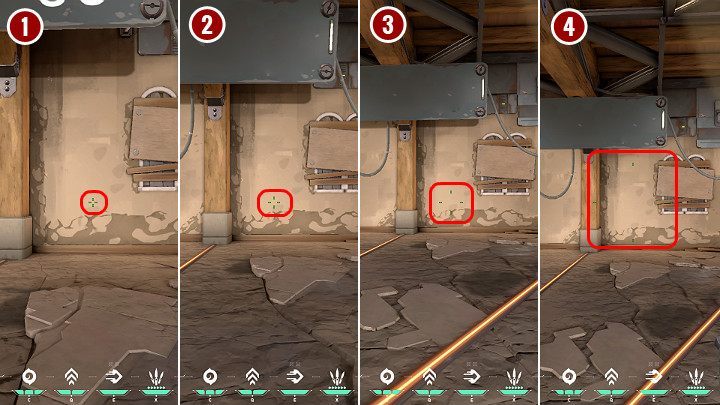
In the image above you can see a change in the crosshair depending on the movement status:
- Neutral position - when standing still, the crosshair is the smallest, the character has the best possible accuracy;
- Walking - when walking slowly you can see that the sight has increased slightly. This means the accuracy is not perfect, but the first shot fired can hit the target;
- Running - the crosshair is so large that there is nearly no chance of aiming correctly;
- Jumping - the crosshair is enormous. This means the shot will miss the target.
Firing Error
By enabling this option, your crosshair will change dynamically as you shoot so you can see at which point the weapon loses its accuracy. Once the recoil of the weapon is reset, the sight will return to normal size.
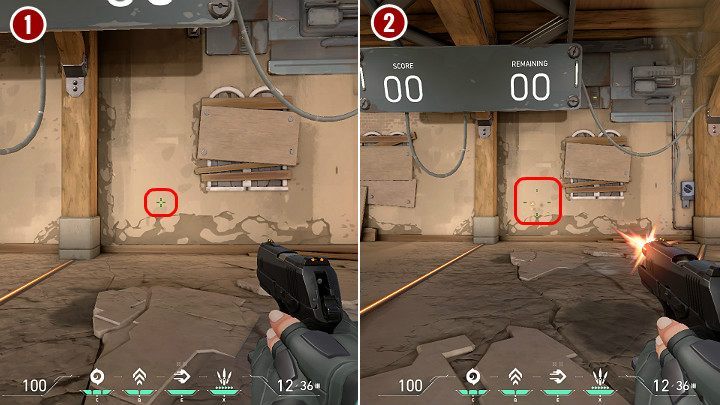
In the image above you can see how accuracy changes when firing the Classic pistol:
- Neutral position - when not shooting and standing still the aim is in a neutral position;
- After firing several shots - the crosshair gets larger, making it much harder to hit the target.
Crosshair in Valorant - available options
When modifying the look of the crosshair in Valorant, the player can use a number of options available. Among them, you will find not only the color change option but also various sliders responsible for the length of the internal and external lines of the crosshair, as well as options regarding the contours and spacing of the insight dots.

Below we describe all the available options to modify the crosshair in Valorant:
- Crosshair color - here you can choose the color of the crosshair. It is worth opting for one that will be well visible against every surface and will not be obscured by the effects of explosions or other character skills;
- Outlines - you can turn on or off the crosshair outline;
- Outline opacity The minimum value is 0 and the maximum value is 1.0.;
- Outline Thickness You can set the value from 1 to 6;
- Center dot - you can turn on or off the dot in the center of the crosshair;
- Center dot opacity The minimum value is 0 and the maximum value is 1.0.;
- Center dot thickness The minimum value is 1 and the maximum is 6.
- Inner line opacity The minimum value is 0 and the maximum value is 1.0.;
- Inner line length The minimum value is 0 and the maximum value is 20.;
- Inner line thickness You can set the value from 0 to 10;
- Inner Line offset - the spacing between each dot in the crosshair. The minimum value is 0 and the maximum value is 20.;
- Outer line opacity The minimum value is 0 and the maximum value is 1.0.;
- Outer line length The minimum value is 0 and the maximum value is 20.;
- Outer line thickness You can set the value from 0 to 10;
- Outer line offset - the spacing between each dot of the crosshair. The minimum value is 0 and the maximum value is 40.
Example of a crosshair in Valorant
What your crosshair looks like in Valorant is really entirely up to you. It is not possible to say which one is the best, because everyone has to adapt it to their own needs. Some stick to the traditional crosshairs, while others use only a dot.
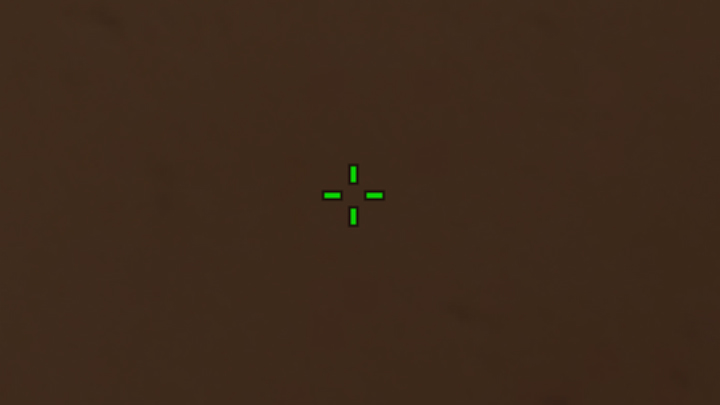
The above crosshair from Valorant has been slightly enlarged so that the player can see exactly what it looks like - in the game, it is slightly smaller. When creating the presented crosshair, the outline was enabled, the green color was chosen so that the inner lines of the crosshair are visible against each surface. The outer lines are turned off, and the dot in the middle was removed so as not to interfere with the sight of the target. If you want to try to play with this gunsight use the settings below:
- Color - choose green color;
- Center dot - turn off;
- Outer lines - disable outer lines completely;
- Outlines - enable crosshair outlines;
- Outline opacity - set the transparency value to 0,5;
- Outline thickness - set outline thickness to 1;
- Inner line opacity - set to 0.8;
- Inner line length - set to 6;
- Inner line thickness - set to 2;
- Inner Line offset - set to 0.