Uncharted 1: On the Trail of the Treasure - Chapter 15 walkthrough Uncharted Drakes Fortune guide, walkthrough
Last update: 15 April 2020
On this page of our guide to Uncharted Drake's Fortune you can find a detailed description of Chapter 15 - On the Trail of the Treasure. In this chapter, in addition to numerous fights and exploration with lots of climbing sequences, there are also two complex puzzles to solve - with a symbol indicating the place of the treasure and with turning the buttons that have to be properly set.
 |  |
When Drake came out of the underground, he saw the stairs in front of him. On the right side of the stairs, in the bushes, he found a Gold Inca Figurine.[1] Then, the hero ran upstairs and looked to his left, where he saw the next path (he had to move on the wall). He jumped on the wall below and then on a ledge. From there, he jumped to the opposite wall and then jumped on a vine.[2]
 |  |
Drake swung on the first rope and jumped right in order to reach a ledge. From there, he made his way to the opposite wall and reached the second vine. He used the vine to jump left and reached a spot where he began to climb up.[1] He climbed to the window and jumped to the inner part of the tower (by descending on consecutive ledges). At the bottom, he quickly hid behind the corner - there were plenty of enemies waiting for him in the corridor.[2]
 |  |
After defeating them, Nathan followed the trail of dead bodies by jumping over the gaps in the floor. At the end of the road he turned left instead of walking straight through the door. There, at the end, on the right side, just at the edge, he found a Golden Bird Vessel.[1] Then, he entered the room with a few pieces of floor. He jumped onto them in order to get to the other side.[2]
 |  |
Drake ran further down the stairs, and bypassed a path blocked by rubble. At the end, he turned left, ran out into the open space for a while and turned right to the next room - he spotted a green vine in front of him. He jumped on a few ledges to reach the vine. [1] He climbed up and jumped through another window - he killed two enemies on the other side (while being in church again). Once they were lying dead, he ran straight ahead and turned right into a dark room - there he found another Golden Spanish Goblet.[2]
 | 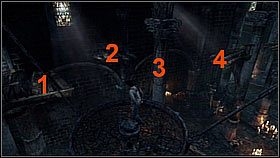 |
Now Nathan had to solve a puzzle associated with a symbol indicating the location of the treasure. In the first stage he jumped on a fragment of the floor(1), and from there on ledges on the right (2-3). He used these ledges to reach the second batch of boards(4) and then jumped on the lamp(5).[1] From there he had to get to the next boards(1-2). Then, he leaped to a ledge around the column(3) and reached another destination(4).[2].
 |  |
Being in the middle of the room, Drake saw two keys on the sides - he had to activate them. First he set off to the mechanism on the right by jumping on the lamp and then on the next available floors.[1] He activated the key by hanging on it. Then, he returned to the previous area by using the same path.[2]
 |  |
After returning to the boards in the middle, Nate turned towards the hole on the left (there was a second bell at the bottom). The path led along consecutive ledges.[1] At its end Drake could activate the last key.[2]
 |  |
From this spot, he had to climb over a ledge around the column. Then, he jumped on a chain and continued his journey by leaping to another protruding stone. From there, he got to the open stained glass window.[1] Drake entered a hidden room with colorful windows. He went straight to the right - around the corner, at the end, he found an interesting treasure - a Jeweled Golden Cross.[2]
 |  |
After that, the protagonist approached a stained-glass window which depicted a distinctive heart - he opened it and spotted his next target. He had to reach the lower level, by jumping left over the ledges and descending on a vine.[1] Another battle with overwhelming enemy forces was awaiting him. He picked up a sniper rifle from the crates and hid at the nearest breach of the wall. He shot one enemy, but a new group of opponents has spawned immediately. The most important bandits were those on the opposite side of the square - two of them (one on the left, the other on the right) had laser sights, and the third one (more or less in the middle) had a grenade launcher.[2]
 |  |
After killing all enemies, Nate jumped down and bypassed a hole in the ground - there were small stone houses near it.[1] Behind one of them the hero found a fascinating treasure - Silver Skull.[2]
 |  |
Drake ran to the next square by using the stairs - he had to defeat another group of enemies. He stopped in front of the building which he had to enter - but before he rushed into it, he headed to the right to a smaller mausoleum and several graves.[1] Behind them he found the Golden Inca Mask.[2] After collecting this valuable item, the hero walked into a building.
 | ![There, he met Elena with Sully and encountered another puzzle[1] - this time he had to turn a few buttons with symbols so that they were properly set (according to the drawings in the diary) - Uncharted 1: On the Trail of the Treasure - Chapter 15 walkthrough - Walkthrough - Uncharted Drakes Fortune Guide](/uncharted-drakes-fortune/gfx/word/23839671.jpg) |
There, he met Elena with Sully and encountered another puzzle[1] - this time he had to turn a few buttons with symbols so that they were properly set (according to the drawings in the diary). At first, Nate turned the seashell upside down. Then he turned the plate with arrows in such a way that the arrowheads were facing up. Finally, he manipulated the symbol of the snake - its head had to be directed to the left and placed horizontally.[2] In case of doubt, Nate could check out his diary.