Guides & Walkthroughs New Guides Popular RPG Action Strategy Adventure YouTube Guides Mobile App

Sniper Elite 5 Guide, Walkthrough by gamepressure.com

Sniper Elite 5 Guide, Walkthrough

Table of Contents
Sniper Elite 5 - Mission 6
This is the default mission starting area. You must go through the woods and to talk to 3 allies. You'll eventually reach the southern town (orange 2 on the map).
You will receive a main objective about liberating the town and you need to neutralize enemy targets - armored vehicle (shoot at the gas canisters and use the satchel charge or the Panzerfausts from the eastern building), sniper, enemy field HQ with German comms. Main bridge is heavily guarded, but there's a river crossing to the east of the town. Watch out for vehicle driving on asphalt roads.
Each anti-aircraft gun can be destroyed by placing a Satchel Charge (they can always be found nearby). Watch out for the tank (orange 4 on the map) that's patrolling the area with the AA guns - you can avoid it or destroy it.
The tank is busy patrolling the area near the 3 AA guns (orange 3's on the map). You can attempt to avoid the enemy machine or destroy it (Panzerfaust, satchel charge, AP weapon or ammo).
There are 3 snipers in the western town and eliminating them is a main objective (alternatively you can disarm the bombs on the eastern bridge - orange 6 on the map). The snipers are in the church tower and on the upper floors of 2 nearby buildings. You can kill them with long distance shots or sneak up on them and perform takedowns.
Disarming the bombs at the base of the bridge is the main objective (alternatively you can kill 3 snipers from the western town - orange 5 on the map). Enter the river and check the main support of the bridge.
This is a Kill List target and he's inside the western estate. Sneak inside without alarming the enemies. Collect the poison near the stairs, head to the upper floor, apply poison and ring the bell. Hide in the area and wait for Trautmann to consume poison and die immediately afterwards.
You can unlock 2 alternative mission starting areas. They can allow you to faster reach certain mission objectives or locations.
Exploring the glider's crash site is tied to finding the radio operator (side mission objective). You can proceed towards the trenches straight away (orange 9 on the map), because that's where he can be found.
Use the radar to check enemy positions regularly. You'll find a bunker here - blow it up with a Satchel Charge or use a key taken from one of the enemies. You'll find the radio operator's corpse and some intel (side mission objective).
You need to visit the town to complete a main objective. Get rid of nearby enemies and blow up the barricade - connect the explosive charge and then detonate it. A Tiger tank will appear as a result (orange 11 on the map).
You need to destroy a huge tank after blowing up the barricade (orange 10 on the map). Sneak in to the area with the tank. Use Panzefausts and weapons with armor piercing rounds (aim for the back of the tank).
The document is in the inventory of one of the farmhouse guards and it's best to identify him using the binoculars.
The letter is in the inventory of one of the guards of Jaan Trautmann's estate (Kill List target).
The collectible can be found in the eastern part of the trenches.
The collectible is inside the building, between the bed and the window.
The collectible is in the building's attic, in the sniper nest.
The secret is on the desk inside the building.
The document is in the north-western part of the trenches.
The collectible is in the dark corner of the building.
The document is on a large crate in front of the building.
The document is inside the town's easter building.
The item is in the possession of one of the enemies searching the glider's crash site. Eliminate him and check his body.
The artifact is in the building's basement and you can remove or destroy (crowbar is needed) the wooden boards to get there.
Check the southern building in the area with the Tiger tank (you must first unlock it).
This is the destroyed building at the northern edge of the map. Take the shot from the northern town or from the courtyard after destroying the Tiger tank.
The eagle is at the top of the windmill.
The eagle is on the arm of the ruined church (west part of the building).
The workbench is inside the building in the northern town. You'll reach it by climbing the vines.
The workbench is in the building's basement and you can remove or destroy (crowbar is needed) the wooden boards to get there.
The workbench is inside a closed room and you can reach it through a hole in the roof.
Each anti-aircraft gun can be destroyed by placing a Satchel Charge (they can always be found nearby). Watch out for the tank (orange 4 on the map) that's patrolling the area with the AA guns - you can avoid it or destroy it.
You can unlock 2 alternative mission starting areas. They can allow you to faster reach certain mission objectives or locations.
Enlarge this map

Sniper Elite 5: Mission 6 (Liberation) map and location description - walkthrough Sniper Elite 5 guide, walkthrough

French villages are the setting of Sniper Elite 5's mission 6 (Liberation). Our guide contains a map of the sixth stage with important locations and finds shown.

Last update: 14 June 2022

Key points of Sniper Elite 5 - Mission 6

Main locations on the map

Kill List target

Secrets and collectibles

After advancing to the sixth mission of Sniper Elite 5 called Liberation, you will get to Desponts-Sur-Douve. On this guide page, you will find our world atlas map, which shows the towns and their surrounding areas. From our description, you will learn about important and dangerous places (snipers, tanks, and other threats) and the locations of all 19 secrets required to complete the mission 100%.

The most important locations on the Desponts Sur Douve map

Taking over the southern town is the first mandatory objective of the mission - Sniper Elite 5: Mission 6 (Liberation) map and location description - walkthrough - Mission 6 - Liberation - Sniper Elite 5 Guide, Walkthrough
  1. Southern town - point 2 on the map

Taking over the southern town is the first mandatory objective of the mission. It consists of 3 parts - you have to shoot the sniper (tower), sabotage the communications (main building), and destroy the armored vehicle, which is best to sneak up on and attach an explosive. You can reach the town from the south or the east.

This is a mandatory task assuming you don't decide to explore the bridge on the east - Sniper Elite 5: Mission 6 (Liberation) map and location description - walkthrough - Mission 6 - Liberation - Sniper Elite 5 Guide, Walkthrough
  1. Western town with 3 snipers - point 5 on the map

This is a mandatory task assuming you don't decide to explore the bridge on the east. There are 3 snipers in the city, hiding in nearby buildings. You can attack them by shooting from a long distance or carefully sneak into individual buildings and perform silent takedowns on them.

This is a mandatory task assuming you don't decide to get rid of the snipers in the western city - Sniper Elite 5: Mission 6 (Liberation) map and location description - walkthrough - Mission 6 - Liberation - Sniper Elite 5 Guide, Walkthrough
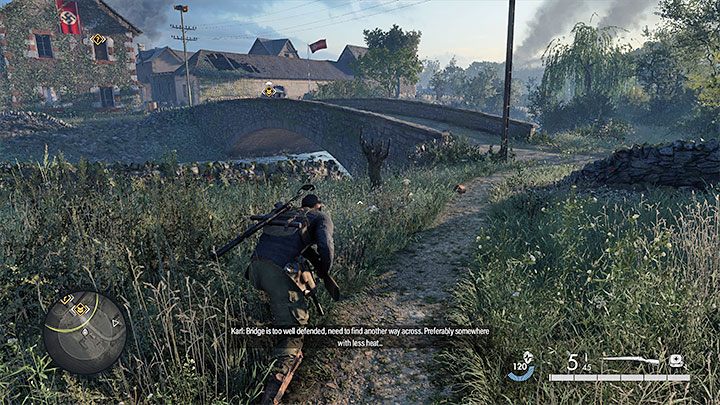
  1. East bridge - point 6 on the map

This is a mandatory task assuming you don't decide to get rid of the snipers in the western city. There are 2 bombs under the bridge that have to be defused after entering the river. You also have to watch out for enemies from the eastern camp adjacent to the bridge.

There are chances that you will play the final part of this mission in the northern town - Sniper Elite 5: Mission 6 (Liberation) map and location description - walkthrough - Mission 6 - Liberation - Sniper Elite 5 Guide, Walkthrough
  1. Northern town and the place of Tiger tank stationing - points 10 and 11 on the map

There are chances that you will play the final part of this mission in the northern town. There, you have to blow up the barricade first and then fight the Tiger tank. It is a very durable tank - fighting it requires planning and skillful use of heavy equipment (your own or picked up in the area).

Mission 6 – general information

The sixth mission of Sniper Elite 5 takes place in the French region of Desponts-Sur-Douve - Sniper Elite 5: Mission 6 (Liberation) map and location description - walkthrough - Mission 6 - Liberation - Sniper Elite 5 Guide, Walkthrough

The sixth mission of Sniper Elite 5 takes place in the French region of Desponts-Sur-Douve. On the map, you will find mainly a few towns. The most unsafe ones are the western ones, with 3 well-hidden snipers, and the northern ones, where you will have to fight the Tiger after destroying the barricade. You can prepare for both of these confrontations by getting better equipment and finding good places to attack.

By default, the mission starts at the southern end of the map, which means longer traveling to the locations where you can complete the mission objectives. You can find and unlock alternative starting locations (western and northern parts of the map) to make it easier to repeat the stage. Mission 6 has various main and side quests. We discussed them on the following pages:

  1. Liberation of the southern town - During this main objective, you have to neutralize the Nazi fortifications by, e.g. destroying an armored car.
  2. Securing the crossing - We have described 2 available paths. The western path runs through the town and involves eliminating 3 snipers, and the eastern path runs across the bridge and requires you to defuse the bombs.
  3. Liberation of the northern town - In the northern part of the map, you have to destroy the barricade first and then the enemy Tiger tank, which is more durable than other tanks.
  4. Side missions - Our walkthrough for mission 6 includes all 3 side missions concerning e.g. finding a radio operator and destroying anti-aircraft guns.
  5. Kill List Target - Jaan Trautmann - Learn how to sneak into the mansion of the mission target in the western part of the map, as well as how to kill Jaan Trautmann with poison.

Mission 6 has 19 secrets and collectibles. These include 3 workbenches, as well as various documents and unique items. They are marked on the map.

See/Add Comments

You are not permitted to copy any image, text or info from this page.

This site is not associated with and/or endorsed by the Rebellion or Rebellion. All logos and images are copyrighted by their respective owners.

Copyright © 2000 - 2024 GRY-Online S.A. for gamepressure.com, unofficial game guides, walkthroughs, secrets, game tips, maps & strategies for top games.