Nier Automata: Weapons List
This guide page for NieR Automata offers a list of all available white weapons. Using the list will help you collect 100 roni for your collection.
On this page of Nier Automata game guide you can find a list of all available varieties of melee weapons. You will find out where you can get, search for or buy particular weapons, as well as whether there are additional requirements for unlocking any type of weapon (eg. weapons available only within a specified Route).
Basic information
- Only melee weapons can be collected and obtained in the game. Ranged attacks are carried out by using weapons installed on the pods and each of the 3 available pods has a different firearm - a machine gun, a laser or a rocket launcher.
- You can upgrade acquired weapons by visiting one of the blacksmiths in the game world. For each such operation you have to pay. Also, you need some crafting materials. Weapons can be upgraded to a maximum 4th level. If you collect all weapon upgrades for every melee weapon type available in the game then you will earn the Inorganic Blade trophy as a reward.
- Acquired weapons are automatically transferred to the next campaign Route, that is, from Route A to Route B, and then from Route B to Route C and D etc. You don't have to look for them again. You will find each type of melee weapon only once.
- It's worth to search for weapons in form of a loot after you reach Route B, because some of them will be hidden in locked chests. Even if you find these chests during Route A (while playing as 2B), you won't be able to open them yet. They require you to use hacking, that is, the unique ability of 9S.
- Chapter Select feature allows you to return to omitted story weapons, e.g. those available only within a specific Route or decision.
- Weapons in the game are divided into several categories - Small Weapons, Large Weapons, Spears and Combat Bracers. We've divided the weapons in our list into the same categories, which should make it easier for you to locate yet unobtained gear.
Small Weapons list
The first column lists the name of the Small Weapon. The second column contains info regarding how to obtain the weapon and can contain a reference to one of the chapters of our walkthrough (in case the weapon is obtained during the main story or a side quest).
WEAPON NAME | HOW TO AQUIRE THE WEAPON |
Ancient Overlord | Available for purchase in the Resistance Camp Shop. |
Beastbane | Available for purchase in the Resistance Camp Shop. |
Cruel Oath | This is 9S'starting weapon. You don't have to look for it. |
Cypress Stick | This weapon can be found on a high shelf in the ruins in front of the Forest Castle. You visit this location for the first time in Route A's Chapter 6 - it's described in our walkthrough. |
Engine Blade | You can find this weapon in a chest - it's in the Abandoned Factory, in an area that's unaccessible at first. It becomes available in Route A's Chapter 9 - it's described in our walkthrough. |
Faith | This weapon is located in the Soul Box tower you visit during Route C/D's Chapter 15 - it's described in our walkthrough. The tower can only be visited once. |
Iron Pipe | You can get this weapon by fishing in the Amusement Park Sewers. |
Machine Sword | This weapon is available for purchase in the Machine Village shop. |
Phoenix Dagger | This weapon can be found in a ravine in the forest. You can easily get it during the Lord of the Valley side quest. |
Type-3 Sword | This weapon can be bought in the Resistance Camp shop on Route C/D (after Devola and Popola appear). |
Type-4O Sword | You get this weapon for finishing the Find a Present side quest on the desert. |
Virtuous Contract | This is 2B's starting weapon. You don't have to look for it. |
YoRHa-issue Blade | You obtain this weapon for finishing the 11B's Memento side quest in the bunker. |
Large Weapons list
The first column lists the name of the Large Weapon. The second column contains info regarding how to obtain the weapon and can contain a reference to one of the chapters of our walkthrough (in case the weapon is obtained during the main story or a side quest).
WEAPON NAME | HOW TO AQUIRE THE WEAPON |
Beastlord | Available for purchase in the Resistance Camp Shop. |
Cruel Blood Oath | This weapon can be found in the Desert Zone caves (first area), behind the locked door that needs to be hacked open. It becomes available in Route B's Chapter 3 - it's described in our walkthrough. |
Fang of the Twins | This weapon can be found in a chest inside of Desert Housing, in the desert area. It becomes available in Route A's Chapter 3 - it's described in our walkthrough. |
Iron Will | This weapon can be found in the Flooded City. To find it, you need to use the scanner (A170 Scanner program). |
Machine Axe | This weapon is available for purchase in the Machine Village shop. |
Phoenix Sword | This weapon can be found on a rooftop in the City Ruins. You can get it immediately after starting Route B's Chapter 2 - hack a closed chest right after you land. |
Type-3 Blade | This weapon can be bought in the Resistance Camp shop on Route C/D (after Devola and Popola appear). |
Type-4O Blade | You get this weapon by finishing the Data Analysis Freak 2 side quest in the bunker. The side quest becomes available during Route B. |
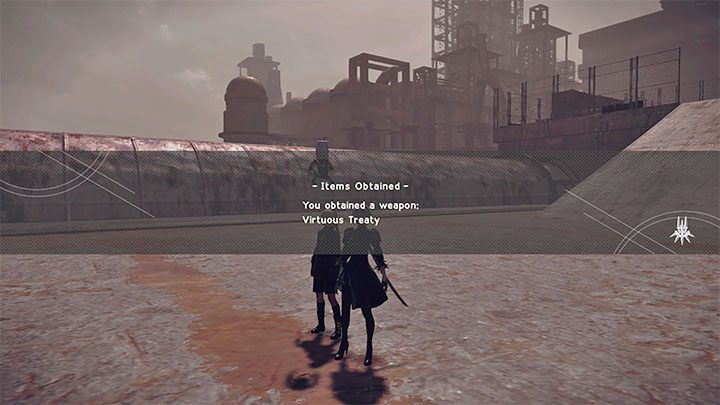
Virtuous Treaty | This weapon can be found in the abandoned factory, right where you fought the first boss of the game. We've described in on the Prologue factory - how to return? page. |
List of Spears
The first column lists the name of the Spear. The second column contains info regarding how to obtain the weapon and can contain a reference to one of the chapters of our walkthrough (in case the weapon is obtained during the main story or a side quest).
WEAPON NAME | HOW TO AQUIRE THE WEAPON |
Beastcurse | This weapon can be found in the Forest Castle library, inside of a closed chest which needs to be hacked open. It becomes available in Route B's Chapter 6 - it's described in our walkthrough. |
Cruel Arrogance | This weapon can be found in the Abandoned Factory, behind a closed door that needs to be hacked open. You can get it during Route C/D. |
Dragoon Lance | This weapon can be found inside of a chest in the central are of the forest. You can reach it by travelling down the river. The chest is available starting from Route A. |
Machine Spear | This weapon is available for purchase in the Machine Village shop. |
Phoenix Lance | This weapon can be found in the main area of the Desert Zone. Finding it requires use of the scanner (A170 Scanner program). We've described how to find it in Route B's Chapter 3. |
Spear of the Usurper | You get this weapon by finishing the Heritage of the Past side quest in the desert. It becomes available in Route B. |
Type-3 Lance | This weapon can be found in a chest on one of the rooftops in the Flooded City. It becomes available starting from Route A. |
Type-4O Lance | You get this weapon by finishing the YoRHa Betrayers side quest in the bunker. |
Virtuous Dignity | This weapon can be found in a secret area inside of the Amusement Park Sewers. We've described how to reach this area in Route A's Chapter 4. |
List of Combat Bracers
The first column lists the name of the Combat Bracer. The second column contains info regarding how to obtain the weapon and can contain a reference to one of the chapters of our walkthrough (in case the weapon is obtained during the main story or a side quest).
WEAPON NAME | HOW TO AQUIRE THE WEAPON |
Angel's Folly | This weapon can be bought from the trader Emil who travels around City Ruins starting from Route A's Chapter 7. |
Cruel Lament | You get this weapon as a reward for upgrading any other weapon to Level 4 at the secret trader Masamune's shop in the Forest Castle. You'll learn how to find the blacksmith on the Fourth weapon level - how to reach? page. |
Demon's Cry | This weapon can be found in a closed chest in the basement of the Amusement Park's main building. It becomes available in Route B's Chapter 4 - it's described in our walkthrough. |
Emil's Heads | This will most likely be the last weapon you'll get. You must defeat the trader Emil in the secret boss fight during Ending Y. You'll find more info on the endings list page. |
Machine Heads | This weapon can be bought from Pascal in the Machine Village starting from Chapter 15. It's only available if you decided to wipe Pascal's memory at the end of Route C/D's Chapter 14 - it's described in our walkthrough. |
Type-3 Fists | This weapon can be bought from the trader Emil who travels around City Ruins starting from Route A's Chapter 7. |
Type-4O Fists | This weapon can be found in a closed chest next to the Access Point in the Resistance Camp. You can get it starting from Route B's Chapter 2 by hacking the chest open. |
Virtuous Grief | This weapon can be found in the central area of the forest. It's available starting from Route A, but reaching it requires platforming on tall cliffs. The weapon is guarded by a single strong enemy. |
You are not permitted to copy any image, text or info from this page. This site is not associated with and/or endorsed by the Square-Enix / Eidos or PlatinumGames. All logos and images are copyrighted by their respective owners.
Copyright © 2000 - 2025 Webedia Polska SA for gamepressure.com, unofficial game guides, walkthroughs, secrets, game tips, maps & strategies for top games.