Fallout 3: Megaton: The wasteland survival guide (second chapter) - walkthrough, side quests Fallout 3 Guide
Last update: 02 November 2022
Second chapter, first assignment:
Let's start this chapter by dealing with a molerat problem. Talk to Moira and she will give you a very interesting melee weapon, called repellent stick. You'll also find out that if you want to achieve the best result for her, you will have to use this weapon to kill at least ten molerats. Moira will also say that the best area to find a lot of molerats is a Tepid Sewer, however this isn't a requirement. You can explore other sewers or spend some time around Megaton and you'll probably encounter enough molerats to get the job done. If you want to follow her instructions, get ready for a long journey. Tepid Sewer is located near D.C. ruins and it's a very dangerous area. You can enter the sewers through a small door (screen).

You shouldn't have any major problems locating and killing three molerats. Make sure that you're using the repellent stick (mace) to kill them, because otherwise you won't score any points for the kills. In order to get to a new area of the sewer safely you should consider hacking into a security terminal (screen). This will allow you to disable the turrets. I wouldn't recommend reprogramming them, because you want all the remaining molerats to be still alive. Continue your exploration of this location. You shouldn't have any major problems finding seven remaining molerats, however you will encounter raiders as well. Obviously you will have to deal with them. Don't forget to check their rooms, including braking into safes, because you'll get your hands on a lot of useful items, including ammunition and a Stealth Boy. There's also a second terminal in the sewers. If you manage to hack into it, you'll unlock a stash with frag grenades and a power fist. Go back to Moira once you've done killing and exploring and tell her about your progress. Moira will reward you with jet and psycho. You should also know that even though she took the repellent stick, you'll be allowed to buy that weapon from her.

Second chapter, second assignment:
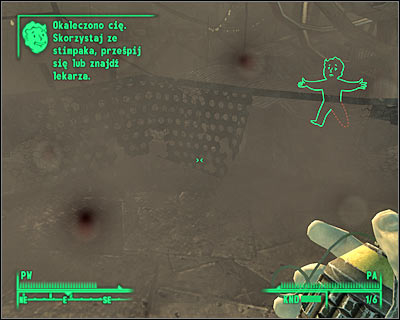
Now you should consider taking an easier assignment. Your job will be to test negative effects of inflicting major injuries. Once again, if you're not in a mood and you don't want to follow Moira's instructions, you can answer to some of her questions, but only if you've spent enough points on medicine. In order to fulfill both goals you must perform two tasks. You must injure one of your limbs and you must lose more than 50% of your health points. I'm sure that you won't have any problems with that. Leave Moira's store. Use a grenade or a rocket launcher to injure one of your legs or hands (screen). Make sure that you're not standing too close to the explosion, so you won't die. As for the health, jump from the balcony you're standing on. Crawl back to Moira and allow her to inspect your wounds. You'll return to full shape in a second and you'll also receive your rewards. Moira will give you a couple of Med-X drugs and an environmental suit.
Second chapter, third assignment:
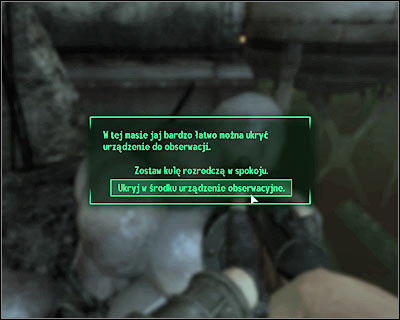
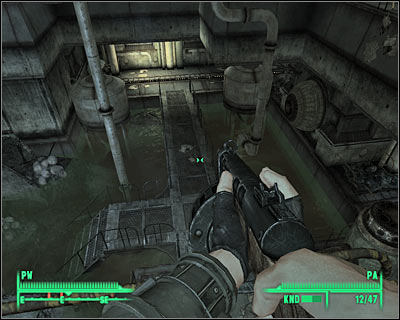
Your final task for this chapter of the guide will be to become a mirelurk observer. In order to do that you must travel to a location which you may have visited before - Anchorage War Memorial. Once you've arrived at your new destination, use one of the doors to get to the mausoleum. Remember that you won't be allowed to attack any of the mirelurks if you want to receive a reward for an optional challenge. Thankfully, these monsters aren't too quick and you can always use a Stealth Boy to move in the shadows. Proceed to the lower level and find a door leading deeper into the underground. You will finally reach a much larger chamber (screen). Jump down (try landing in the water) or use the stairs to get to the lower level.
All you have to do here is to approach some eggs. Press the action key and choose the second option from the list (screen) in order to plant a small device amongst the eggs. You may now go back to the surface. I would recommend choosing the same path as before. Obviously you must avoid getting too close to the mirelurks, because their attacks can be quite deadly. Once you've returned to the surface travel to Megaton and go to Moira. You will receive rewards for this assignment, as well as for the completion of the second chapter of the guide. Moira will give you a few Stealth-Boy units, some ammunition and a shady hat (bonuses to sneaking and perception).