Fallout 3: Megaton: The wasteland survival guide (third chapter) - walkthrough, side quests Fallout 3 Guide
Last update: 02 November 2022
Third chapter, first assignment:
The first assignment of the final chapter of Moira's guide will require you to become a historian. Moira will sent you to Rivet City in order to find out something about how it began to exist. Once you've arrived at Rivet City you must get on board of a huge aircraft carrier. Your task here will be to talk to some of the people who know a lot about the history of this city. You must locate and ask Seagrave Holmes (tell him that Vera has sent you) and Bannon. Both of these gentlemen can be found during the day in the Rivet City Market. You can also go and ask Belle Bonny and she will mention that Bannon is the person you need to talk to. You can find her in the Muddy Rudder bar in the lower deck of the ship. This will allow you to fulfill the main part of this objective.
If you want to dig deeper and find out the true story of Rivet City you will have to find Pinkerton. Check the second chapter of my guide (description of Rivet City) in order to find out how to reach his hideout. During the conversation with Pinkerton you must be very convincing, because only then he'll tell you the story. Don't forget to ask him for some kind or a proof (screen) and he'll give you Rivet City historical record. Once this item is in your possession you may leave Pinkerton's hideout. Go back to Megaton and talk to Moira. The funny thing is that you can convince her that Rivet City was once inhabited by a powerful civilization of underwater creatures. :-) Moira will give you a few mentats for your troubles. She will also promise that she will ask some of the traders in Rivet City to lower their prices for you.

Third chapter, second assignment:
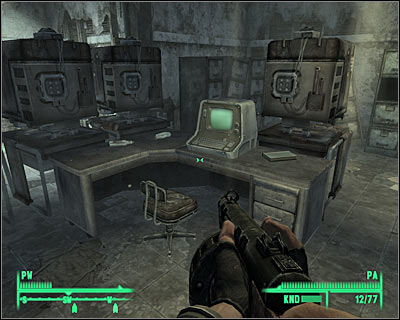
This time you'll have to travel to RobCo facility, however if you have a perk called Robotics expert you can avoid this trip and also you won't lose a reward for an optional assignment. The factory can be found in the lower left corner of the map of Capitol Wasteland. It's near Tenpenny Tower. Once you've arrived at the plant use the main door to get to RobCo facility. The first level of the factory is taken over by rodents and insects, so it shouldn't be a problem to get rid of them, even with a melee weapon. Eventually you'll have to get to a door leading to RobCo facility - offices and cafeteria. It shouldn't get harder here, however the factory is a multi-story building, so you can't rely on your personal map. Eventually you must get to the central server room (screen) which can be found on the upper floor.

Approach the main computer of the factory and install the processor you've received from Moira. This will allow you to fulfill the main assignment. Sadly, installing the CPU will activate protectrons and security turrets throughout the entire factory. Kill the first machine, because it will active itself in this room. As for other robots, it would be a good idea to reprogram the mainframe (screen). This will make leaving the factory a lot easier and you'll also fulfill the optional assignment. If you don't have necessary skills to reprogram the computer, fight your way out. Either way you must return to Moira. She will hand over a couple of pulse grenades (great against robots!), as well as a big book of science.

Third chapter, third assignment:
The final assignment given to you by Moira will require you to visit one of local libraries. Your target for this mission is the Arlingon Library which can be found in the southern area of the map. I wouldn't recommend trying to get there through the metro tunnels, because it would be extremely dangerous. Instead start your journey near Megaton and head south-east. After that you should stay close to the southern edge of the map, because there's a road here (screen) which leads directly to the library. You will probably encounter a few raiders along the way, but it's nothing compared to what you would have to do in the sewers. Approach the main door of the library and travel to the foyer.

You will be greeted by Scribe Yearling upon entering the library. Listen to her proposal. Yearling will pay you 100 bottle caps for each pre-war book you manage to find and deliver to her. You should also ask her to help you in gaining access to the archives of this library. The main objective can be completed easily. All you have to do is to locate a check-in terminal (screen). Use it and choose Access card catalog option from the main menu. In order to complete the side objective you must explore the rest of the library. Notice that brotherhood soldiers are fighting with raiders throughout this entire building complex. Obviously you should help your allies in getting rid of the bandits, however you can also wait for the fights to end if you feel unsure of your success. Locate a door leading to Arlington Library media archive.

You will witness a lot of fights taking place in the archives as well. Prevent your character from getting shot at from too many directions and attack the bandits once they've been wounded by brotherhood soldiers, so it won't take too long for you to finish them off. You will have to get to the top floor of the library. Sadly, there isn't only one staircase you could use. As a result, you will have to secure each floor before moving on to the next one. Be on a look out for security terminals and watch out for traps. There are a lot of landmines in the area and you may also end up being attacked by security turrets. Your objective can be found in a large corner room. Check a nearby terminal to open a safe. Thankfully you don't need any skills to access the final computer (screen). Choose an option from the list to upload the data to your Pip-Boy. You may finally return to Moira. She will reward you with bottle caps and with a book - Lying: Congressional Style.
And that's it - the survival guide is ready to be published. Moira will thank you for all the help you've done. You will receive two items from her - a mininuke and the first issue of the Wasteland Survival Guide. Furthermore, you'll be given a new perk, but the quality of the perk will depend on how many side objectives you've finished. You can get one of three perks - Junior survivor, Survival expert or Survival guru.