DCS AH-64D Apache: TSD - Tactical Situation Display DCS AH-64 Apache guide, instruction
In this chapter of the DCS AH-64D Apache tutorial, we introduce the TSD Tactical Situation Display system. We describe the MAP, SHOW, PAN, RTE, BAM tactical map functions and how they work.
Last update: 14 November 2023
In this chapter of the DCS: AH-64D Apache simulator guide, you will find information about TSD - Tactical Situation Display system. We describe following modes and functions: MAP, BAM, RTE, SHOW and PAN. We advise on how to use a digital image of the battlefield.
NOTE : Map points management and basic navigation are described in separate chapter: Navigation and Map Points. The entry is based on an early access version of DCS: AH-64D Apache - not all features are currently working.
- TSD - what is it?
- Required keybinds
- TSD Basics
- TSD Screen
- MAP - map options
- SHOW options
- RTE Route options
- PAN - panning the map image
- BAM - Battle Area Management
TSD - what is it?
TSD - Tactical Situation Display - is a system that shows a top-down view of a digital image of the battlefield in the cockpit. It displays navigational and tactical data in form of various icons and symbols They can be waypoints, obstacles, allied and enemy units positions, detected threats - all shown on a digital map of the terrain.
Required keybinds
- Cursor Controller / Enter - moves the map cursor, Enter function;
- Cursor Display Select - switches the cursor between screens.
TSD Basics
Press the TSD hotkey to switch on the map screen.
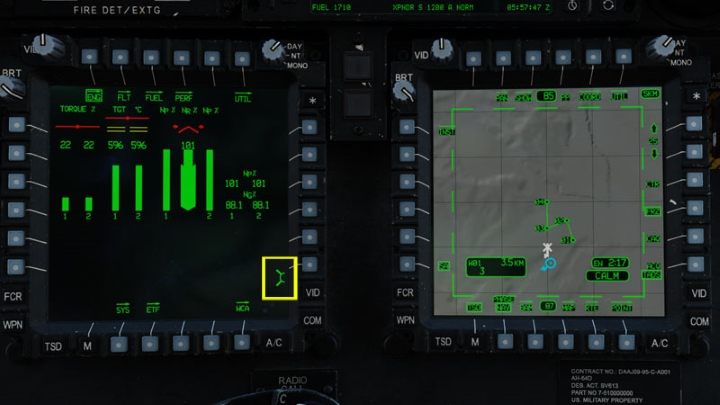
A sort of mouse cursor is required to operate the TSD. If the cursor is on the second monitor, move it withe the Cursor Controller axis to the edge of the screen and double click towards the screen with TSD. Alternatively, you can press the Cursor Display Select button.
When you have the cursor on the TSD monitor, you're all set.
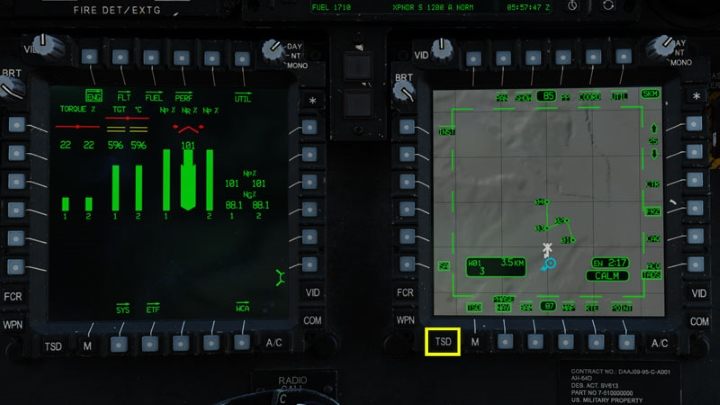
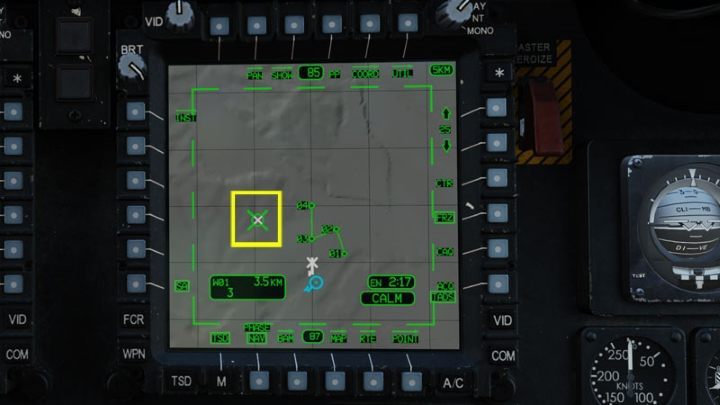
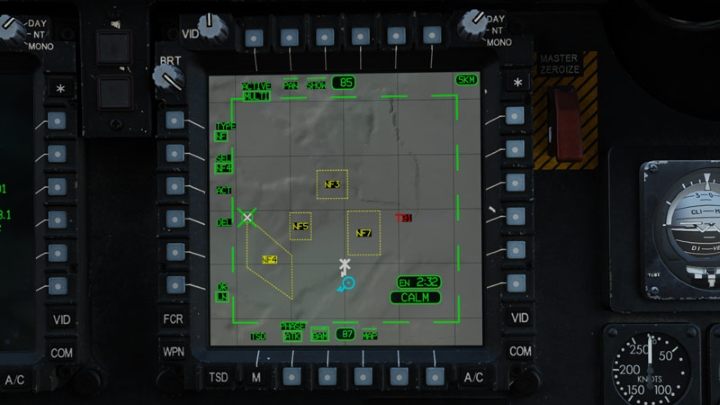
TSD Screen
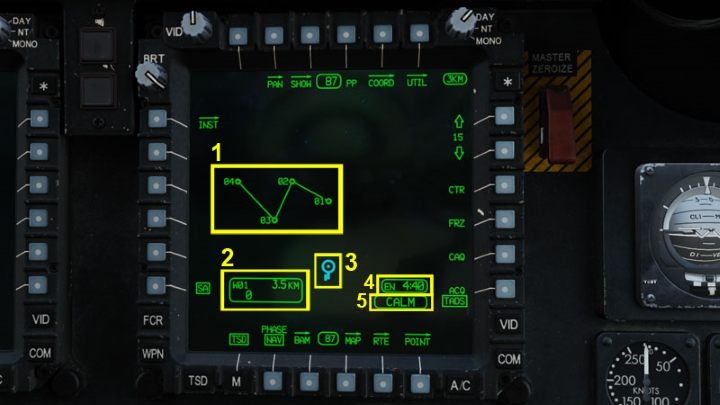
The default TSD screen shows various data:
- (1) - Waypoints and active ROUTE (if they were previously created in the editor or in the helicopter)
- (2) - Active Waypoint with distance and estimated time of arrival.
- (3) - "Ownship" - blue helicopter's icons showing current position on the map
- (4) - EN - Endurance - the remaining time of flight with current fuel on board.
- (5) - Wind Status - if it is less than 5 knots, the word CALM appears.
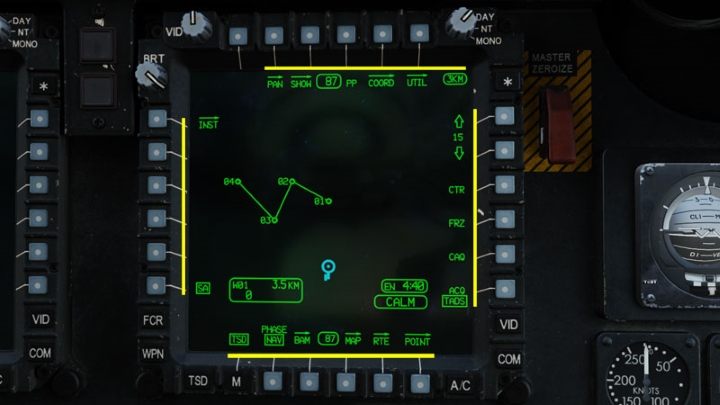
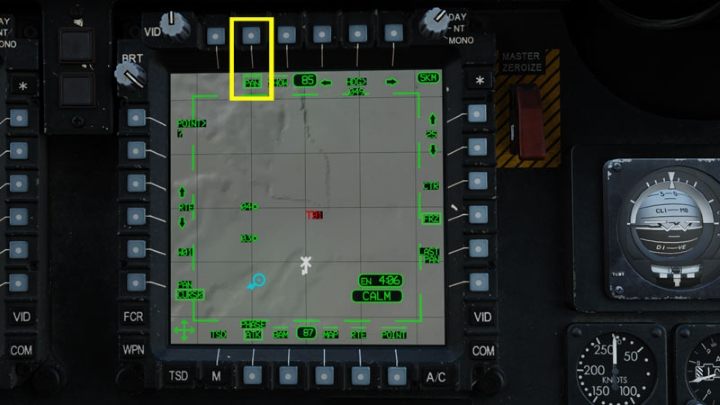
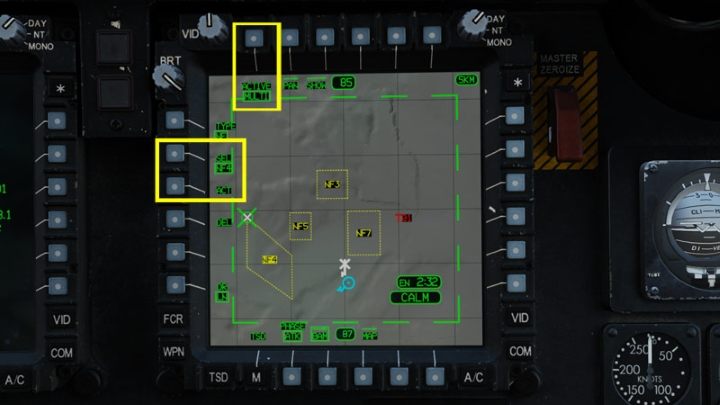
There are various functions available by pressing the corresponding buttons:
- PAN - moves and rotates the map freely without changing the scale;
- SHOW - adjusts the amount of information shown on the TSD screen;
- "87" - Current heading;
- PP - Present Position - current coordinates of the helicopter's position on the map;
- COORD - Displays a list of map points with their coordinates, sorted into categories;
- UTIL - Displays detailed data of the navigation system;
- 3KM - Current map scale - the number represents the length of one grid square;
- 15 up / down - Selects map scale in kilometers (x5 grid square);
- CTR - Center - Centers or de-centeres ownship's position on the map;
- FRZ - Freeze - Freezes the current map image;
- CAQ - Cursor Acquisition - allows to select a point under the cursor as "acquisition" source;
- ACQ - Selects acquisition source;
- POINT - Shows map points options;
- RTE - Shows Route options;
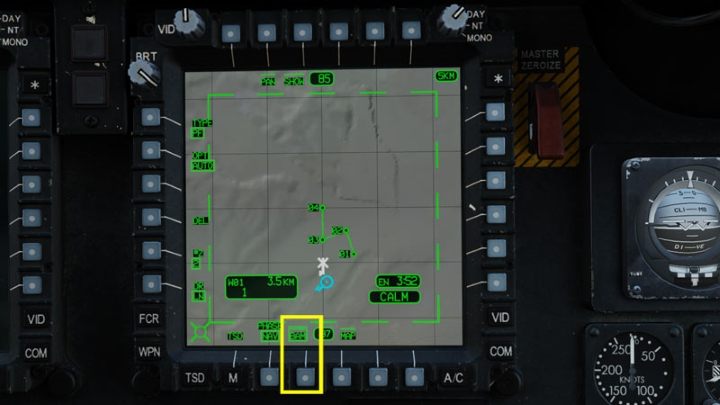
- MAP - Shows map options;
- "87" - Current heading;
- BAM - Battle Area Management - allows you to designate Priority Fire Zones (PFZ), attack zones and No-Fire Zones for wingmen;
- PHASE (NAV) - Switches the map between NAV (navigation) and ATK (attack) mode;
- TSD - Exit to the main menu;
- SA - Not implemented in DCS Apache;
- INST - Instruments - Displays the instruments required for ADF radio navigation.
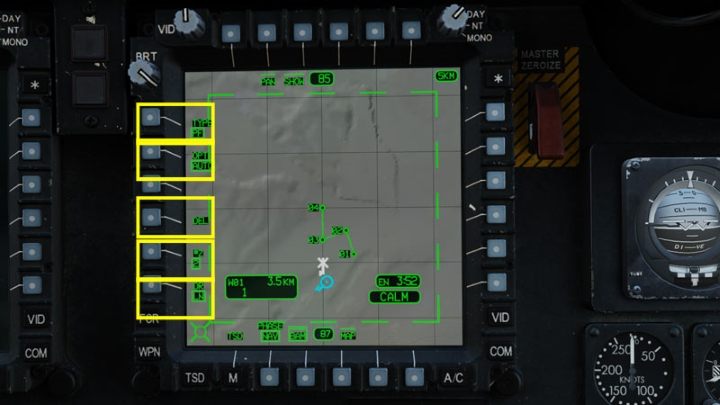
MAP - map options
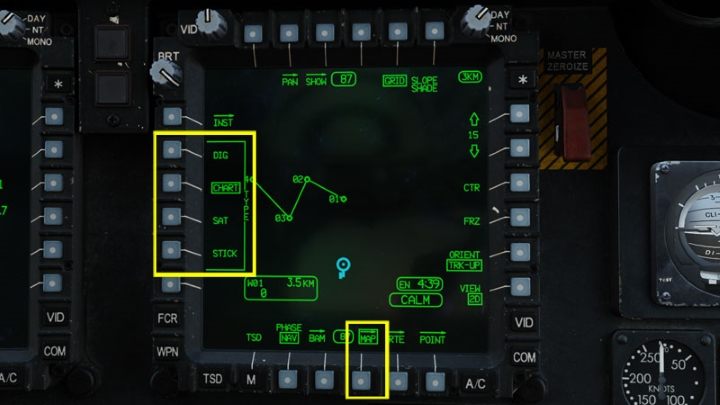
Press the MAP button to enter the Map submenu.
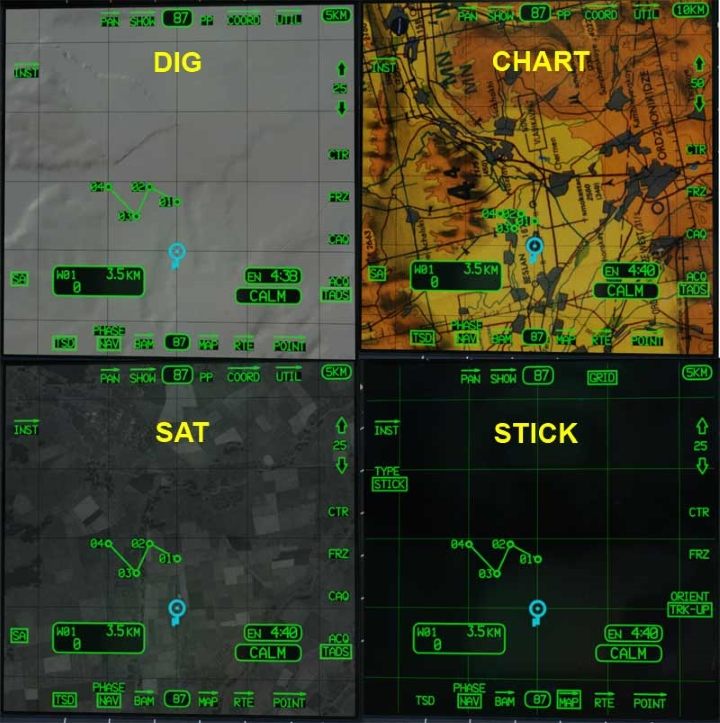
PAN options:
- DIG - Digital Terrain - shows a digital image of the terrain;
- CHART - shows a cartographic map (not available for all DCS World DLC terrains);
- SAT - Satellite - Shows a satellite image of the terrain;
- STICK - No map, shows only the grid.
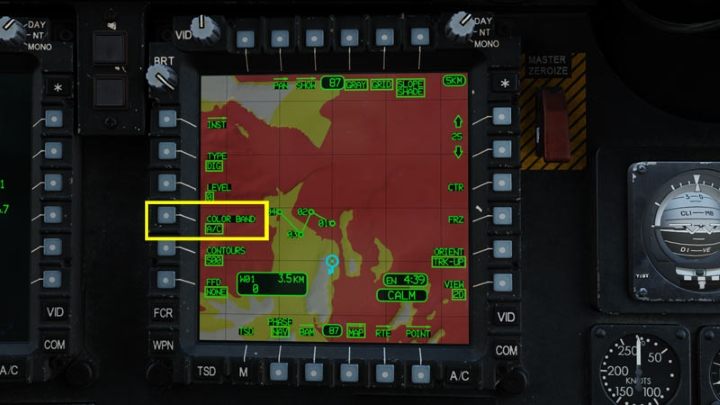
COLOR BAND - Digital Terrain map can show colored areas depending on terrain elevation:
- NONE - Colors disabled;
- A / C - Aircraft Altitude - Colors depend on the current flight altitude: red terrain is above the current altitude, yellow is within 50 feet of the current altitude;
- ELEV - Elevation - Colors depend on the terrain elevation above sea level (MSL) - from green (the lowest) to brown (the highest).
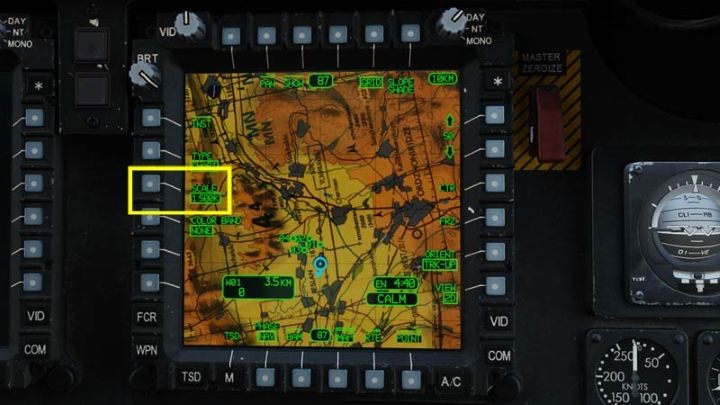
In Chart mode, you can change the scale of the map image by pressing the SCALE button.
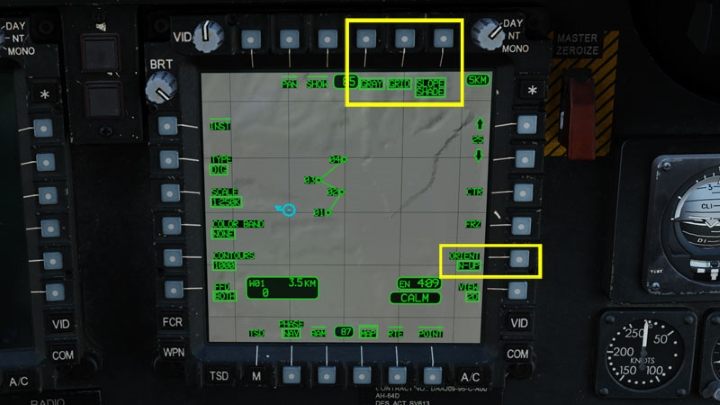
Other MAP options:
- GRAY - Switches the digital map image (DIG) between green and gray color (if the Color Band option is off);
- GRID - Enables / disables the grid;
- SLOPE SHADE - Switches on slope shading in DIG mode
- ORIENT - Switches the map display orientation: N-UP - North Up (12 o'clock); 12, HDG-UP - Current heading Up (12 o'clock); 12, TRK-UP - Current helicopter Ground Track Up
SHOW options
The SHOW menu allows you to filter the amount of information shown on the TSD screen at any given time. Some of them are available only in the navigation or attack mode.
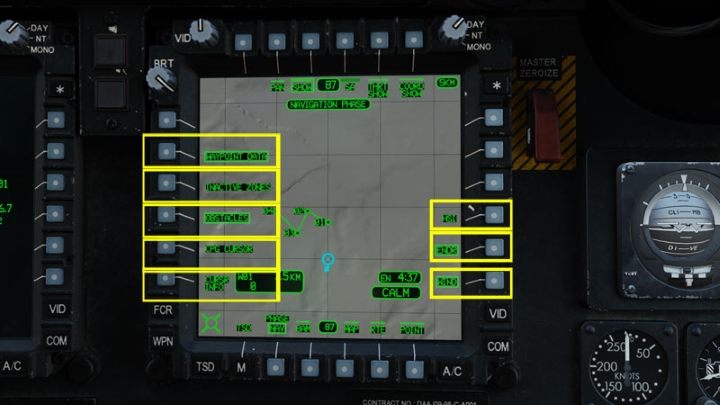
Press the SHOW button. NAV (navigation mode) options:
- WAYPOINT DATA - A box with the active waypoint data;
- INACTIVE ZONES - Shows inactive attack zones if created in BAM menu;
- OBSTACLES - Shows obstacles detected by the FCR radar (not implemented in the current DCS version);
- CPG / PLT CURSOR - Shows another crew member's cursor position on the TSD map;
- CURSOR INFO - Shows the coordinates of the current cursor position on the map;
- HSI - Shows the Horizontal Situation Indicator (Compass Rose);
- ENDR - Shows the Endurance time;
- WIND - Shows current wind status.
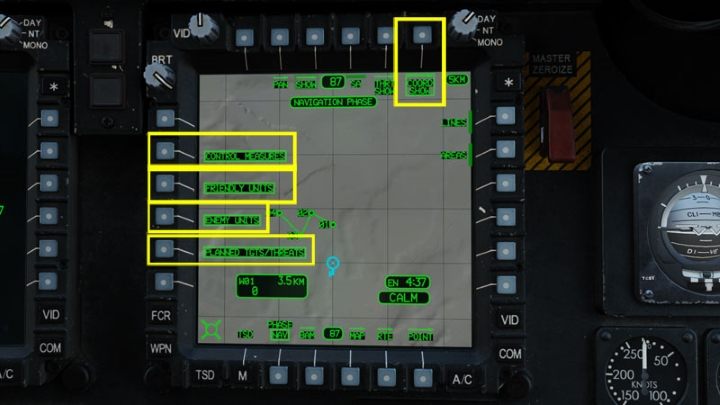
COORD SHOW options:
- CONTROL MEASURES - Shows created map points in the Control Measures category
- FRIENDLY UNITS - Shows friendly units map points in the Control Measures category;
- ENEMY UNITS - Shows enemy units map points in the Control Measures category;
- PLANNED TGTS / THREATS - Shows target / threat map points.
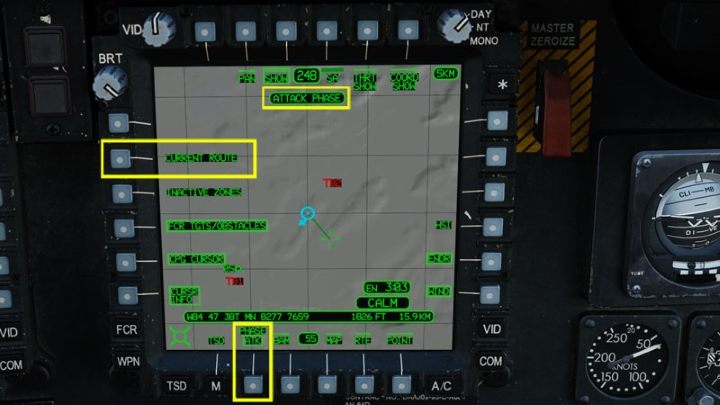
With the ATK (attack phase) mode on, the COORD SHOW options change. Icons of stored target points are visible by default, but the current route with waypoints is gone. Press the CURRENT ROUTE button to display the route.
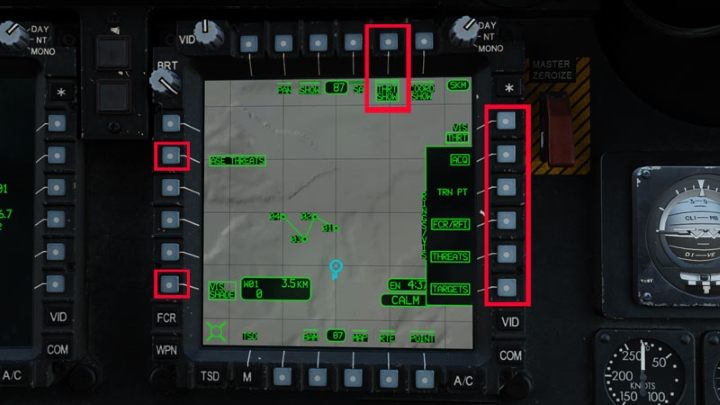
The THRT SHOW (Threat Show) button shows range rings around threat icons.
After enabling various types of map points in SHOW menu, the TSD screen can be very helpful.
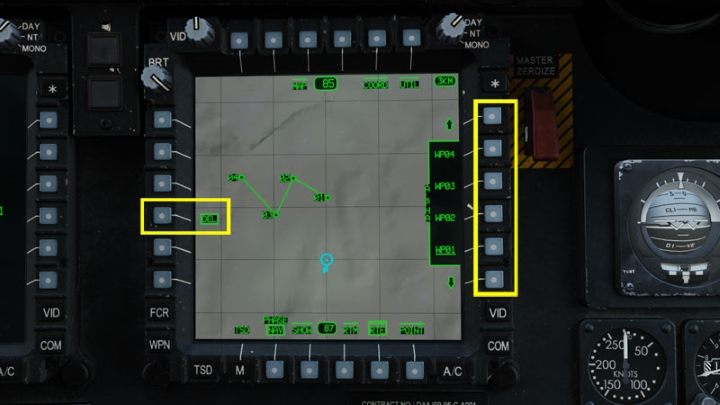
RTE Route options
Routes are sequences of Waypoints or Hazards and Control Measures points. Target points cannot be part of a route. A route is not a typical flight plan like in F-16C or F/A-18C. It shows how to get to the area of operation (Ingress), leave it safely (Egress), but it does not show any target locations. It helps to control number of aircrafts participating in the mission.
You can save up to 10 different routes with100 map points each. It is not always necessary to follow all the waypoints in sequence. You can always change the active waypoint with the DIRECT TO option. The routes can be created and edited in the RTE menu. Deleting a waypoint from the route does not delete it from the helicopter database. If a sequence of waypoints is created in the DCS Mission Editor, it will be displayed as an active Alpha route with W01 as a starting point.

Press the RTE button to display route options:
- ADD - Adds a point to the route;
- DEL - Deletes a route point;
- DIR - Allows to select any waypoint as the active waypoint;
- ALPHA Wxx-END - Shows all the waypoints in the route.
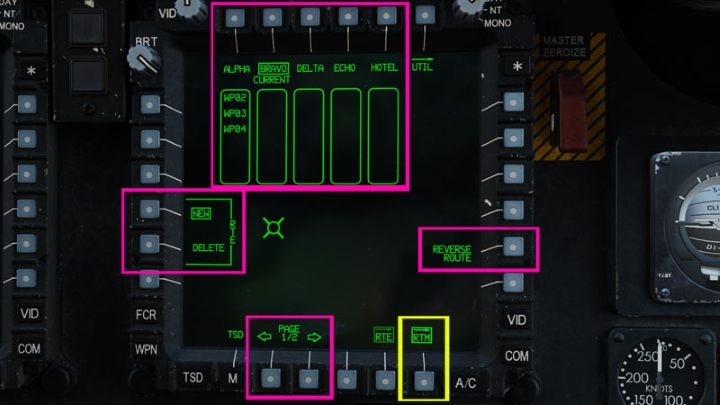
Press RTM (Route Manager) to enter the route management menu:
- ALPHA, BRAVO, DELTA ... - Activates one of the ten available routes;
- REVERSE ROUTE - Reverses the order of the route points
- NEW - Enables chosen route as an active route. It will be displayed as CURRENT route.
- DELETE - Deletes all points points in the selected route
- PAGE 1/2 - Switches to the next page where the other five routes can be chosen.
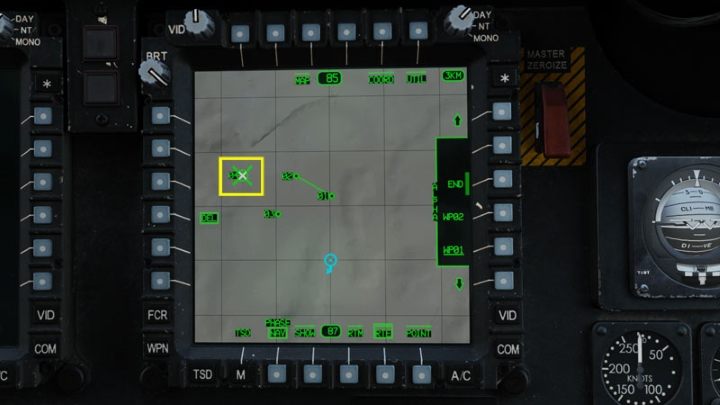
Adding points to the route
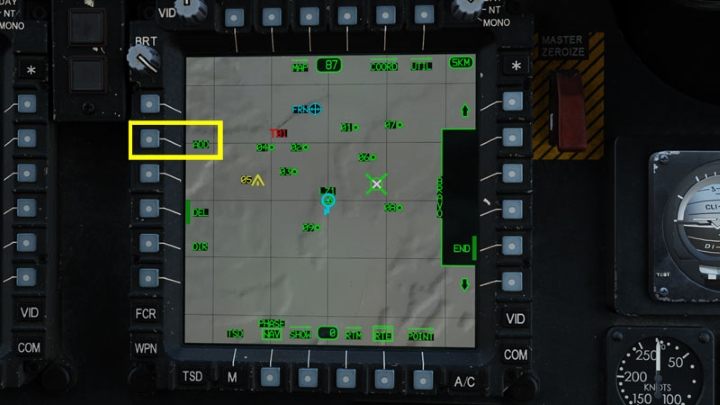
Make sure there are some waypoints created earlier that can be added to the route. Press the ADD button.
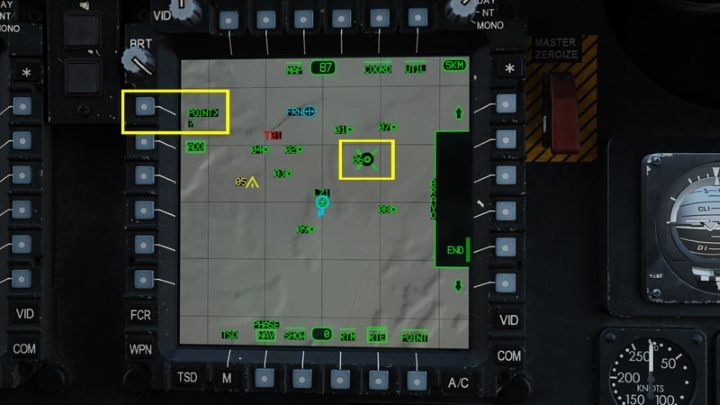
The easiest method is to place the cursor on a point and press Cursor Enter. Another way is to click the POINT? button and enter the waypoint number, e.g. W06 on the keyboard unit.
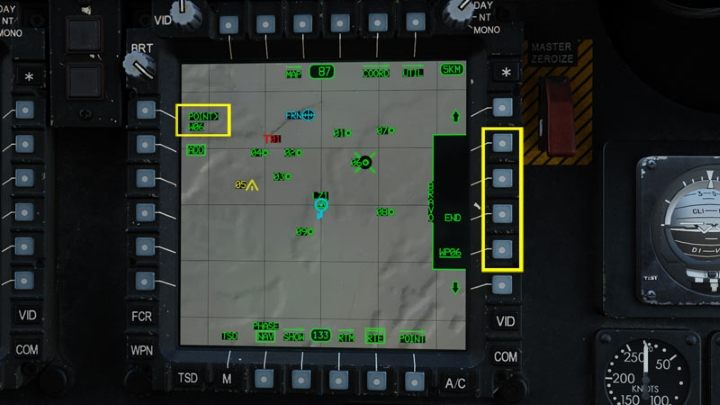
After that make sure the POINT option shows the number of the selected point and not "?" sign. Press one of the buttons on the right to add the new point to the route. END is the end of the route. It is always shown at the top. Repeat the process for all the remaining route points.
Deleting route points
Select the RTE menu, then click the DEL button followed by a desired route point from the list on the right.
Alternatively, click the DEL option and move the cursor over the chosen map point and press Cursor Enter. Note that the deleted waypoints are still stored in the system. They can be used again for different route or DIRECT TO option.
PAN - panning the map image
PAN allows you to view the entire map by simply moving the image. You don't have to zoom it in or out.
Click on the PAN option. Now you can pan the map with the Cursor Controller.
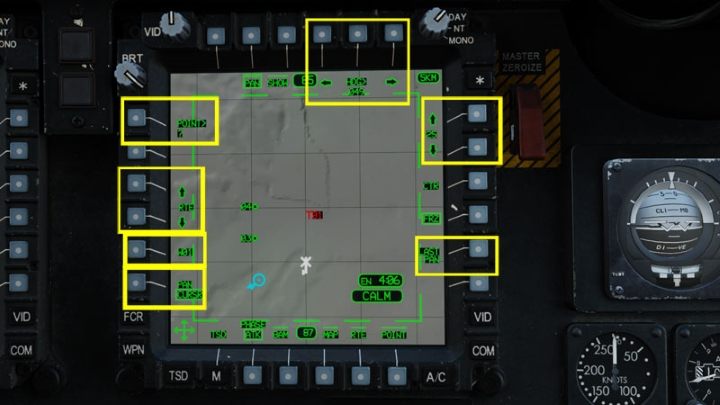
PAN options:
- Right / Left HDG - Rotates the map relative to the selected heading (HDG). You can enter the heading on the keyboard unit;
- Up / Down 25 - Map scale;
- LAST PAN - Returns to the previous PAN view;
- PAN NORM / CURSR - Switches between moving the map or moving the cursor;
- Wxx - Centers the view on a chosen waypoint;
- Up / Down RTE - Centers the view on a chosen route point;
- POINT? - Centers the view on a point typed on the keyboard unit (e.g. W04).
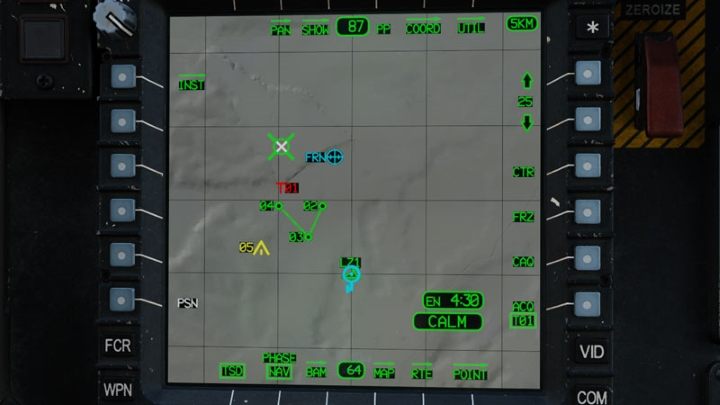
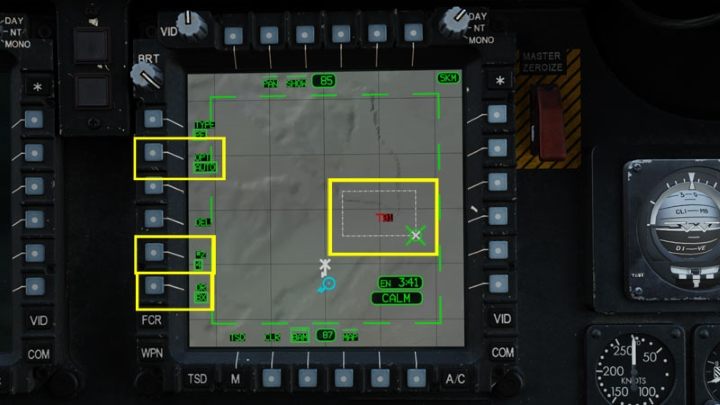
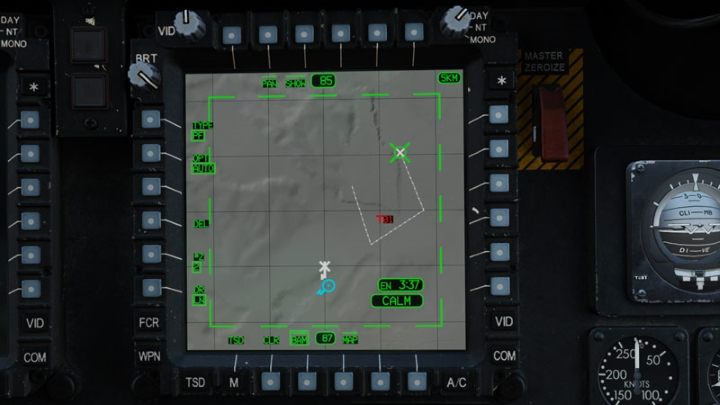
BAM - Battle Area Management
Battle Area Management lets you create and manage battlefield zones. It can be useful in complex multiplayer missions. It allows to create zones on the map with higher priority targets (PFZ - Priority Fire Zone) and lower NFZ (No-Fire Zone) for FCR radar and assign them to wingmen. You can create up to eight PFZ zones with one active and eight NHF zones with any number of active ones. Targets in PFZ have the highest priority for the FCR radar, and targets in the NFZ the lowest priority. In the BAM mode, the map image is "frozen".
Press the BAM button to enter the BAM screen:
- TYPE: PF / NF - Switches between Priority Fire Zone (PF) and No-Fire Zone (NF);
- OPT: AUTO / MAN / TRP - Selects zone drawing method: Auto, Manual and Target Reference Point;
- DEL - Removes PFZ zones;
- #Z - Selects the number of zones the created area will be divided;
- DR: BX / LN - Selects the shape of the zone: BX (Box - rectangle), LN (Line - quadrilateral polygon).
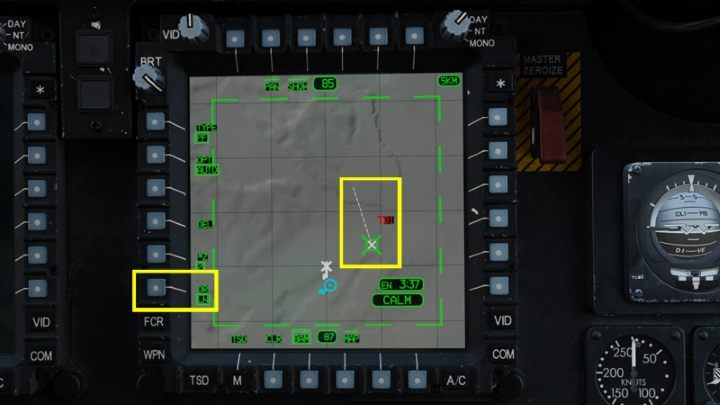
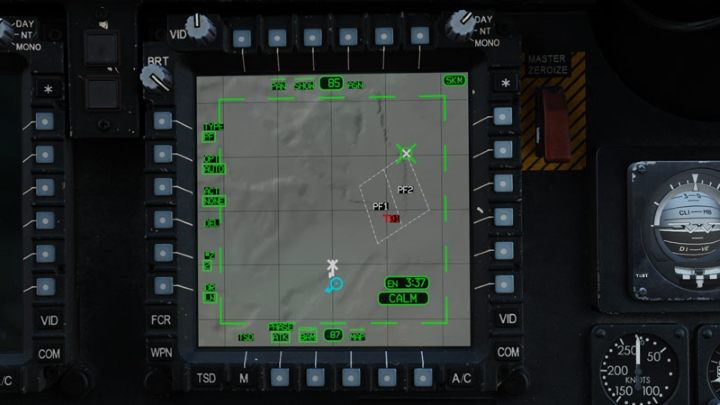
Creating PFZ zones - AUTO mode - BOX drawing
OPT mode: AUTO Divides the created area into the selected number of #Z zones. BOX is a way of drawing (selecting) an area by marking two opposite corners of a rectangle.
Choose OPT - Auto and DR - Box. Select the number of zones in #Z. Move the cursor over the first corner of the area and click Cursor Enter. Then move the cursor to the opposite corner - a dashed rectangle will appear on the map.

Press Cursor Enter once more to confirm the selected area. The box will be automatically divided into the indicated number of zones. A new ACT option will appear, allowing you to select one active PFZ zone. Active zone can be sent to the wingman by pressing the SEND button (not yet implemented in current DCS version).
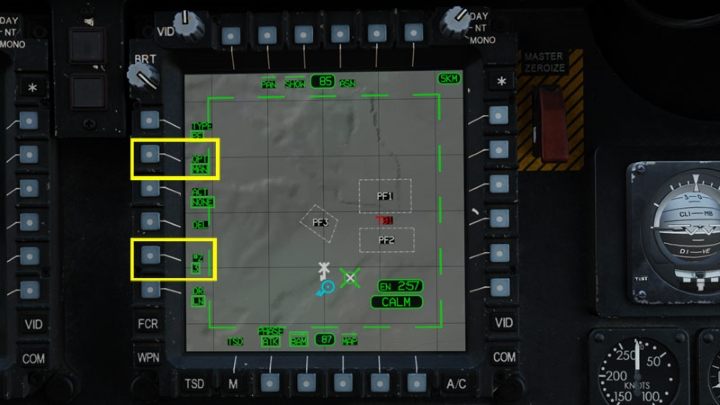
Creating PFZ zones - AUTO mode - LN drawing
The LN - Line drawing method allows to designate three lines of any length that will create an irregularly shaped quadrilateral.
Set the drawing method DR - LN. Place the cursor at the desired corner of the area and press Cursor Enter. Move the cursor to a new location and press Cursor Enter again to draw the first side of the quadrilateral.
Similarly, create the other sides.
After confirming the third corner, it will be automatically connected with the first point creating a quadrilateral. With the AUTO function, it will be automatically divided into PFZ zones. With the ACT button you can select the active zone to be sent over the Longbow network (not yet implemented in current DCS version).
Creating PFZ zones - MAN mode
The MAN mode allows to draw each PFZ zone individually - it will not divided automatically. You can draw as many zones as set in the #Z option. Any new zone created after reaching the #Z number will remove the previous one and become a new No. 1 PFZ. You can choose any drawing method - BOX or LN. You can also switch between drawing methods and draw some zones as Box, and other as Line.
Select the OPT - MAN function and define the number of #Z zones. Draw the zones.
Creating PFZ zones - TRP mode
In the TRP (Target Reference Point) mode you select only one point on the map. The system automatically creates four square zones around it of selected size: 1, 2 or 3 square kilometers.
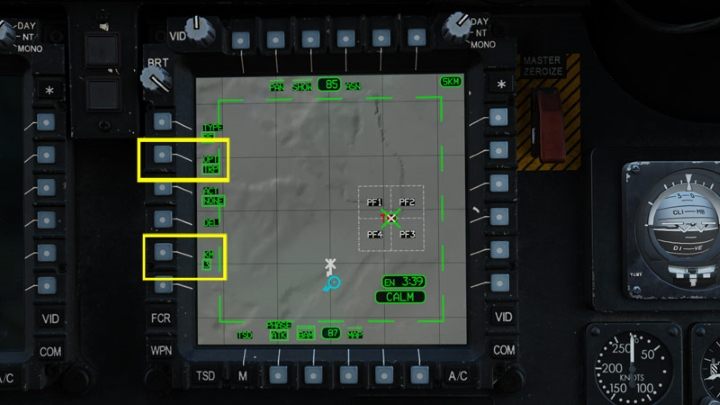
Select the TRP mode and the size of the zone in KM (kilometers). Move the cursor to the desired location and press Cursor Enter. Four PFZ zones will appear around it.
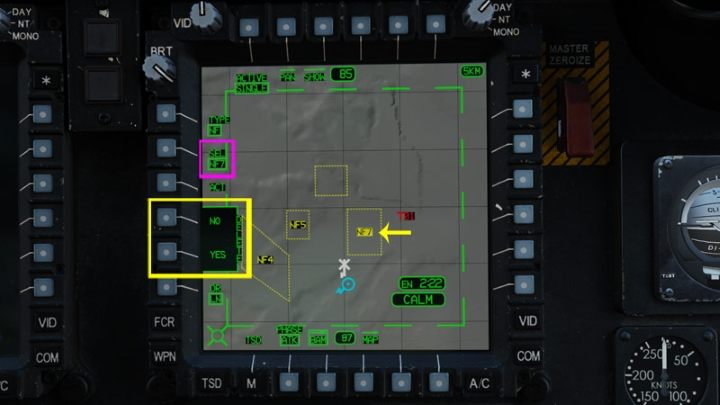
Deleting PFZ zones
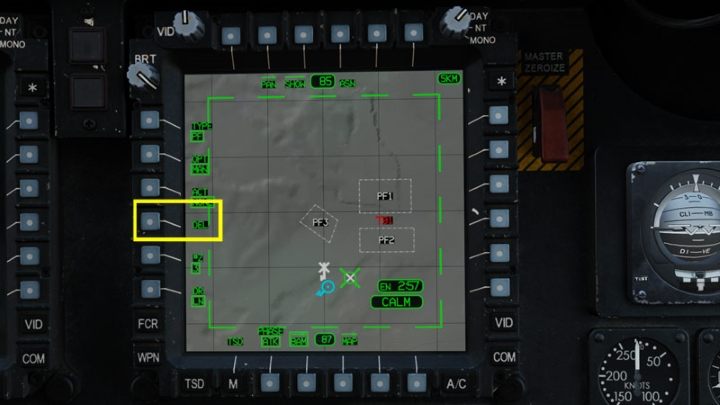
Press the DEL button.
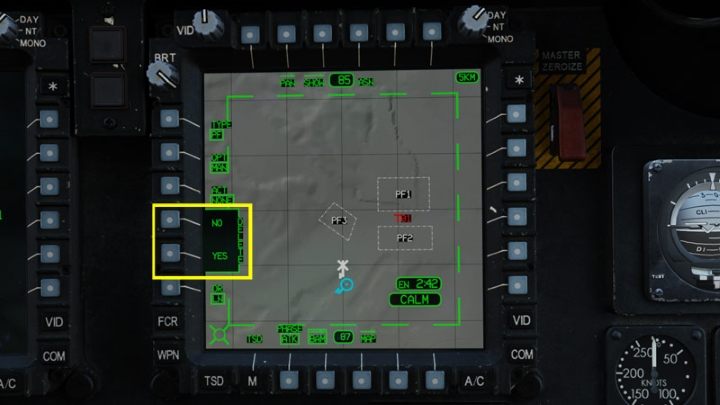
Confirm by clicking YES. Remember that all PFZ zones on the map will be deleted.
Creating NHF zones
The NFZ (No-Fire Zone) is created in the same way as PFZ, but without dividing of the area. Each created area is a single zone. You can activate one or more zones at the same time.
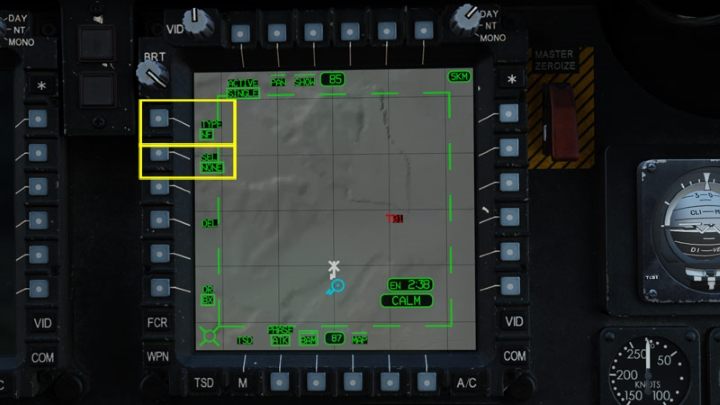
Select the TYPE zone type - NF and SEL - select the zone number to be created.
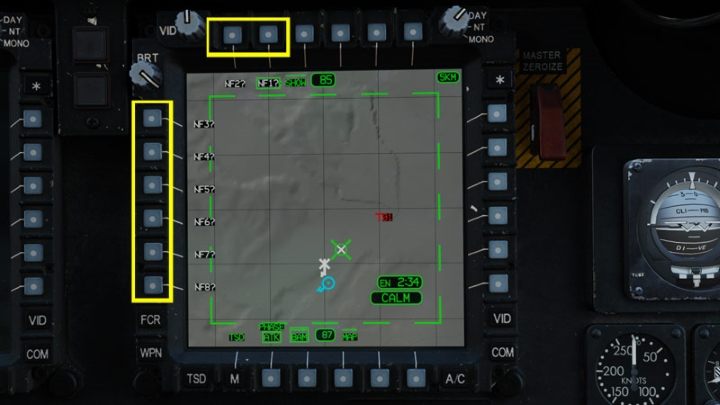
From the list N1? -N8? select the number of the zone you want to create.
Use the BOX or LN method to draw zones in the same way as for PFZ. Press the SEL function and the list N1? -N8? to draw another zone.
The ACT option allows you to activate the selected zone in the SEL section. Select MULTI option if you want to activate more than one zone.
Deleting the NFZ zone
The DEL function deletes the NFZ zone. Contrary to the PFZ, not all zones are deleted, but only those selected by the SEL function. Selected zones are marked yellow.