DCS AH-64D Apache: Basic GPS Navigation and map points DCS AH-64 Apache guide, instruction
This DCS AH-64D Apache tutorial page explains how to use GPS navigation. We show how to create map points and the difference between LATLONG and MGRS coordinate formats. We explain the differences between Control Measures, Targets, Waypoints, and Hazards points.
Last update: 06 July 2022
Navigation is a crucial part of every combat mission. In this chapter of the DCS AH-64D Apache simulator guide, we'll tell you how to use the GPS map, and navigate between waypoints or along the selected route. Here you can find the list of various categories of map points and instruction on how to create, delete or edit map points. Finally, we explain the differences between LATLONG geographic coordinates and the MGRS military grid format.
- Basic Navigation Overview
- Required keybinds
- Waypoint navigation
- DIRECT TO - direct flight to a selected waypoint
- Map points - categories, adding, editing
- MGRS and LAT / LONG coordinates
Basic Navigation Overview
The AH-64D Apache uses a lot of systems for navigation in different conditions and for flying at low altitudes. There are two main GPS inertial navigation systems (EGI), to determine aircraft's position. Navigating to the next waypoint in the Apache is quite simple, but the first notable thing is the fact that traditional "waypoints" for navigation (which you can set in the mission editor) are only part of a much bigger whole. There are many other markers the map. Moreover, they usually do not indicate the home airbase, nor are located directly at the target position. They only mark a sort of a safe route to the mission area.
This is due to the specific role of helicopters, which often operate and search for targets within very limited area, without GPS-guided weapons. In such conditions, it becomes crucial to have the best knowledge of the area of operation. Information about targets is only a part of it. Details such as the location of power lines, radio towers and other tall objects are also very important.
All this information is either included in the mission brief or may be provided during the mission, in radio messages. The crew's task is to enter all the available data into the helicopter's computer and the mighty Tactical Situation Display (TSD) map. Various categories of map markers, distinguished by colors and icons, are helpful here.
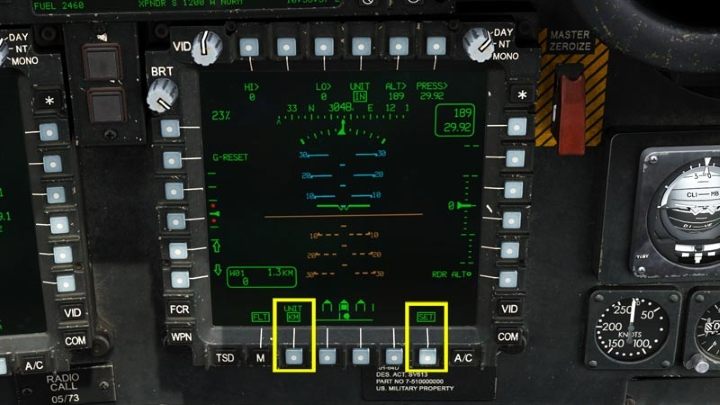
NOTE: The US Army ground forces use kilometers as the unit of measure, not miles which are standard in the US Air Force. All distance information on the IHADSS and the TSD map is provided in kilometers by default. On the FLT screen there's an option to change it to nautical miles. You can find it by pressing the SET and then UNIT buttons on the FLT screen, but it is not used much in practice.
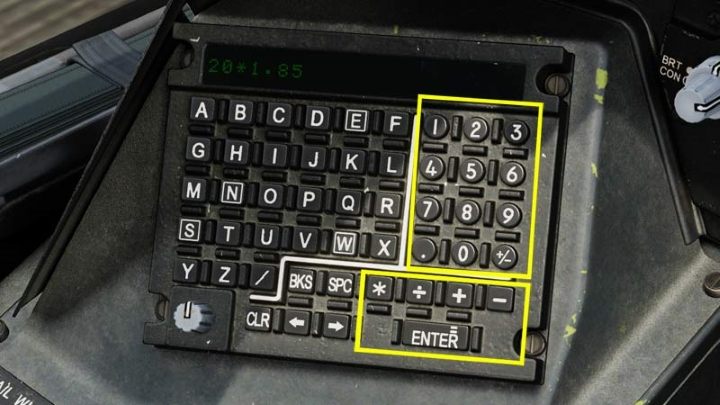
Apache pilots only use miles in communication with air force pilots and they simply use memory conversion: KM / 1.85 = NM, NM x 1.85 = KM. In case you need it, the Keyboard Unit in the Apache also works as a calculator.
Required keybinds
For convenience, the buttons should be assigned both in the PILOT AH-64D and CPG AH-64D categories. All the buttons used for the map and navigation are either on the collective or the TADS hand grips, so it's worth having them within quick access.
Buttons for both categories Pilot AH-64D and CPG AH-64D:
- Cursor Controller Left - Moves the map cursor left
- Cursor Controller Right - Moves the map cursor right
- Cursor Controller Up - Moves the map cursor up
- Cursor Controller Down - Moves the map cursor down
- HOCAS Cursor Controller Axis X / Y - alternative cursor control for analog axis
- Cursor Enter Depress - confirms the selection with the cursor
- Cursor Display Select Button Depress - switches the cursor between MPD screens
- Show kneeboard - displays the kneeboard with crucial information about the mission (RShift + K by default)
- Kneeboard Next / Previous Page - turns kneeboard pages ("]" " [" by default )
Buttons only for CPG AH-64D category:
- Sight Select Switch Right - TADS - activates TADS as an active sight
- LHG CURSOR CONTROLLER / ENTER - analog axis that controls the cursor on the MPD
- LHG CURSOR CONTROLLER / ENTER - confirms the selection under the MPD cursor
- RHG Sight Manual Tracker - moves the TADS crosshair
- LRFD Trigger 2nd Detent - activates laser rangefinder and designates a target (as long as the button is pressed)
- LHG STORE / Update Switch - STORE - saves a map point in the TSD system
Waypoint navigation
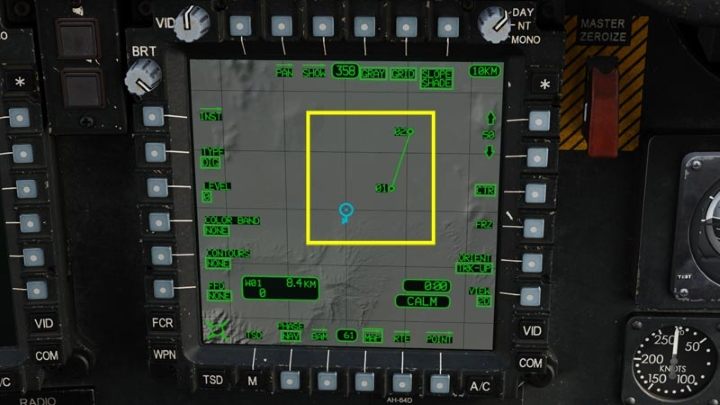
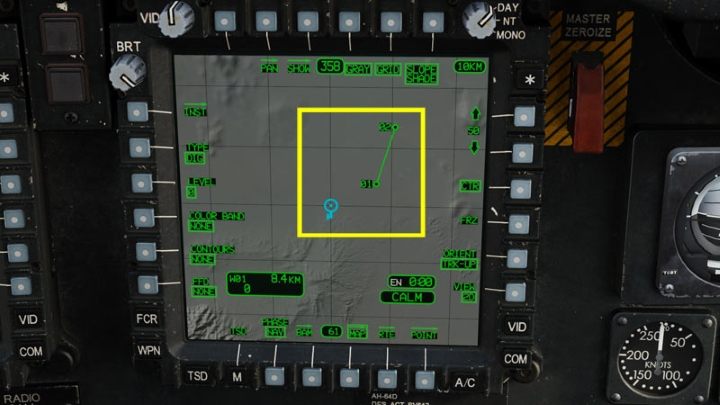
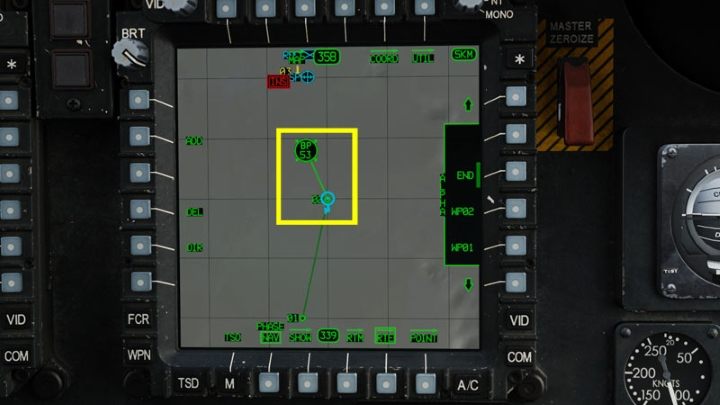
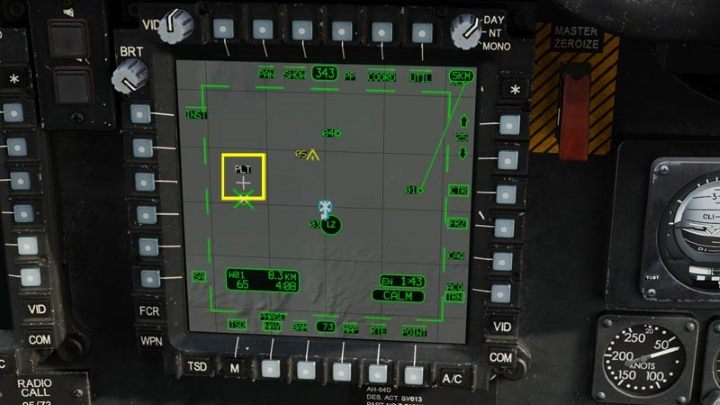
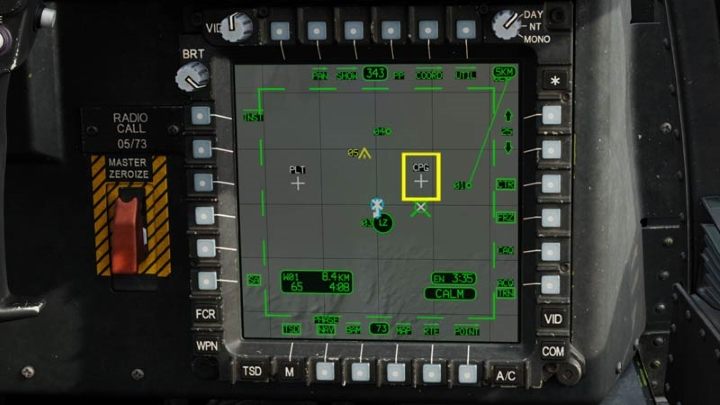
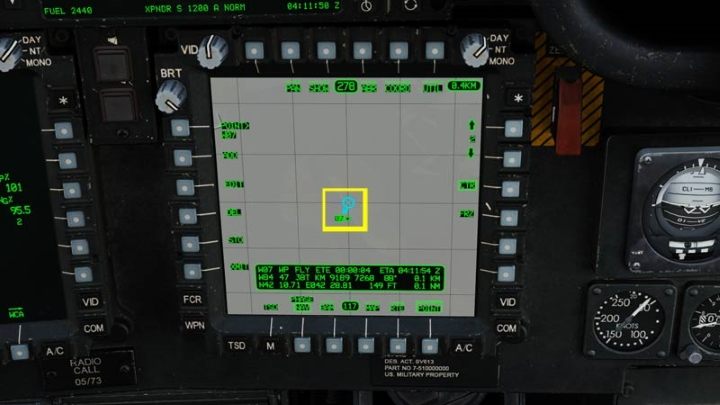
If any waypoints have been created in the mission editor (or in the cockpit), they will be visible on the TSD map as W01, W02, W03, etc. After take-off, W01 is set as the first active waypoint, although the TSD map does not show any line connecting the symbol of our helicopter (Own Ship) with the W01 point.
If you cannot see any route points, change the map scale and center the image.
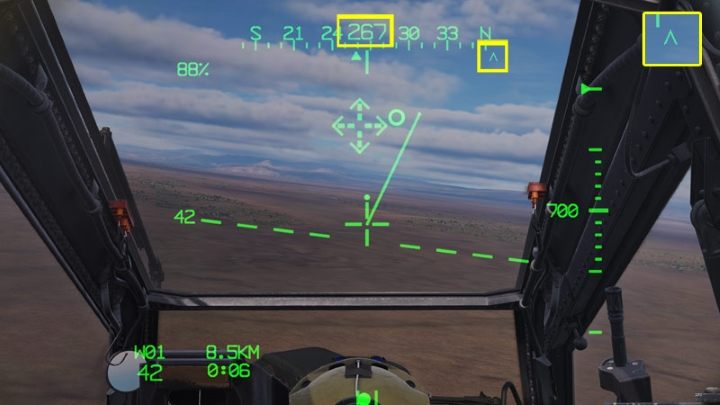
Navigation indications can be seen on the IHADSS in modes: Transition and Cruise. The direction to the active waypoint is shown by a small arrowhead facing up (Command Heading Chevron). The current heading is shown in enlarged digits. Turn the helicopter so that the Command Heading Chevron is in the center of the heading tape.
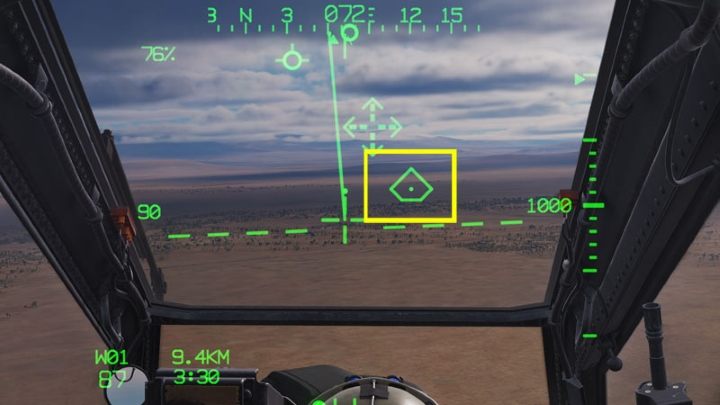
When flying towards waypoint, another indiction is a pyramid-like symbol called Navigation Fly-To-Cue. It shows the exact location of the selected waypoint.
Aim the Flight Path Vector (FPV) at or above the "pyramid" to fly straight to the waypoint.
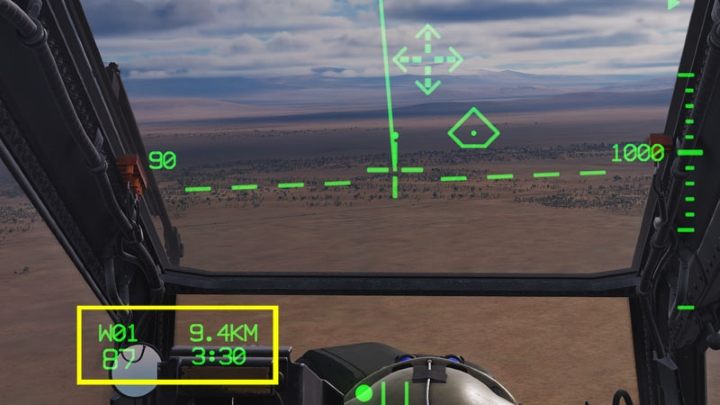
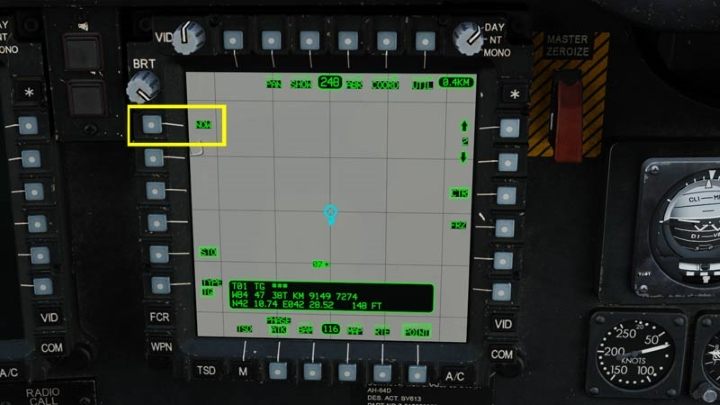
The last piece of information on the IHADSS is the Waypoint Status Box, which includes:
- waypoint number (W01);
- distance in kilometers (9.4KM);
- current Ground Speed (87)
- time remaining to reach the waypoint at the current speed (3:30)
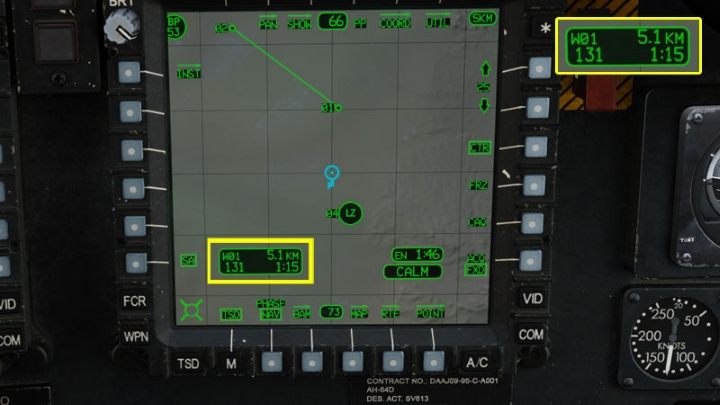
Waypoint Status information can also be seen on TSD.
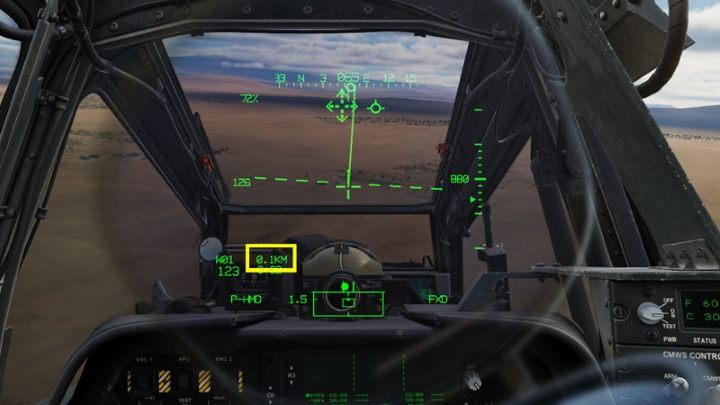
After reaching the distance of 0.1 km to the designated waypoint, it will automatically change to the next RTE route waypoint (W02, W03, etc.). If there are no more waypoints on an active RTE route, IHADSS will continue to show the distance and heading to the last waypoint.
DIRECT TO - direct flight to a selected waypoint
At any time, you can select any map point as the active waypoint with the DIRECT TO function and get directions on the IHADSS to fly to it. DIRECT TO points can be any points in all categories, except for Hazard category. You can set the DIRECT TO point in several ways.
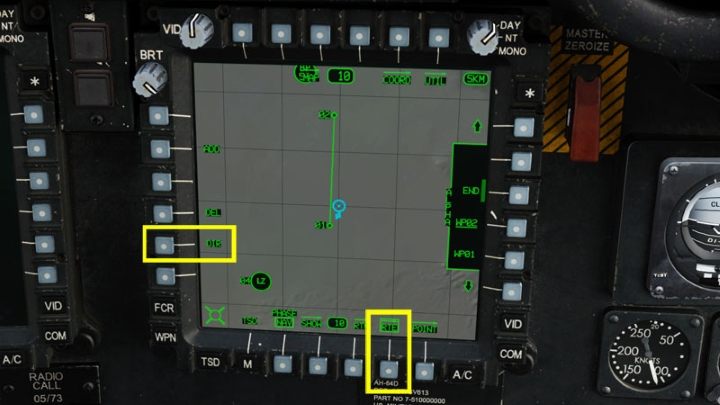
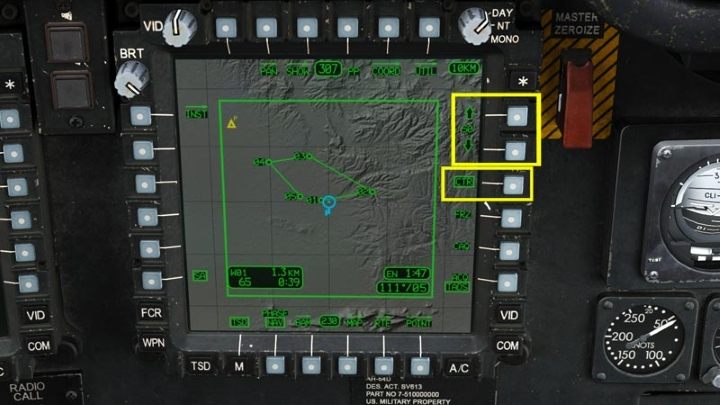
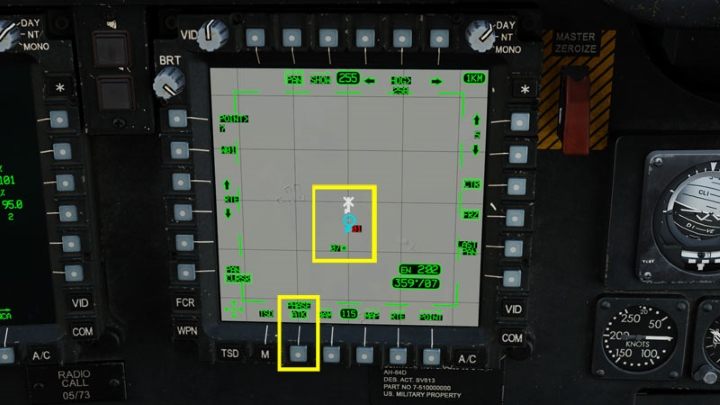
Select the TSD map screen. Then the RTE (Route) function followed by DIR (Direct To).
Use the Cursor Controller Right / Left / Up / Down or HOCAS Cursor Controller buttons / axis to move the cursor to the selected point and press the Cursor Enter Depress button. If there is no cursor on the TSD screen, it is on the other MPD monitor. Press Cursor Display Select Button Depress or move the cursor to the edge of the screen and doubleclick Cursor Controller Right (or Left) to switch it to the second screen.
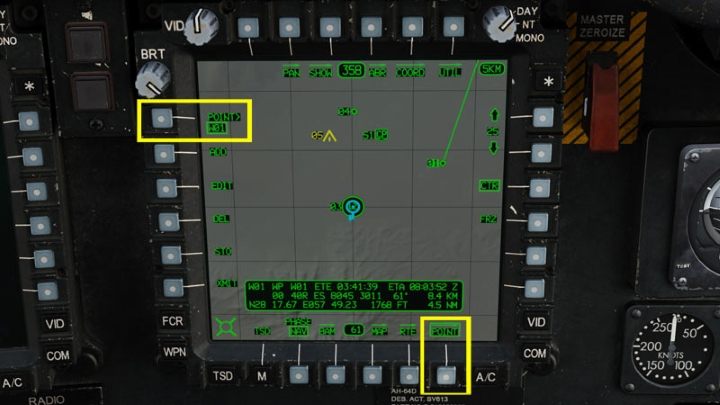
Another method is to select POINT> function,
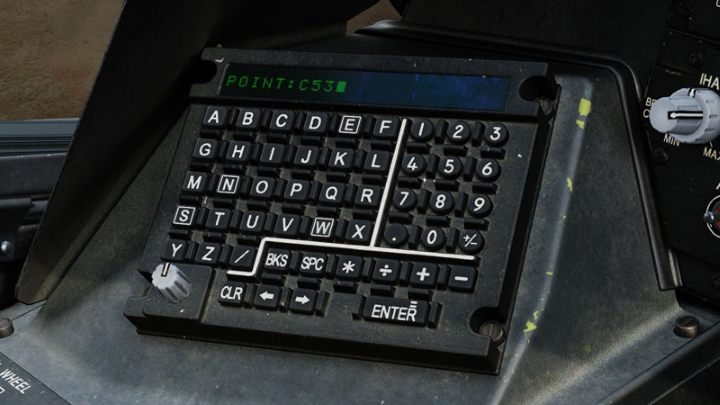
enter the point number on the Keyboard Unit, e.g. C52, W02 etc. and confirm with Enter.
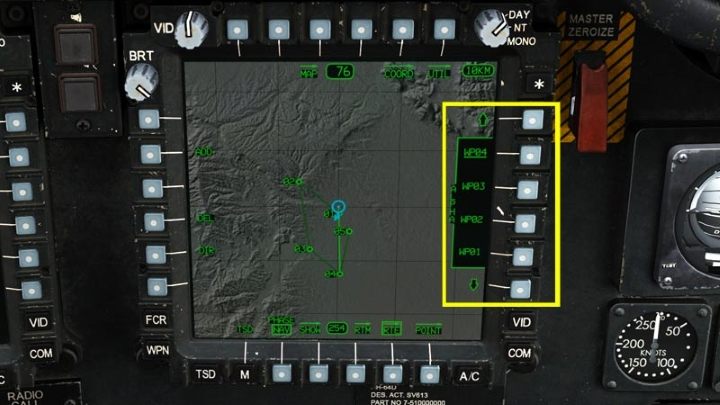
The third method applies only to points connected into a route RTE. Just choose one from the list.
A line will appear on the TSD screen connecting the helicopter symbol (Own Ship) to the selected point. Corresponding indications will also appear on the IHADSS.
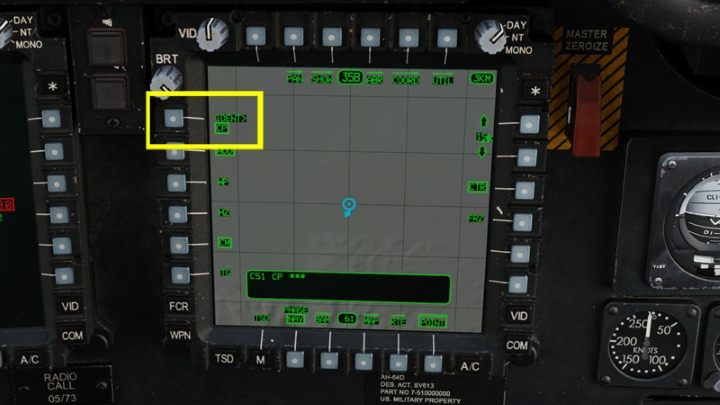
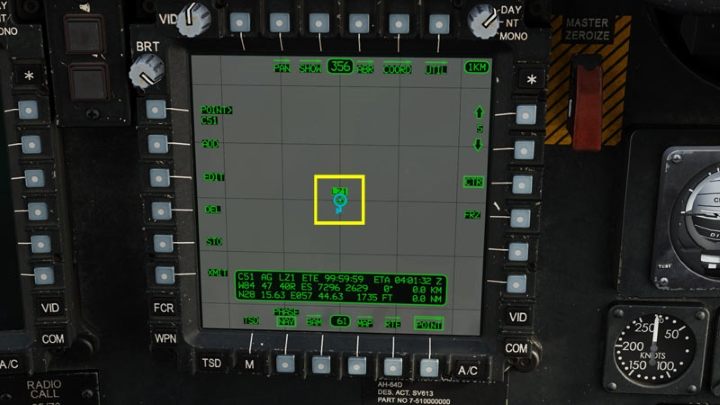
Map points - categories, adding, editing
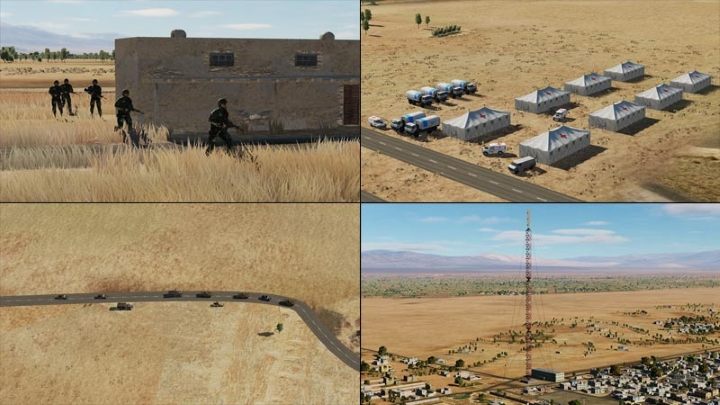
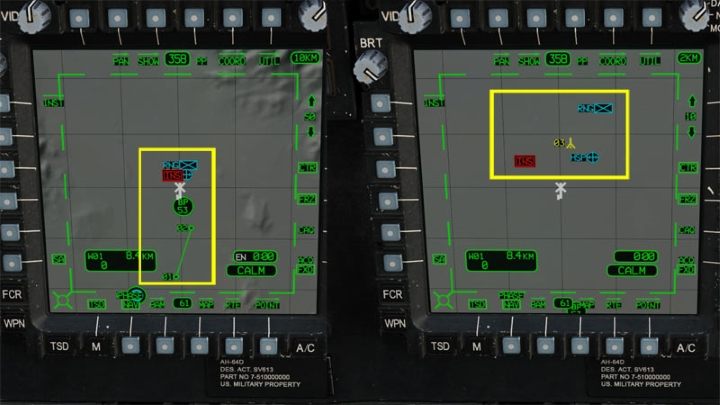
The map points are best explained on a specific example. Imagine a mission area where, in addition to enemy forces, there is also a field hospital, a squad of allied soldiers and a very high TV tower. Not to mention the possible presence of hidden anti-aircraft guns. All of these objects pose a problem or threat for a helicopter.
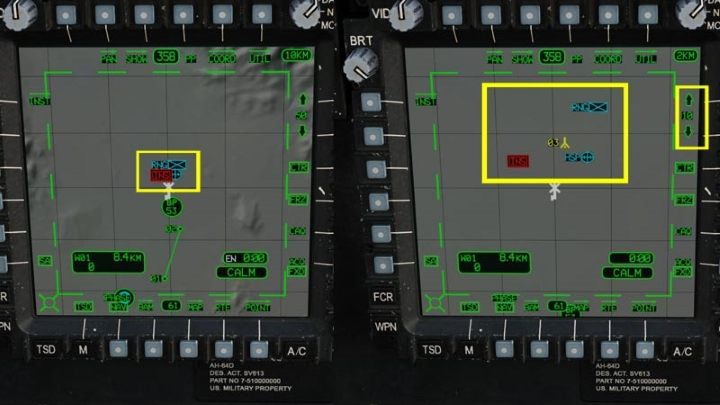
In DCS World CPG George AI cannot distinguish friend from foe (although it will be possible in future, with upcoming updates) and can destroy a civilian or friendly truck if you order him too hastily to open fire at vehicles. The same danger applies to a squad of allies, and knowing the exact location of the TV tower is also useful when flying at low altitudes. In the example above, you can see four important pieces of information from the previous picture shown as map points: a red icon of enemy unit, a yellow icon of TV tower, a field hospital, and the allied squad of Rangers. All this information can be transfered to the TSD map as map points dedicated to each object and divided into several categories.
Map points - categories
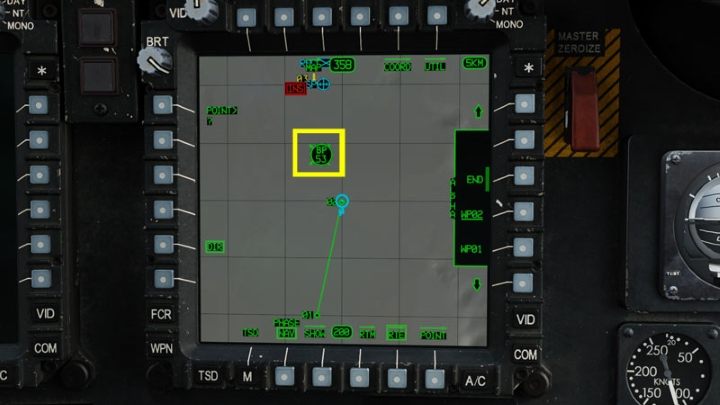
TSD map points fall into the following categories:
- Waypoints / Hazards No. 01-50 (normal waypoints, landing sites, checkpoints / hazards, e.g. TV / Radio / GSM towers, power lines). Waypoints are marked in green, Hazards in yellow.
- Control Measures No.51-99 (all allied or enemy units and objects important for the mission, e.g. airbasess, FARPs, armored divisions, infantry battalions, squads, artillery, field hospitals, etc.) Allied CMs are marked blue, enemy - red.
- Targets / Threats nr 01-50 (all hostile targets and threats, e.g. tanks, anti-aircraft SAM sites, infantry units. In the database, they are numbered 100-149, but on the TSD from 01 to 50). Targets and threats are marked red.
- Targets / Threats No. 51-56 (targets and threats, but reserved for numbers from 51 to 56). These are Terrain Points determined by the CAQ function - created directly with the cursor on the map by the pilot or CPG. They are also marked in red color.
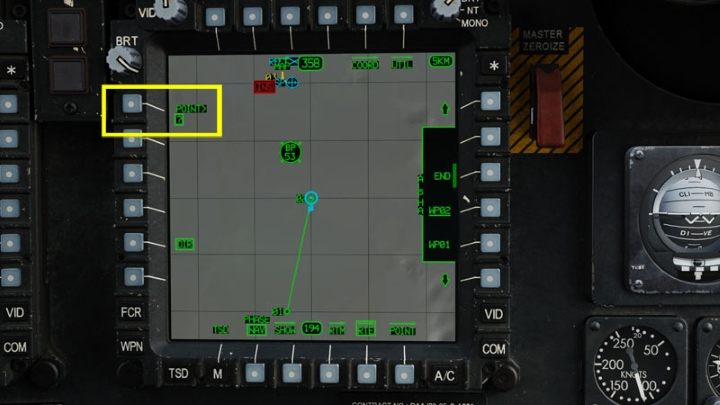
To quickly distinguish what a given point means, in addition to the graphic icon, the most important information is the unique identification abbreviation (ID) for each point type. They are necessary when entering data into the TSD system. Remembering dozens of acronyms can be difficult, so on the TSD screen there is a database of all ID abbreviations.
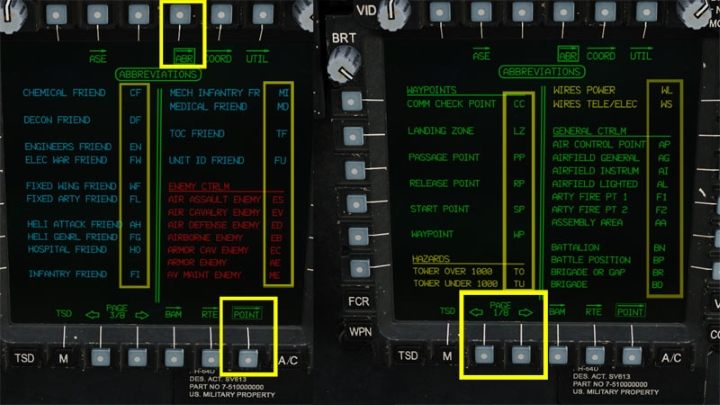
Press the POINT button, then the ABR button. You can scroll it with on screen arrows through 8 pages!
The most commonly used abbreviations are:
Waypoints / Hazards
- WP - Waypoint
- LZ - Landing Zone
- CC (Comm Check Point) - radio communication checkpoint
- TO (Tower Over 1000) - A TV / radio tower over 1000 feet high
- TU (Tower Under 1000) - A TV / radio tower less than 1000 feet high
- WL (Wires Power) - Power lines
- WS (Wires Tele / Elec) - telephone poles
General Control Measures
- AG (Airfield General) - airbase. It is a common practice to enter the first point labeled CM51 as your home base / starting point.
- AI (Airfield Instrument) - an airbase with ILS system
- AL (Airfield Lighted) - an airbase with an illuminated runway
- BP (Battle Position) - location to search for targets
- CP - Checkpoint
- FF (FARP Fuel Only) - a forward landing site with fuel only
- FM (FARP Ammo Only) - a forward landing site with ammunition only
- FC (FARP Fuel / Ammo) - a forward landing site with fuel and ammunition
- HA - Holding Area
- FI (Infantry Friend) - friendly infantry
- HO (Hospital Friend) - friendly field hospital
- FU (Unit Friend) - friendly unit
- AM (Armor Friend) - friendly armored unit
- AE (Armor Enemy) - enemy armored forces
- EI (Infantry Enemy) - enemy infantry
- EU (Unit Enemy) - enemy unit
Targets / Threats
- AA (Gun Air Defense) - enemy anti-aircraft gun
- NV (Naval System) - enemy naval unit
- 2 (SA-2) - SAM 2 anti-aircraft missile battery
Map point - required information
Adding map points requires entering the following information into the mission computer:
- Point category ( WP, HZ, CM, TG )
- ID abbreviation ( IDENT )
- Any helpful text up to 3 characters ( FREE )
- MGRS or LAT / LONG coordinates
- Point elevation (above Mean Sea Level) in feet (ALTITUDE )
All data should be included in the mission briefing documents or in the pilot's kneeboard. Information may also be provided in radio messages during the mission. Hints on the coordinates types can be found further in this chapter.
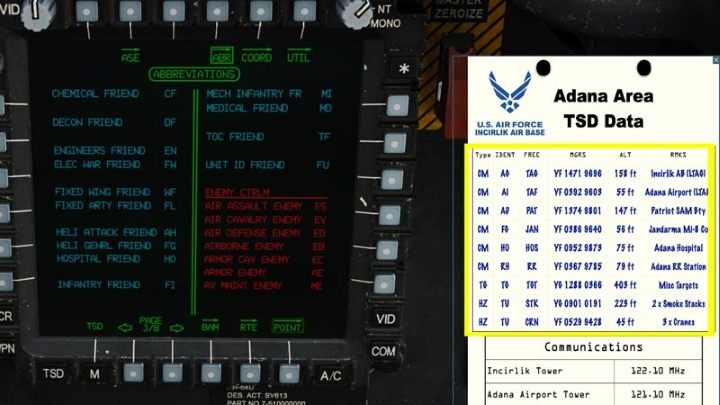
Press RShift + K to display the kneeboard. Press "[]" to search data page.
Map points - adding
On the TSD screen, select:
- POINT
- ADD
- and choose category: WP, HZ, CM, TG
In this case, it's the CM for the Control Measures category with home airbase.
Press the IDENT button.
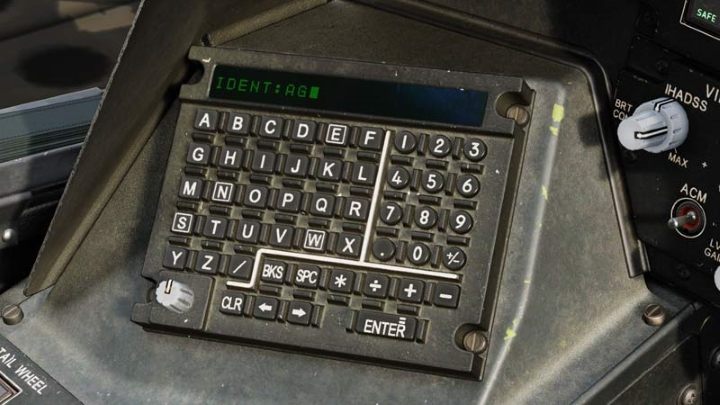
On the keyboard unit, enter the selected point ID abbreviation according to the ABR abbreviation database and confirm with Enter. For an airbase / landing site, these can be: AG, AL, FC, etc.
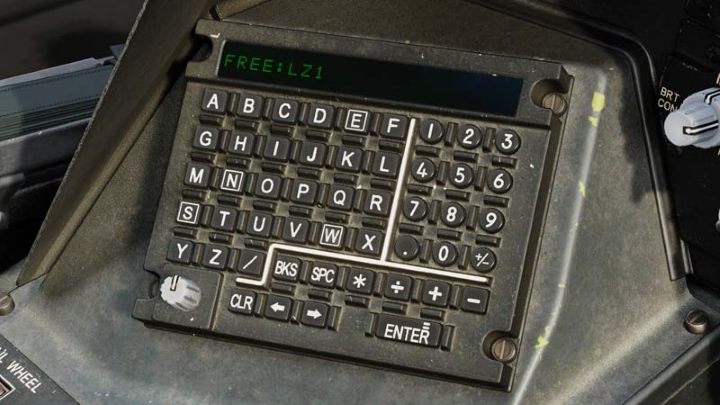
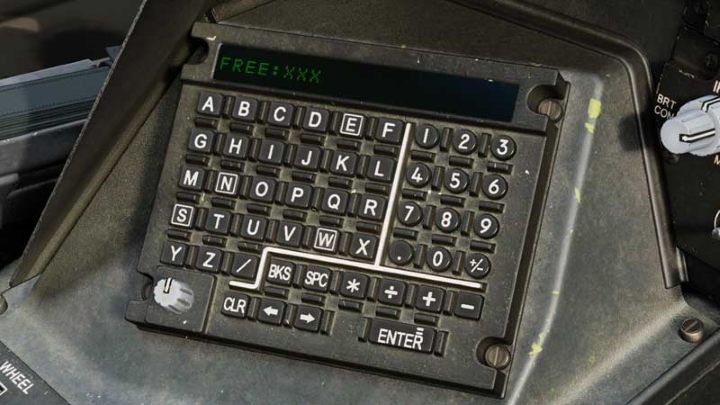
The keypad will display FREE . You can put any text that can help you to identify the point later. The limit is 3 characters.
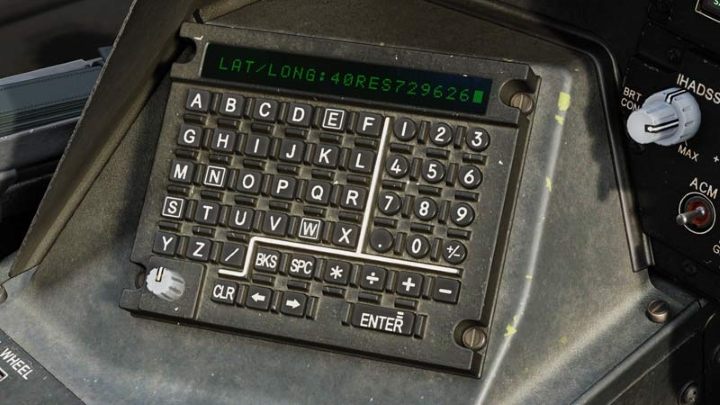
The next step is to enter the coordinates MGRS or LAT / LONG . By default, the current helicopter location coordinates are already entered in MGRS format, provided that the navigation system alignment has finished.
When creating a waypoint for your airbase while waiting on the ground, you can simply confirm the coordinates with Enter, BUT ONLY if you have finished the navigation system alignment during Cold Start. Otherwise the data will be very inaccurate and show a different location. The safest method is to type everything manually. The CLR key clears entered text and the BKS works as Backspace. MGRS data can be entered even if the keyboard unit shows LAT LONG.
If the entered data is incorrect, the text on the keyboard unit will flash. Detailed information on obtaining coordinates can be found further in this chapter.
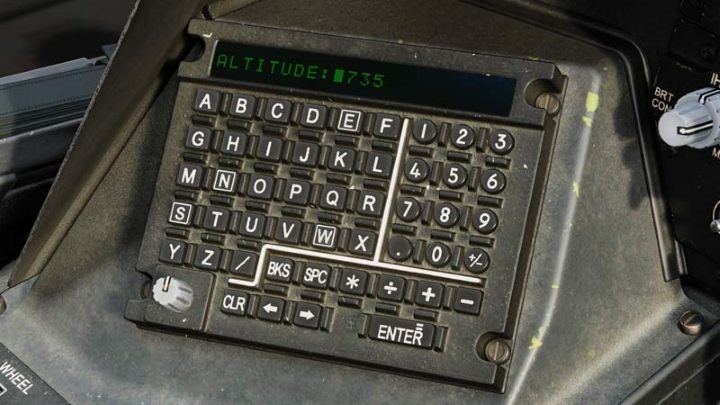
The last step is ALTITUDE , which is the elevation above mean sea level in feet. The system usually suggests the correct value here, as long as the coordinates have been entered correctly. Confirm with Enter.
If everything is done correctly, the point will appear on the map, on condition that the visibility for a given point category is turned on in the SHOW option. More information on the operation of the TSD system can be found in a separate entry: TSD - Tactical Situation Display.
In a similar way you can add points from other categories.
Adding map points with the TSD cursor
This is much faster than the manual method, but requires a good understanding of what is shown on the TSD map. Adding a point with the cursor applies to only one, default ID in categories:
- Waypoints - default ID - WP (Waypoint)
- Hazards - default ID - TU (Tower Under 1000)
- Control Measures - default ID - CP (Checkpoint)
A point in the TG (Target) category cannot be added with cursor designation. Points can be edited later, but without changing the ID, only in the following positions:
- FREE (free text)
- MGRS / LAT LONG (coordinates)
- ALTITUDE (elevation above mean sea level)
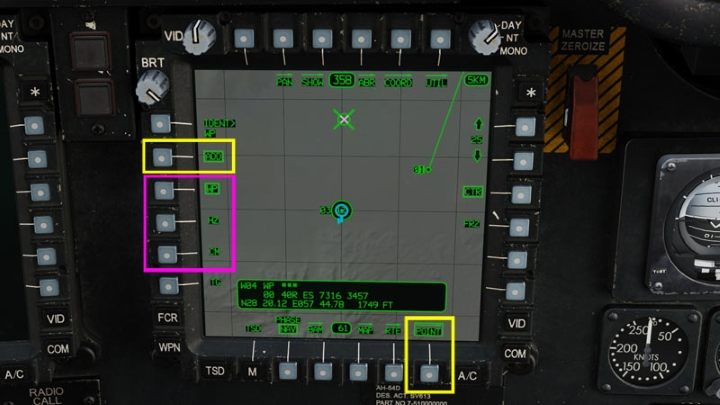
On the TSD screen select POINT, then ADD. Select the desired category: WP, HZ or CM.
Use the Cursor Controller Right / Left / Up / Down or HOCAS Cursor Controller keys / knob to move the cursor to the desired location and press the Cursor Enter Depress button. The new WP point will be created on the map.
CAQ - adding Terrain/Target Points
An equally quick method is adding Terrain Points by the pilot (PLT) or CPG gunner. This is also done using the cursor and the CAQ (Cursor Acquisition) function. These points are automatically treated as targets and numbered from T51 to T56, although on TSD screen you can see them as white crosses with the appropriate signature of the point creator (PLT or CPG). They allow to quickly indicate the location of a point of interest to another crew member. They don't need to be targets. These points cannot be edited.

On the TSD, select the CAQ function and move the cursor to the desired place.
Press Cursor Enter Depress. A white cross with the signature PLT will be created, if the point was created by a pilot.
In the gunner's seat you can create the CAQ point in the same way, but it will be marked as CPG.
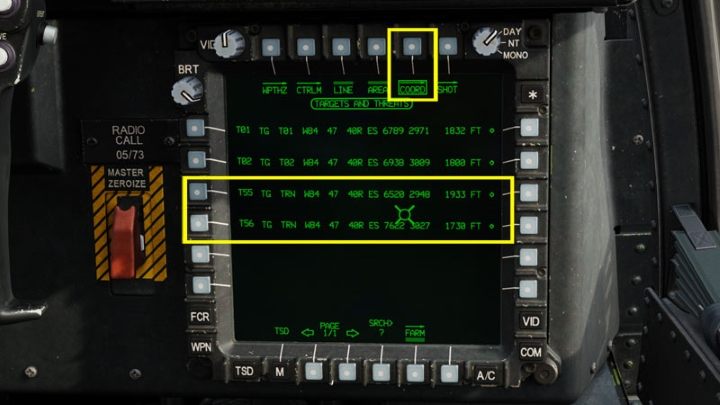
The COORD function allows you to view a list of created points. Terrain Points appear as T51-T56.
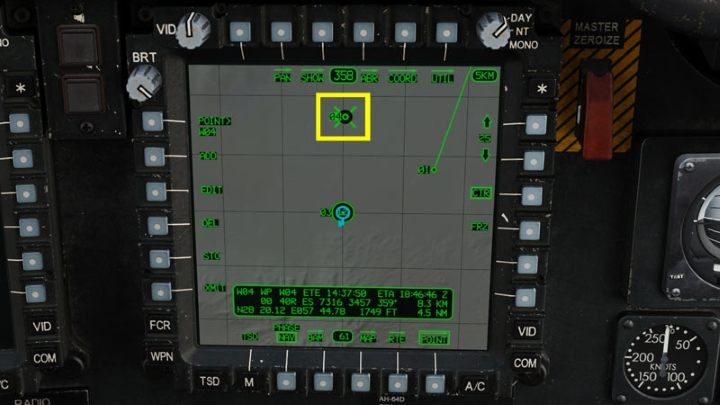
Adding Fly-By Points (STO)
Another way of adding points is the STORE option, to save the point over which the helicopter is currently flying or hovering. Depending on the active TSD phase (NAV-navigate or ATK - attack), the point will be added in the Waypoint or Target category.
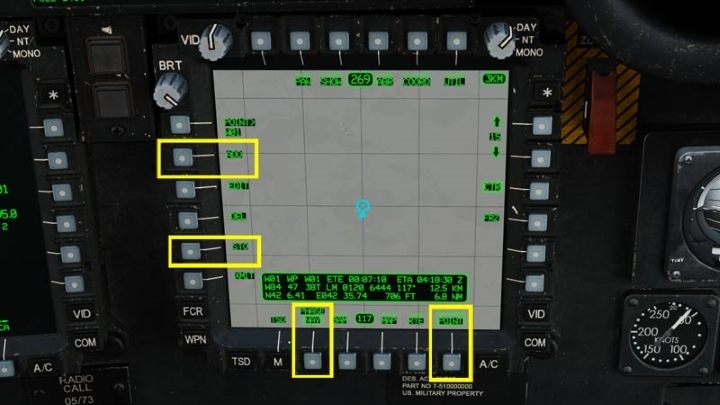
Select POINT, make sure the correct phase is selected: NAV (navigation for WP) or ATK (attack for TG). Then select the STO option.
Press NOW to save the point.
A new point with a sequential number will appear under the Own Ship symbol.
A target point marked in red is created in the same way in the ATK phase.
Adding a point using the TADS system
The last way to add a map point is by using the TADS system. It can be done only by the CPG - co-pilot/gunner. It allows you to zoom in the view, identify a target or an important object optically and then create a precise point at that location.
NOTE - it is necessary to be familiar with operating the TADS system, which is described in a separate entry: TADS - Target Acquisition and Designation Sights. The buttons on the TADS grips can also be activated on screen with the mouse (except for the triggers on the other side of the grips).
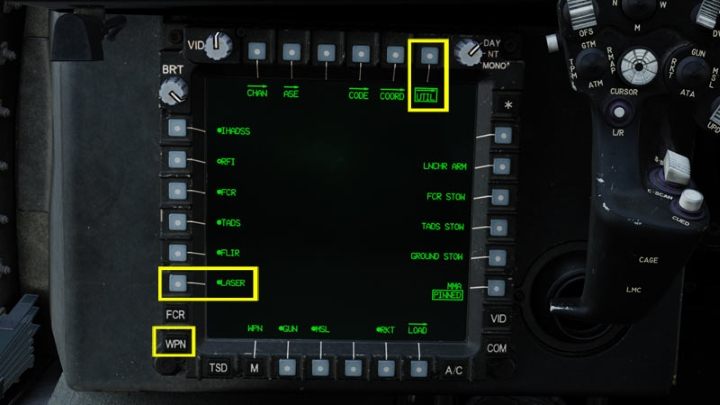
If you began the mission with Cold Start procedure, make sure that the laser is turned on. This can be done on the WPN armaments page, then UTIL and LASER. The circle dot must be full.
On the TSD screen, choose the active phase. NAV phase will create Waypoint WP and ATK phase will create Target TG.
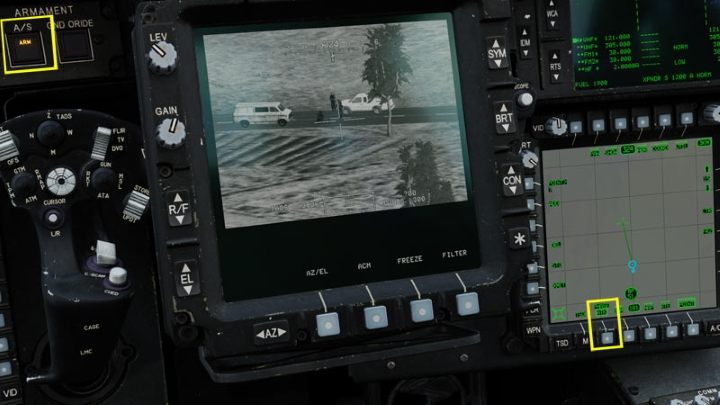
Make sure your weapon is armed - A/S is set to ARM
Set TADS as the active sight with the Sight Select Right - TADS button.
Use the Sight Manual Tracker knob / buttons to aim the TADS at the desired location
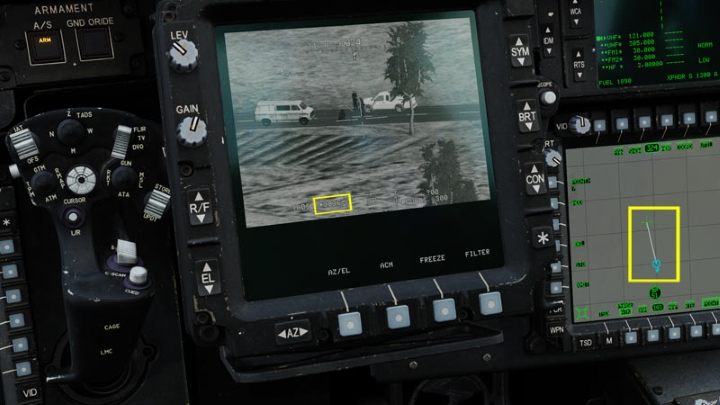
Press LRFD Trigger 2nd Detent to illuminate the spot with the laser beam. Active laser is visible by the more complex crosshair, also the exact distance to the target will appear at the bottom, and a white line from the helicopter to the marked spot will be shown on the TSD map.
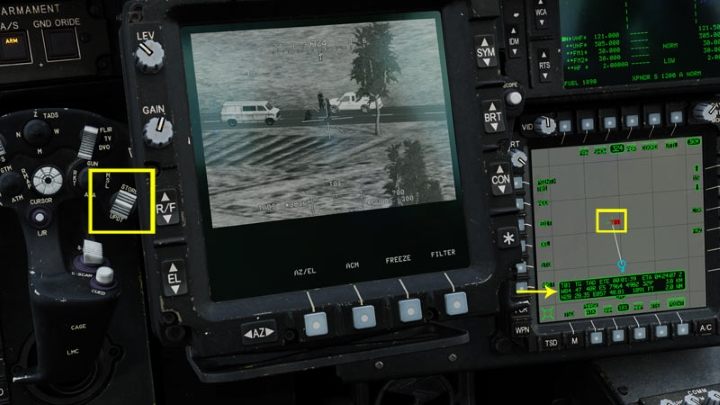
While holding the laser trigger, press the button on the left grip marked: LHG STORE / Update Switch - STORE. The point will be saved. An appropriate icon with the point number will appear on the TSD.
Editing a point
The category and point ID cannot be edited. You can only change:
- FREE (free text)
- MGRS / LAT LONG (coordinates)
- ALTITUDE (elevation above mean sea level)
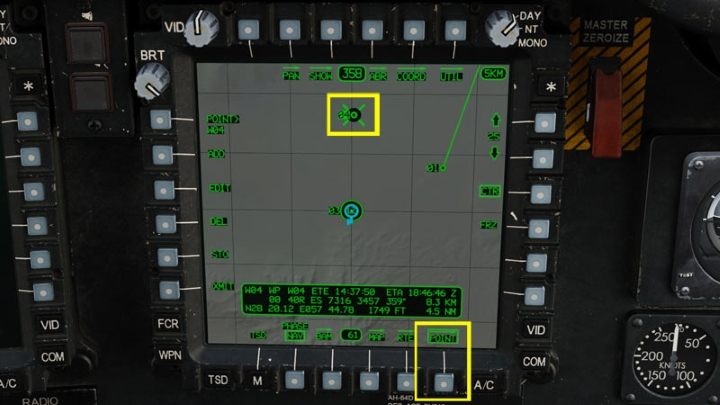
Mark the point to be edited. Press POINT button. Then hover the cursor over the desired point on the map and press Cursor Enter Depress.
Alternatively, if you cannot use the cursor, select POINT and then select the POINT>Wxx.
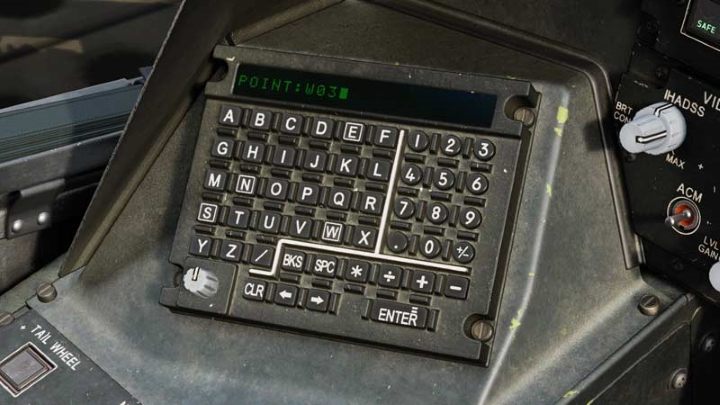
On the keyboard unit enter the full name of the point to edit, eg. W03 and confirm with Enter.

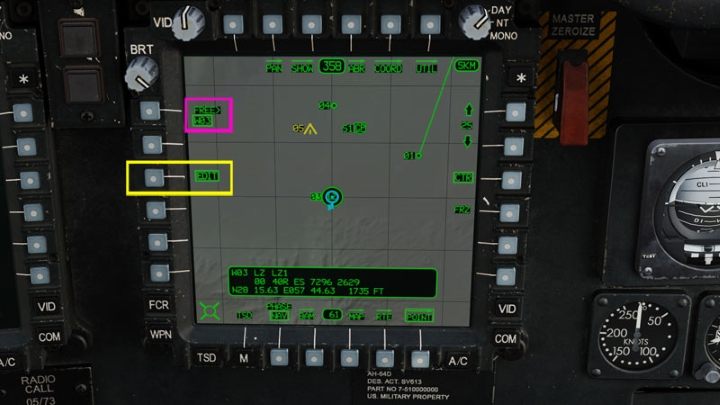
The selected point is shown next to the L1 button. Press EDIT.
Make the desired changes on the keyboard, Remember that you can change only: FREE, LAT LONG and ALTITUDE. Confirm with Enter.
Deleting a point
Select the point in the same way as for editing - either with the cursor or by entering its number on the keyboard. The selected point is shown next to the L1 button. Press the DEL button.
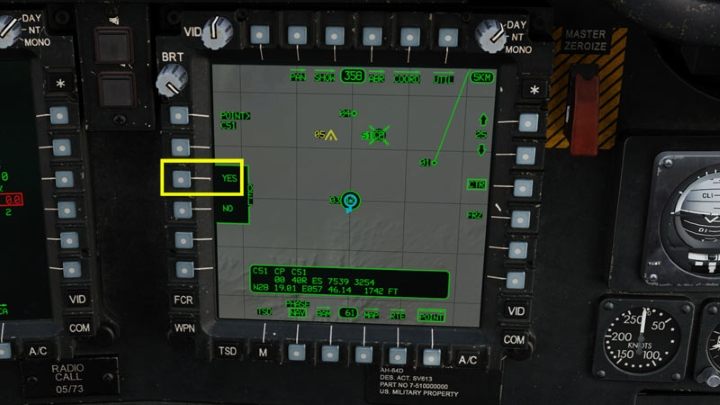
Confirm the deletion with the YES button.
MGRS and LAT / LONG coordinates
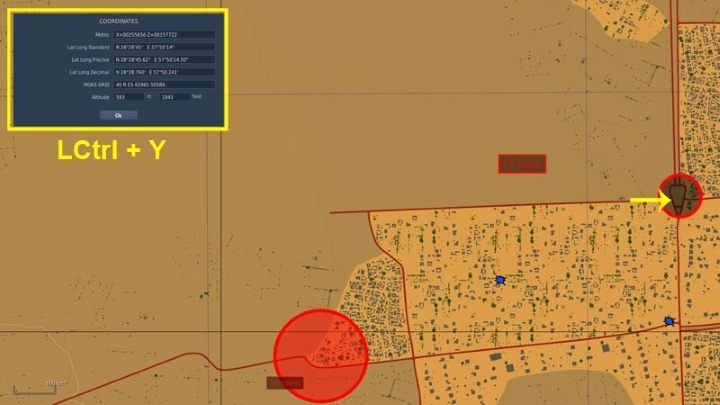
When creating a mission in the mission editor, the coordinates of a point in all formats can be displayed by zooming in the view, placing the cursor on the desired location and pressing LCtrl + Y.
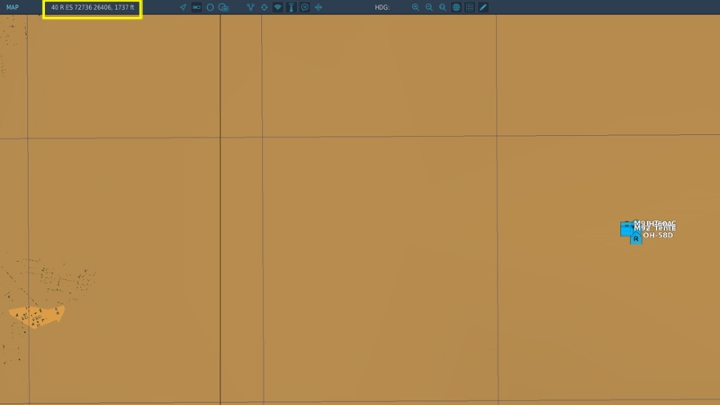
During the game, the coordinates are shown at the top of the screen on the F10 map. On the F10 map the LAlt + Y keys switch between coordinates formats.
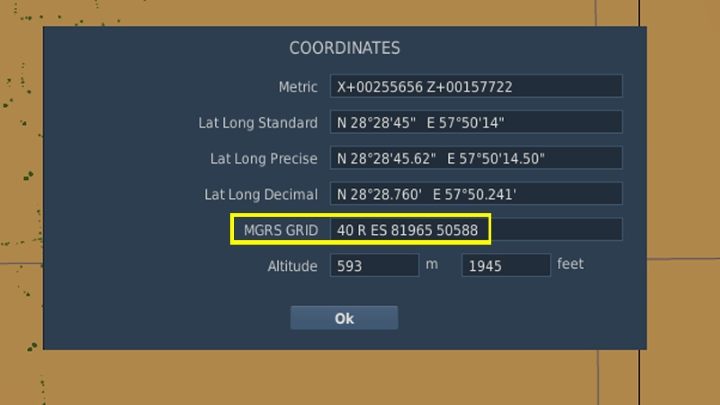
Note that the Apache computer reads MGRS coordinates in 8 digits, not 10 digits as it is displayed in DCS World mission editor.
Therefore, each block of 5 digits of the coordinates needs to be rounded to 4 digits, e.g.
40R ES 81965 50588
change to:
8197 5059 and enter the TSD into the computer without spaces as:
40RES81975059

It is similar with the latitude and longitude format. The required coordinates are listed under LAT LONG DECIMAL. Again, the data from the F10 map should be converted to a format acceptable by the Apache mission computer by rounding to decimal format, removing spaces and adding 0 in front of the LONG coordinates, e.g.
N 28 ° 28.760 'E 57 ° 50.241'
change to: 28 28 76 and 057 50 24. Then enter the coordinates into the mission computer without spaces as:
N282876E0575024
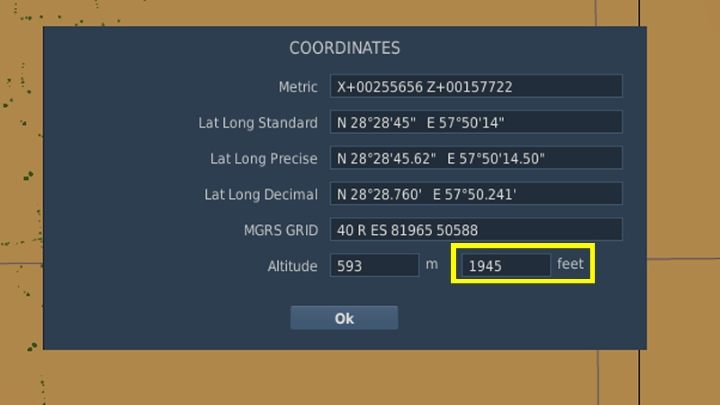
The last information necessary is the elevation of the point above mean sea level. Nothing needs to be changed here, but the value in FEET not meters, is required.