Mission 2 - Into the Flames | Protoss | Campaign Walkthrough StarCraft: Remastered Guide
Last update: 03 October 2017
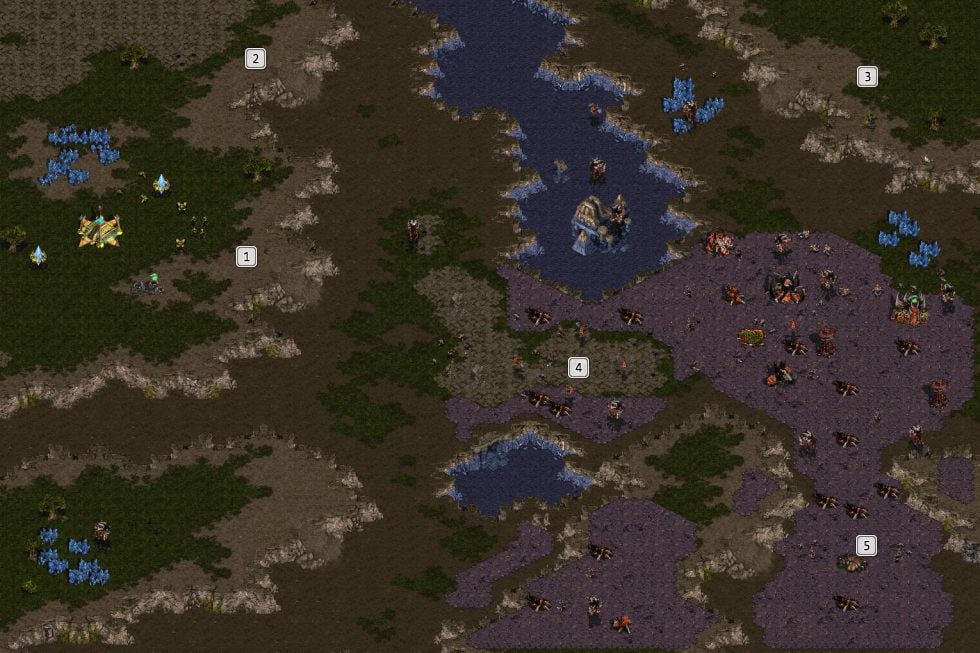
The main ramp � Enemy attacks will be coming mostly from the center of the map, through the main ramp. build your turrets here, and keep your main force in this area as well to deal with enemy assaults.
Northern ramp � In time, the Zerg will divert some forces to try and attack you from the North. Add some turrets and Zealots to set him straight.
The spot in which Fenix and reinforcements will appear � Fenix will emerge on this hill along with Reavers. Those powerful units can deal devastating damage. Use their firepower to destroy the enemy base on the North. Begin with enemy workers and Hatchery. The enemy will throw everything he has on the map to defend the Hatchery so have your main force in the base ready to assist.
Fortified passage � There only one land route leading to the Zerg base, full of turrets and Zerg forces. If you attack using both your resident army and Fenix's reinforcements, however, you should be able to emerge victorious and without any major losses.
Mission Objective - Cerebrate � Your mission objective is surrounded by several turrets and Mutalisks (assuming they were late for Hatchery defense). Use the Reavers to wipe out the defenders, along with the Cerebrate, swiftly and efficiently.
Mission objectives:
- Keep the Zerg busy until Fenix reaches his position
- Kill the Zerg Cerebrate
- Fenix must survive
Tassadar has contacted the rest of the Protoss and relayed crucial information about the Zerg, their behavior and organization. He shares the info about Cerebrates, the Zerg swarm commanders. If a Cerebrate is killed, the overall efficiency of Zerg forces in the area is significantly reduced. Fenix is to bring in some reinforcements, but he needs time to reach the designated spot. Your task is to help in taking down one of the Cerebrates near your positions.

You'll begin the mission on a hill, on the left edge of the map (1). Your first task will be to wait 15 minutes before Fenix brings in the reinforcements. Expand your base and secure the necessary resources. Each ramp needs to be protected by at least a pair of turrets and several Zealots (2). The Zerg will attack often but without conviction. In this mission, you'll be given a new structure - Shield Battery. It stores energy, which may be used to replenish lost shield points. This option can be used only on units. Use it when defending your positions or to quickly regain lost shields. Before Fenix reaches his destination, begin training units and prepare 1-2 teams of Zealots and Dragoons.

Fenix will emerge in the right upper corner of the map, just above the Hatchery and enemy mineral deposit (3). His group will include three powerful Reaver units. You've already encountered those machines during the Zerg campaign. Their powerful attack has a weak point, though. Each artillery shell needs to be produced using 15 crystals, and each Reaver can load up to five shells. Their primary advantage here is range, however, and you should use it more than anything else. Focus on destroying the enemy HQ. Luckily, the Zerg have only one Hatchery in this mission, but their numerous air units and towers will take a toll on your men. Combine both groups under your command.

Between your two battle groups there will be numerous Sunken Colonies and hidden Zerg units (4). Once your forces combine, the assault on the Cerebrate should be rather easy. By that point the Zerg should have no Hatchery and be deprived of most of their ground units. Remember to advance slowly. Let the Reavers deal with the turrets and have the Dragoons covering them in case some Mutalisk decides to turn back and fight (5). The Zerg Cerebrate itself has no offensive capabilities, only large amounts of health. Once you destroy this unit, the mission will be completed.

