
Into the Depths - main quest walkthrough | Bloom Heart Torment: Tides of Numenera Guide
Last update: 17 March 2017
How to unlock: Automatically, after finishing the Dracogen's Price (M15.1).
This is another long quest, which has to be completed while you're in the Bloom. The first part of this quest requires you to get to the Bloom Heart with the goal of search and rescue of a Memovira's disciple - a scholar, Ishen (it will turn out to be someone else). The trip to the heart is rather linear, however there's a couple of ways you can act during the encounter with the Bloom.
The second part of this quest is getting back to Memovira, and that's where this mission is seriously branching out according to your decisions during another meeting with the Bloom's leader.
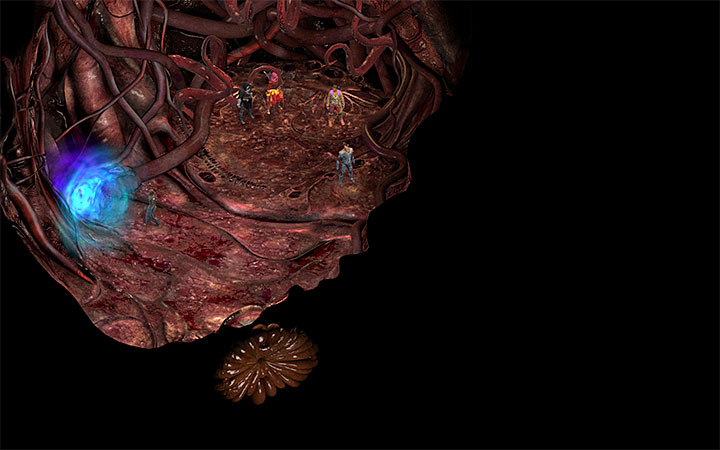
Reaching the Bloom Heart
Locating the first new Maw

The primary concern is finding someone who knows the Bloom. The one you're looking for is the Observant Spec, who can be found in the Shrine of Chilia (M16.2). Talk to Spec about possible ways into the Bloom Heart and a Maw will appear right next to her. You have to open that and it can be achieved in a few ways:
- Sacrifice one of the members of the party. It's not possible for every member. Using Deception or Persuasion may also be necessary. You have to keep in mind that your relations with the team member will deteriorate.
- Gifting the Jar with the Iron Wind - It's only possible if you have completed, in the Old Slave Block, the side quest What the Winds Took, i.e. if you've helped Skoura retrieve eyesight.
- Sacrifice Waiting-for-prey's head - Return to Memovira's Courtyard and use all the dialogue options while conversing with Waiting-for-prey (M15.8), a powerful construct guarding the entrance to the Newborn Maw. Once you've completed the dialogue, use Persuasion to convince Waiting-for-prey to sacrifice himself, considering the Maw is interested in eating predators. If you've managed to complete the roll, return to the Maw and use Waiting-for-prey's head to unlock the way.
- Using the Transdimensional Scalpel to pry open the Maw - It's only possible if you own the Transdimensional Scalpel. The item is awarded for doing a quest called A Hilt Without a Blade, which is unlocked in The Vast Interior (M16.6). You can use it to pry open the Maw, yet it will anger the Bloom and can have consequences in the future.
Crossing the Gullet
Whichever way you prefer, the pathway to the Gullet will be open (M23.1). BEFORE you use it, consider sending your team to rest, because you may encounter danger more than once on your way to the Heart. After entering the Gullet, the portal will close and you will have no way of returning to the safe part of the Bloom.
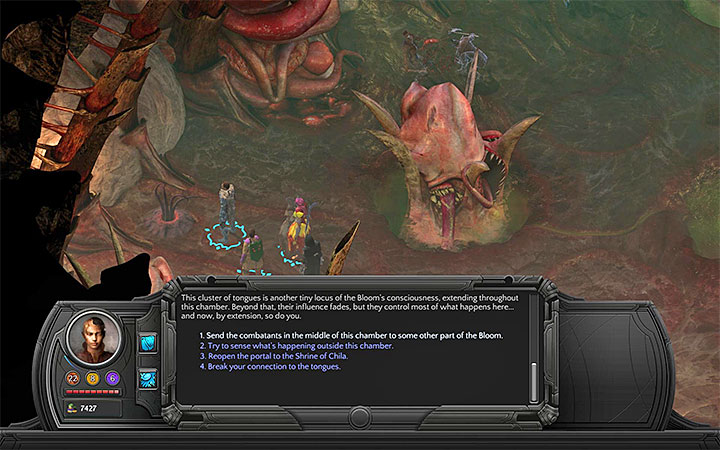
Not far from the starting place are Predatory Echoes (M23.1). The easiest way of dealing with them is combat, since they don't pose a real threat. If you'd rather not fight, check out the Tongue Cluster. You can use Intellect and then transfer the echoes to another part of the Bloom. This will unlock the passage.
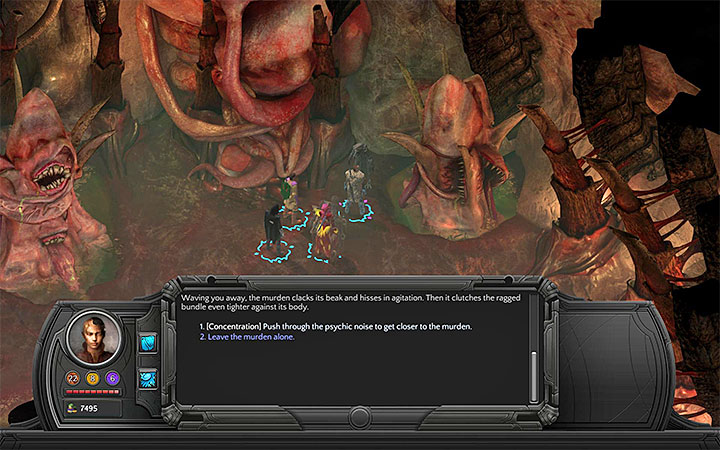
A little bit further, you will meet Murden (M23.3). If you have the Concentration skill, you can use it to close in on this creature. You will then be able to kill or stun Murden. Murden will drop two items. Synth Egg is a quest item that may come in handy quite soon. The other one is Candy dispenser. Examine it in the inventory and squeeze its arms. You will thus acquire the Pastel Blue Candy cipher, one of its effects is permanent increase of Intellect by 1 point (allocate this cipher to the character that uses Intellect most often).
Now you have to reach the western part of the Gullet (M23.10). The Large Metal Armor is located there. You can examine the metal armor and find 2 quest items - Sealant Spray and Sealant Bomb (use Quick Fingers to obtain this item). Both of these will also come in handy soon.
<br>
Before you attempt to get to another location in the Bloom, you should pay a visit to the southern area (M23.12). There, you can meet Herja or another character that you decided to sacrifice to open the Maw (if you did that of course). Should that happen, try to resolve the matter peacefully, because otherwise the character may attack the party.
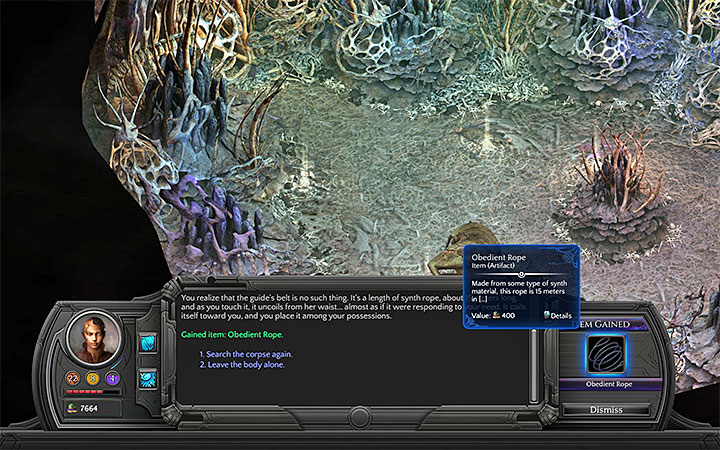
In the southern chamber there are more Predatory Echoes, but this battle also shouldn't be very demanding. After winning it, examine the corpse of a woman. You will find the last quest item (at least for now) - The Obedient Rope.
After doing all of the above, you can start thinking about getting to subsequent location of the Bloom - Nethermost Cavity. Check out the central area of the Gully, where the whirlpool is (M23.4). The plan is to drain all of the liquid that's in the container, which will leave a bare hole on the bottom. You can do that by interacting the following points:
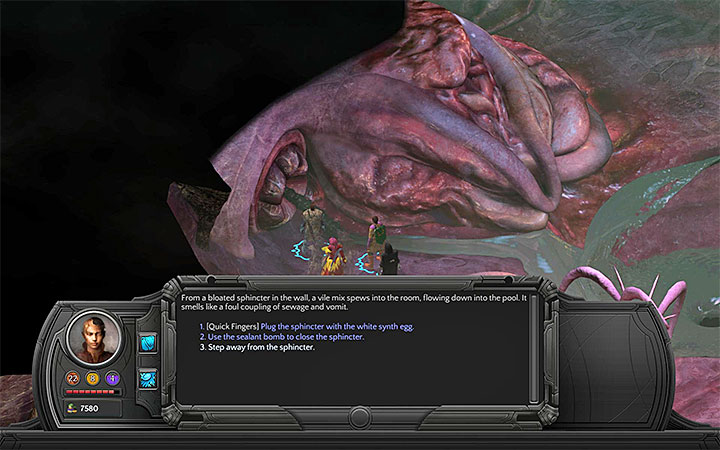
- Examine the northern interactive point with the liquid flowing (M23.5) and use one of the items you've obtained to stop the flow of the river. Use the Sealant Spray or Bomb.
- Examine the western interactive point with the liquid flowing (M23.6) and use one of the items you've obtained to stop the flow of the river. Use the Sealant Bomb or the Synth Egg (Quick fingers required).
- Examine the sewers located next to the whirlpool (M23.11) and use Quick fingers to drain some of the liquid.
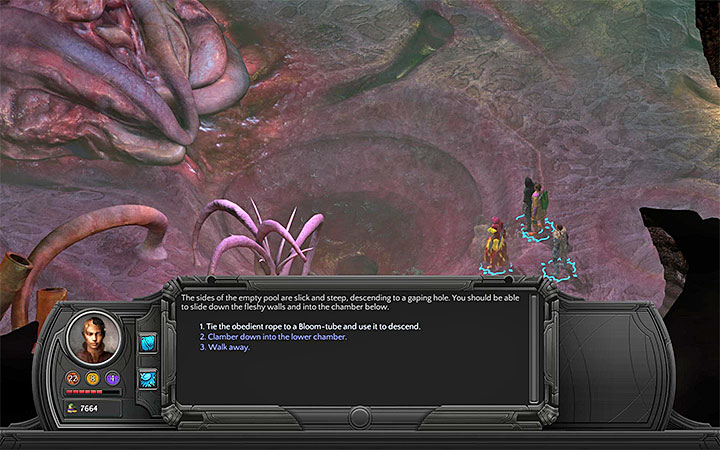
Performing the above actions will totally drain the place. Click the hole at the bottom. You can go to the next location at once, but you risk receiving damage then. If you wish to avoid damage, then use the Obedient Rope.
Whatever you decide, you will make it to the next location - Nethermost Cavity (M24.1). Save the game here, because a fight awaits you after a couple steps.
Reaching the Bloom Heart
After making a couple steps, a crisis will commence. Here's a rundown of the situation:
- The goal is to reach the Bloom Heart (M24.4). Don't even try to kill all the Corpuscular Maws on the map, because that's not the point and more enemies may arrive anyway.
- If you have finished A Hilt Without a Blade quest, then crossing the Cavity will be a bit easier, since Abykos will be here. The being is friendly, and during a couple of turns (until it dies) it will distract monsters away from your team. Besides, you will also be using the Transdimensional Scalpel, which will help you make your way to the Maw leading to the Heart.
- If during your stay in the Vast Interior you haven't killed Inkpot and other cultists (M16.1) then, after a couple turns of the crisis they may appear and aid the Corpuscular Maws. This event should serve as additional "incentive" to reaching the exit faster - their attacks are much more dangerous.
- The whole team has to reach the exit. Don't worry if one of the members of the party dies along the way. Of course, try to keep them alive as long as you can.
- The Bloom Heart will try, every once in a while, to prevent the party from reaching it, and will cause earthquakes. They don't deal damage, but they prevent knocked-down characters from performing actions in a given turn. So focus on getting the whole party to the exit rather than on waiting for one of them to be able to perform certain action.
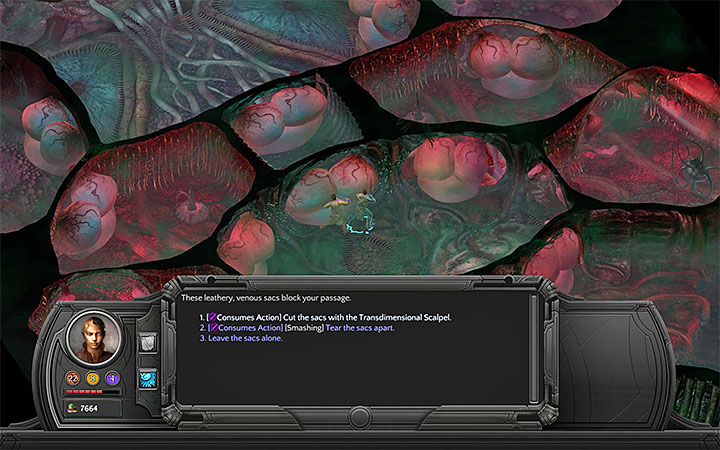
There are two basic ways of reaching the Bloom Heart. The first one is about reaching the Tongue Cluster on the sides of the chamber (M24.2). It's good to choose the western clusters, since enemies spawn near the eastern ones. After reaching a cluster you can use up one action and pass an Intellect test. This will lead to neutralizing given Sacs.
The other way requires you to break through two central sacs (M24.3) that separate the team from the Maws. After interacting with the sac you can choose one available skill, and if you pass the test, the sack will be destroyed. You can also use the Transdimensional Scalpel to cut them sacks at once.
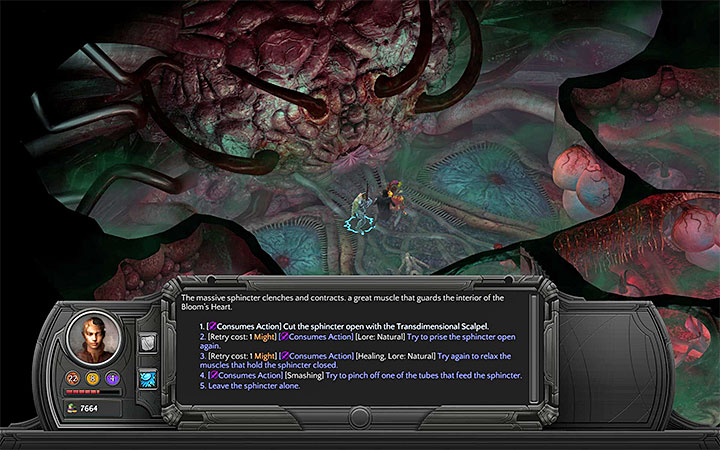
After reaching the Maw that leads to the Bloom (M24.4) you have to pass a test of using one of the abilities twice (it's best to use two characters to speed the process up). Passing this test will end the crisis and open the way to the Bloom Heart (M24.5) as well as award you 100 XP. Save your progress here, because in the next scene, according to your previous conduct, you may lose or gain a whole lot.
Meeting the Bloom Heart
Upon attempting to reach the Bloom Heart you will first be asked whether you want to go it alone or resort to the help of your comrades. You can ask any of them for help, but in every case, you will have to use Persuasion to get their support.
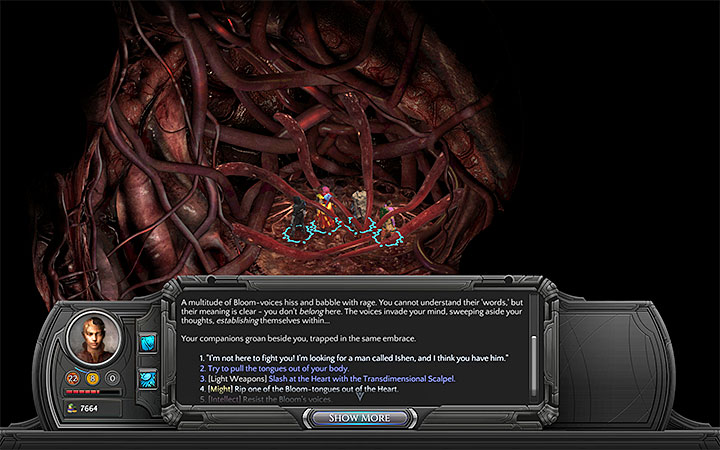
The meeting itself may go down in many different ways. The most important points were listed below. Attention - Some action will not be available - they depend on what character you play and what decisions you have made earlier (especially with regard to the Scalpel and the Maws)
- Worst case scenario is this: you meet the heart and you don't defy it in any way. You may allow it to peep into the protagonist's mind twice. The downside of this is that you'll lose two Intellect points permanently. The negative effects may be nullified, however. The first way of achieving that is by coercing the heart to use the mind of your comrade, which is only possible if you've asked someone to go with you. The other way is to use the Tidal Affinity skill, which will only allow you to save one Intellect point.
- One of "intermediate" ways assumes passing the Intellect tests. It's only viable if you play a character with this parameter quite high. The first Intellect test will let you shield yourself against the voices of the Bloom, and the other will let you see into its mind. If you succeed, you will permanently gain 1 Intellect point.
- Another "intermediate" way is to use force. You can use Might to snatch out one of Bloom's Tongues or hit it with the Transdimensional Scalpel (if you have it, of course). In such case, you may have to fight a couple of Corpuscular Maws. Winning the fight will, however, allow you to intermediate Bloom and spare you the loss of Intellect points.
- The optimal way of resolving this situation is to block Bloom's aorta and calm it down. This will allow the protagonist to look into Bloom's mind. Each such action will grant you 2 Intellect points permanently.
All of the above variants have the same ending - you manage to free the person you're looking for. It turns out to be Mazzof the Lost. After a short conversation, you will get a a Frictionless Merecaster and a portal to the Memovira's Courtyard will be open (M15.1). Use it to finish the first big part of this quest, and proceed to the second one.
Meeting with Memovira
Important - Before you go to Memovira, consider saving the game and giving your party some rest. Soon their lives will be endangered. Additionally, complete all the side quests from the Bloom - you won't be able to do it later!
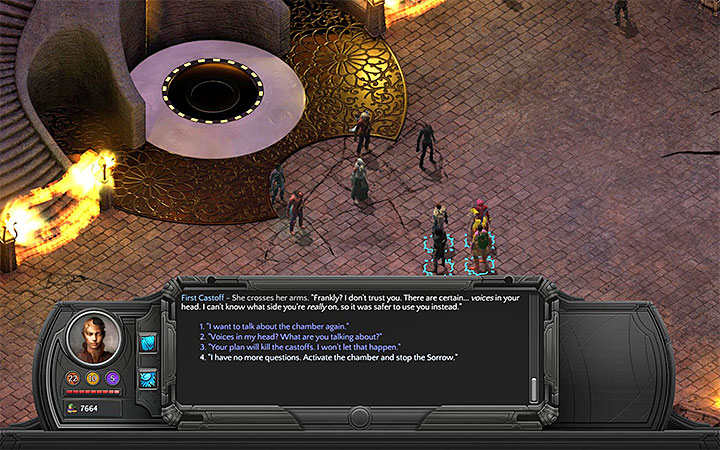
Speak to Brusca at the large gate in Memovira's Courtyard (M15.4). Tell her you want another audience from Memovira. You will be taken to Memovira's Fortress (M25.1). During the meeting, Memovira will reveal her true identity. You will learn that she is the First Castoff. You will also receive 100 EXP. The First Castoff will reveal her plans. You can react in two ways:
- You can oppose her and try to stop her and her followers from murdering the other Castoffs.
- You can allow the First Castoff to activate the resonance chamber in order to stop the Sorrow.
These options actually don't differ too much. If you choose the first one (attacking the First Castoff), the crisis will be expanded with the part in which you stop her. If your party usually avoids combat, then the second option will be safer - you will immediately skip to the crisis related to Sorrow's attack.
Battle with the First Castoff
If you decided to attack the First Castoff, then she and all other characters in the Fortress will turn against you during the crisis. Don't attack everyone - you don't have time for that. What's more, if they survive, they will make the second part of the crisis (Sorrow's attack) easier for you. You should focus on using blinding attacks or any other techniques that will stop the opponents. At the same time you should complete main steps described below. Keep your weaker party members away from the First Castoff, she can deal a great amount of damage in close combat.
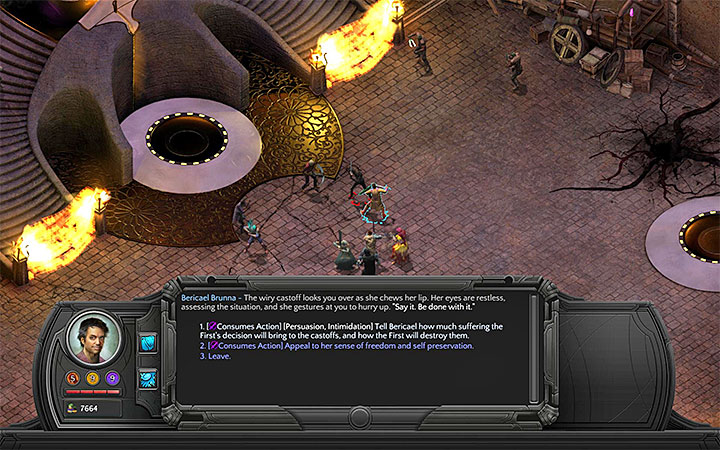
An alternative solution is to convince the followers of the First Castoff to stand against her. Instead of attacking them, you can initiate a conversation (only with those who have unique names, it doesn't apply to "nameless" thugs) and use Persuasion, Intimidation or Deception to gain their support. This might make surviving the battle much easier, especially if your party isn't suited for direct confrontations.
Important - Corpuscular Maws can appear a bit later in the eastern part of the Fortress. The modus operandi is the same - ignore the monsters and focus on completing the main objective of the crisis.
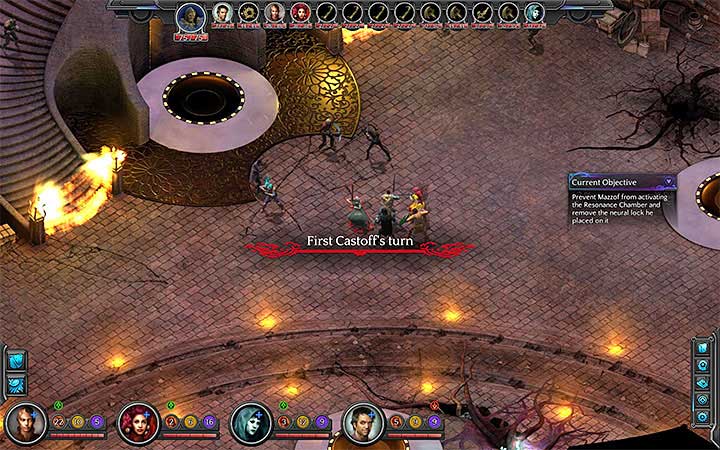
Your primary objective in this part of the crisis is reaching Mazzof. He is standing next to the resonance chamber activation panel (M25.2). You must stop him. There are two ways of reaching him:
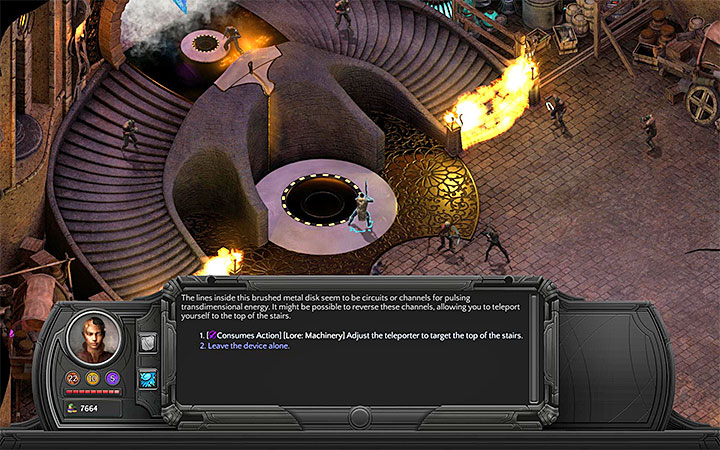
- The easiest way is reaching one of the teleports (M25.6) and completing a test that enables you to unlock them (all three at once, not only the one you've reached). After using the teleport you will be taken to Mazzof.
- You can also destroy the force fields at the stairs (M25.5). It is a slightly worse option as you would have to complete a test (Smashing or Quick fingers) and additionally climb the stairs.
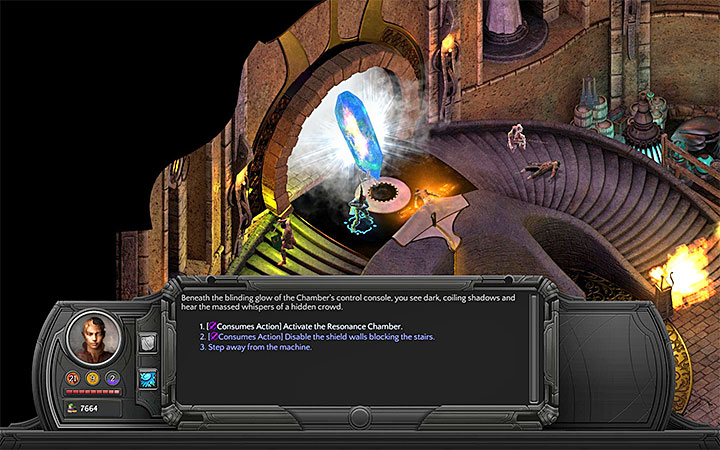
No matter how you acted, you must decide whether to eliminate Mazzof the Lost or convince him to change his mind. In the first case, select any attacks and kill him before he activates the chamber. Now you must activate the chamber on your own - select the main protagonist to do that (activating the resonance chamber consumes one action point).
If you prefer diplomacy, then speak to Mazzof and use Persuasion or Intimidation. If you succeed, then after interacting with the control panel you will have to complete another test related to bypassing Mazzof's security system.
After completing all actions the second phase of the crisis starts, in which the Sorrow attacks.
Sorrow's attack
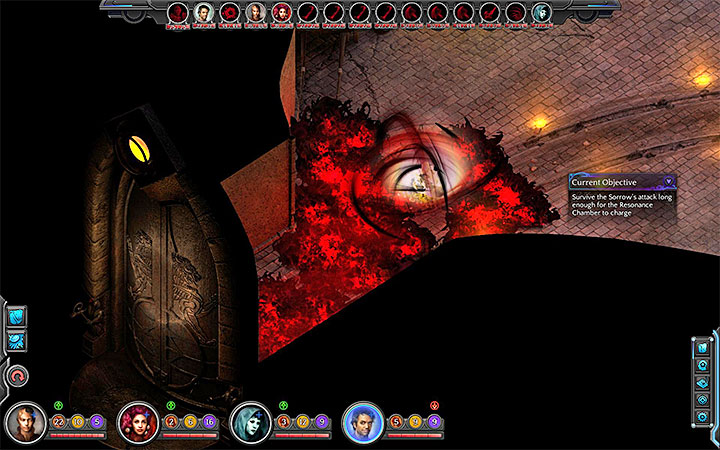
If during the conversation with the First Castoff you decided to help her in activating the resonance chamber, Sorrow will attack just as the crisis starts. If you attacked the First Castoff, then the scene will start once you neutralize Mazzof and you activate the resonance chamber as the protagonist.
No matter how the crisis started, you must be aware that Sorrow Fragments will start appearing in the western part of the fortress. Additionally, you will notice flames there. They will gradually spread across the whole area. Same as during the crisis in Miel Avest, stay away from the flames or you will receive additional damage.
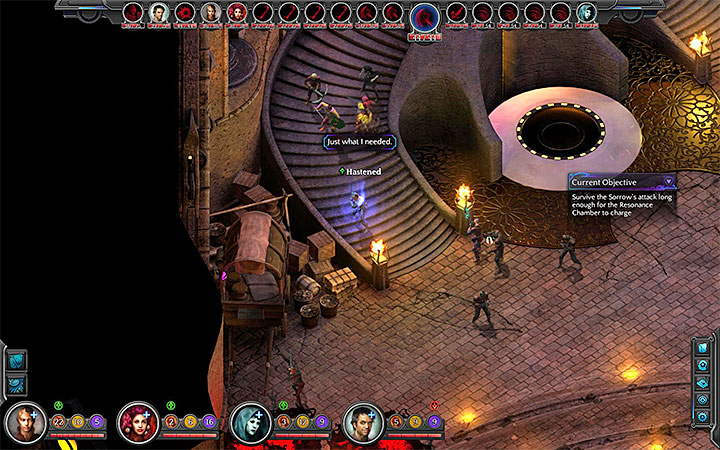
This scene is much simpler than one would presume. You can ignore the Sorrow Fragments that are fighting with First Castoff and her followers. This is why it wasn't recommended to kill the people from the Fortress if you attacked the First Castoff - if you killed them, the monsters wouldn't have other targets and they would focus on you. Remain close to the stairs and intervene only when a monster directly threatens your party.

After a few turns since the beginning of the crisis, Sorrow will appear in the Fortress. Same as in the Miel Avest Sanctuary, don't get near it. One attack can be enough to kill any party member and if your main character dies, you will fail the game. Luckily, Sorrow will probably join the Fragments and attack only Memovira's men. This means you won't have to change your tactics.
Stick to defense (preferably while remaining in the upper part of the stairs) until the resonance chamber is charged. It will trigger a new cutscene. Once it ends, you will receive 100 EXP and will be taken to the Castoff's Labyrinth. There you will speak to Ghostly Woman and you will start a new main quest The Right to Exist.