
Revealing the Unseen - p. 2 TES V: Skyrim Guide
Last update: 11 May 2016
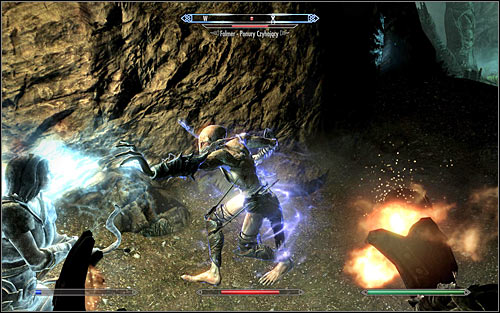
After exploring the area enough, head into the eastern corridor. Look out for the Chaurus that you come across on your way, as you might not note him at first because of the darkness. Be careful after reaching the northern part of the caves, as you will be attacked by a few enemies at once. By far the strongest enemy will be the Falmer Gloomlurker (screen above). Try to block its ice spells (I'd also recommend increasing your resistance against that element) and don't let him get too close, as he has a very good magical weapon. Try to use AoE spells during this battle, as the enemies will be gathered on a relatively small area.

You can move onwards, walking beside the cleared Falmer camp. The second camp you come across should be empty and you will only come across a single Chaurus north from here. Soon you will get out of the caves and return to the room resembling dwarven ruins. Be ready to deal with some more Falmers (screen above). After the battle, you will be able to try to open the master locked door to a small room to find a couple rare items, Mzulft Room Key and The Lunar Lorkhan skillbook, boosting your Alteration.

Follow the northern passage and afterwards turn west. On your way you will come across another locked door which you can either lockpick or use the key found in the storage room before. Look out for the Chaurus and search the area for treasures and a locked chest. Go further west, eventually reaching a much bigger room (screen above).
![Be careful, as there will be two]Falmers to eliminate here, including one capable of casting spells - Revealing the Unseen - p. 2 - College of Winterhold quests - The Elder Scrolls V: Skyrim Game Guide](/theelderscrollsvskyrim/gfx/word/1559087843.jpg)
Be careful, as there will be two]Falmers to eliminate here, including one capable of casting spells. After dealing with them, I'd suggest you take a look around the area. The most interesting place is the room located in the south-west corner. It's guarded by a Chaurus Reaper, but it also contains a chest with a few very previous items. In order to continue your mission, you need to approach the big western door (screen above). Examine the corpse of yet another Synod researcher and head through the door leading to Mzulft Aedrome.

Head east and deal with the first group of monster, consisting of a Chaurus and Falmer. Turn north, saving the game on your way. Soon enough you should reach the biggest so far room of the ruins and you will be in for quite a hard fight. Start off by attacking the weaker Falmers, though sooner or later you will come across their leader - the Falmer Shadowmaster (screen above). Remember to try and block his spells and look out for his weapon.

After eliminating the Shadowmaster, deal with the other Falmers and afterwards return to its corpse. I'd recommend taking the Focusing Crystal, as it will come in handy later on. Explore the room thoroughly (the northern door has a master lock and one of the researcher's body inside). Note that you are temporarily unable to use the western gate, so choose the corridor going east (screen above).

Go through the empty room inside which you quite surprisingly won't be attacked by anyone. Stop after reaching the room inside of which you will note dead Falmers (screen above). Be sure to save your game, as you're in for a fight with the hardest enemy of this location. Try to open the door and you should note the Dwarven Centurion Master in the neighbouring room.

The basic attack of the Centurion implies releasing hot steam, quickly depleting your health. Luckily you can dodge it, quickly strafing upon seeing that the boss is preparing an attack (screen above).

I'd recommend attacking the Centurion from the previous room (screen above), as he won't be able to fit through the door and get near you. You of course need to consider that draining all of his health might take some time, especially that just like any other dwarven construction he's resistant to magic.
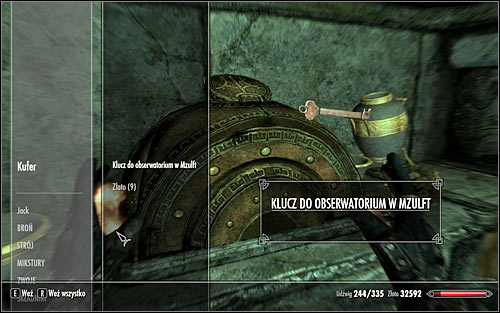
After the battle, look for a chest containing the Mzulft Observatory Key (screen above). Curiously, if your character can sneak well or if you have invisibility spells and/or potions, you could try to avoid fighting the Centurion at all and speak pass him. However considering the Centurion can be easily attacked from a distance, I wouldn't recommend such a solution.

With the key in hand, you need to return to the main room of the ruins, i.e. where you fought the Shadowmaster. Head to the previously ignored big western gate (screen above), open it using the key and go west. Approach the new door and wait for Paratus Decimius to open it.
New main objective: Find the Focusing Crystal

A conversation with Paratus Decimius, the only living Synod researcher will automatically start. The man will tell you that you will need the Focusing Crystal to solve the ruins' mystery. If you followed my hint and took it before, you will be able to automatically move to the next step. Otherwise return to the previous room, find the corpse of the Falmer Shadowmaster and pick up the Focusing Crystal (screen above).
New main objective: Return the Crystal to Paratus

Regardless of whether you had the crystal or had to return for it, you need to speak with Paratus again and give him the item (screen above). The Mage will in return allow you to accompany him in the further journey.
New main objective: Follow Paratus

Follow Paratus, crossing the room with the large Oculory (screen above). Paratus will tell you that his plan implies switching one of the elements of the dwarven construction with the Focusing Crystal. After reaching the destination, listen to a short instruction regarding what you need to do.
New main objective: Place the Crystal into the Oculory

Approach the middle part of the Oculory, look up and interact with the astrolabe (screen above) to mount the Crystal. You will need to solve a rather complicated puzzle and I'd recommend following the instructions included in this guide so that you avoid any problems.