Guides & Walkthroughs New Guides Popular RPG Action Strategy Adventure YouTube Guides Mobile App

Sherlock Holmes The Awakened Walkthrough by gamepressure.com

Sherlock Holmes The Awakened Walkthrough

Table of Contents

Sherlock Holmes The Awakened: Ardnamurchan Point Sherlock Holmes The Awakened walkthrough

Here you will find a walkthrough of Chapter 8 in Sherlock Holmes The Awakened, which takes place in the lighthouse on the Ardnamurchan Point.

Last update: 28 April 2023

Time for a walkthrough and puzzle solutions for Chapter 8 of Sherlock Holmes The Awakened Remake. We explain how to get to reach the lighthouse in Ardnamurchan Point and how to solve the puzzles involving the lever in underground sections. You will also learn how to align the beams and destroy the lenses to stop the ritual from happening.

How to enter the lighthouse?

Take a look at the main path to the lighthouse and statues near it - Sherlock Holmes The Awakened: Ardnamurchan Point - Chapter 8 - Ardnamurchan Point - Sherlock Holmes The Awakened Walkthrough

Take a look at the main path to the lighthouse and statues near it. Follow the path until you reach stairs leading to the underground sections.

Examine the cannon and interact with the stone door - Sherlock Holmes The Awakened: Ardnamurchan Point - Chapter 8 - Ardnamurchan Point - Sherlock Holmes The Awakened Walkthrough

Examine the cannon and interact with the stone door.

At the door examine - Sherlock Holmes The Awakened: Ardnamurchan Point - Chapter 8 - Ardnamurchan Point - Sherlock Holmes The Awakened Walkthrough

At the door examine:

  1. Keyhole (in Concentration Mode),
  2. sculpture of a snake,
  3. footprints on the ground.
Continue following the path and examine the red shirt on the ground - Sherlock Holmes The Awakened: Ardnamurchan Point - Chapter 8 - Ardnamurchan Point - Sherlock Holmes The Awakened Walkthrough

Continue following the path and examine the red shirt on the ground.

Examine Ashmat' - Sherlock Holmes The Awakened: Ardnamurchan Point - Chapter 8 - Ardnamurchan Point - Sherlock Holmes The Awakened Walkthrough

Examine Ashmat's body:

  1. face,
  2. abdominal wounds,
  3. knife blade,
  4. small chain on pants.
1 - Sherlock Holmes The Awakened: Ardnamurchan Point - Chapter 8 - Ardnamurchan Point - Sherlock Holmes The Awakened Walkthrough
Turn around and examine the symbols on the wall and in Concentration Mode the blood traces on the right side of the path - Sherlock Holmes The Awakened: Ardnamurchan Point - Chapter 8 - Ardnamurchan Point - Sherlock Holmes The Awakened Walkthrough

Turn around and examine the symbols on the wall and in Concentration Mode the blood traces on the right side of the path.

On the ground next to the traces of blood examine - Sherlock Holmes The Awakened: Ardnamurchan Point - Chapter 8 - Ardnamurchan Point - Sherlock Holmes The Awakened Walkthrough

On the ground next to the traces of blood examine:

  1. Fingerprints (Concentration Mode),
  2. broken branch,
  3. footprints on the ground to the right.
Pin Ashmat's body evidence to the screen and examine the leaves by the stone in Concentration Mode - Sherlock Holmes The Awakened: Ardnamurchan Point - Chapter 8 - Ardnamurchan Point - Sherlock Holmes The Awakened Walkthrough

Pin Ashmat's body evidence to the screen and examine the leaves by the stone in Concentration Mode. Pick up the medallion and examine it from all sides.

Return to the stone door and put the medallion in the hole - you can now enter the lighthouse - Sherlock Holmes The Awakened: Ardnamurchan Point - Chapter 8 - Ardnamurchan Point - Sherlock Holmes The Awakened Walkthrough

Return to the stone door and put the medallion in the hole - you can now enter the lighthouse.

How to solve the puzzle in the lighthouse basement?

2 - Sherlock Holmes The Awakened: Ardnamurchan Point - Chapter 8 - Ardnamurchan Point - Sherlock Holmes The Awakened Walkthrough
Enter the room on the right and take a look at the heart on the table and a vessel with blood near the lever - Sherlock Holmes The Awakened: Ardnamurchan Point - Chapter 8 - Ardnamurchan Point - Sherlock Holmes The Awakened Walkthrough

Enter the room on the right and take a look at the heart on the table and a vessel with blood near the lever.

Exit the lighthouse through the stone door and approach Ashmat's body - Sherlock Holmes The Awakened: Ardnamurchan Point - Chapter 8 - Ardnamurchan Point - Sherlock Holmes The Awakened Walkthrough

Exit the lighthouse through the stone door and approach Ashmat's body. Collect his blood and return to the interior.

Pour the blood into the vessel and pull the lever 2 times - Sherlock Holmes The Awakened: Ardnamurchan Point - Chapter 8 - Ardnamurchan Point - Sherlock Holmes The Awakened Walkthrough

Pour the blood into the vessel and pull the lever 2 times.

Proceed to the second underground room and pull the lever at the stone platform - Sherlock Holmes The Awakened: Ardnamurchan Point - Chapter 8 - Ardnamurchan Point - Sherlock Holmes The Awakened Walkthrough

Proceed to the second underground room and pull the lever at the stone platform.

The action switches to Watson - pull the nearby lever - Sherlock Holmes The Awakened: Ardnamurchan Point - Chapter 8 - Ardnamurchan Point - Sherlock Holmes The Awakened Walkthrough

The action switches to Watson - pull the nearby lever.

Back to Sherlock - in Concentration mode, examine the hole in the pillar - Sherlock Holmes The Awakened: Ardnamurchan Point - Chapter 8 - Ardnamurchan Point - Sherlock Holmes The Awakened Walkthrough

Back to Sherlock - in Concentration mode, examine the hole in the pillar.

Search the room and pick up all bones from the ground - Sherlock Holmes The Awakened: Ardnamurchan Point - Chapter 8 - Ardnamurchan Point - Sherlock Holmes The Awakened Walkthrough

Search the room and pick up all bones from the ground. You must put 2 bones in each pillar. Once bones are put in 4 pillars, the grate in the middle of the room will raise.

Approach the stone platform and collect the coins. Put the coins in the vessel next to Watson.

Now, as Watson, take the coins from the vessel and place them on the table - Sherlock Holmes The Awakened: Ardnamurchan Point - Chapter 8 - Ardnamurchan Point - Sherlock Holmes The Awakened Walkthrough

Now, as Watson, take the coins from the vessel and place them on the table.

Finally, pull the lever and proceed to the lighthouse - Sherlock Holmes The Awakened: Ardnamurchan Point - Chapter 8 - Ardnamurchan Point - Sherlock Holmes The Awakened Walkthrough

Finally, pull the lever and proceed to the lighthouse.

How and where to find Sherlock in the lighthouse tunnel?

Once inside the tunnel, you need to follow Sherlock's voice - Sherlock Holmes The Awakened: Ardnamurchan Point - Chapter 8 - Ardnamurchan Point - Sherlock Holmes The Awakened Walkthrough

Once inside the tunnel, you need to follow Sherlock's voice. Press the appropriate button to call your companion and follow his voice.

Searching the lighthouse

Enter the first room and examine the man on the wall - Sherlock Holmes The Awakened: Ardnamurchan Point - Chapter 8 - Ardnamurchan Point - Sherlock Holmes The Awakened Walkthrough

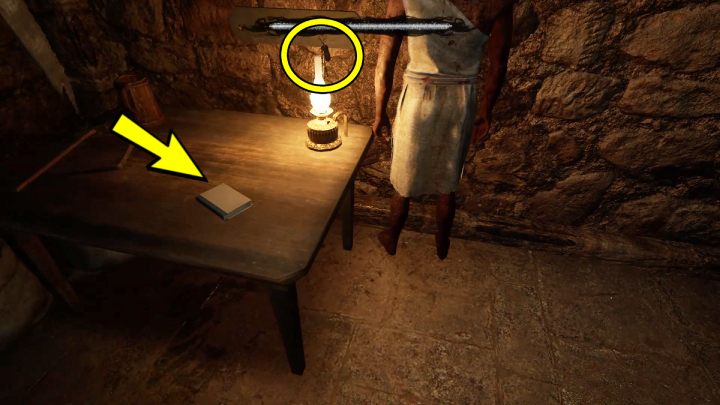
Enter the first room and examine the man on the wall. From the table take:

  1. diary,
  2. keys.
3 - Sherlock Holmes The Awakened: Ardnamurchan Point - Chapter 8 - Ardnamurchan Point - Sherlock Holmes The Awakened Walkthrough
In the next room, examine the beam-emitting device and the lens near which a group of people are standing - Sherlock Holmes The Awakened: Ardnamurchan Point - Chapter 8 - Ardnamurchan Point - Sherlock Holmes The Awakened Walkthrough

In the next room, examine the beam-emitting device and the lens near which a group of people are standing. Enter the small room.

On the table take a look at - Sherlock Holmes The Awakened: Ardnamurchan Point - Chapter 8 - Ardnamurchan Point - Sherlock Holmes The Awakened Walkthrough

On the table take a look at:

  1. knife blade,
  2. piece of paper,
  3. lens,
  4. lens at the wall.
Open the Mind Palace and at the question How to interrupt the hypnosis from the lens - Sherlock Holmes The Awakened: Ardnamurchan Point - Chapter 8 - Ardnamurchan Point - Sherlock Holmes The Awakened Walkthrough

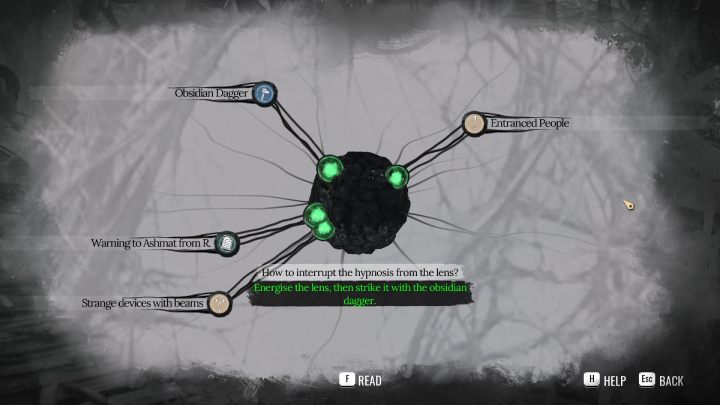
Open the Mind Palace and at the question How to interrupt the hypnosis from the lens? choose:

  1. Obsidian Dagger,
  2. Warning to Ashmat from R,
  3. strange device with beams,
  4. Entranced People.
4 - Sherlock Holmes The Awakened: Ardnamurchan Point - Chapter 8 - Ardnamurchan Point - Sherlock Holmes The Awakened Walkthrough
Point the 2 beams to the lens - Sherlock Holmes The Awakened: Ardnamurchan Point - Chapter 8 - Ardnamurchan Point - Sherlock Holmes The Awakened Walkthrough

Point the 2 beams to the lens. The color of the beam should change from red to orange, the color of the lens from blue to green.

Walk up to the lens and stick the dagger into it.

Approach the woman lying on the mattress and examine her - Sherlock Holmes The Awakened: Ardnamurchan Point - Chapter 8 - Ardnamurchan Point - Sherlock Holmes The Awakened Walkthrough

Approach the woman lying on the mattress and examine her:

  1. face,
  2. chest,
  3. right hand.
Now you can go through the gate to the higher level of the lighthouse - Sherlock Holmes The Awakened: Ardnamurchan Point - Chapter 8 - Ardnamurchan Point - Sherlock Holmes The Awakened Walkthrough

Now you can go through the gate to the higher level of the lighthouse.

On the way you will be accosted by Dirty Sommers - Sherlock Holmes The Awakened: Ardnamurchan Point - Chapter 8 - Ardnamurchan Point - Sherlock Holmes The Awakened Walkthrough

On the way you will be accosted by Dirty Sommers. Shoot him in the head and continue following the path.

How to stop the ritual in the lighthouse?

Enter the small room at the entrance to the lighthouse tower - Sherlock Holmes The Awakened: Ardnamurchan Point - Chapter 8 - Ardnamurchan Point - Sherlock Holmes The Awakened Walkthrough

Enter the small room at the entrance to the lighthouse tower. Pick up Dirty Sommers' diary from the desk.

At the chest look - Sherlock Holmes The Awakened: Ardnamurchan Point - Chapter 8 - Ardnamurchan Point - Sherlock Holmes The Awakened Walkthrough

At the chest look:

  1. diary,
  2. inscription on the lid of the box,
  3. hay.
On the table examine - Sherlock Holmes The Awakened: Ardnamurchan Point - Chapter 8 - Ardnamurchan Point - Sherlock Holmes The Awakened Walkthrough

On the table examine:

  1. diary,
  2. drawing on the right side of the board,
  3. mechanism in the picture on the left side of the board,
  4. beam-emitting devices in the picture on the left side of the board.
Enter the Memory Palace (Mind Palace) and at the question How to stop the ritual - Sherlock Holmes The Awakened: Ardnamurchan Point - Chapter 8 - Ardnamurchan Point - Sherlock Holmes The Awakened Walkthrough

Enter the Memory Palace (Mind Palace) and at the question How to stop the ritual? choose:

  1. Obsidian Dagger,
  2. Modified Lighthouse Lantern Blueprint,
  3. Khaleid lenses' weakness.

Time to go to the lighthouse tower. Walk up to the ladder and watch the cutscene.

5 - Sherlock Holmes The Awakened: Ardnamurchan Point - Chapter 8 - Ardnamurchan Point - Sherlock Holmes The Awakened Walkthrough
Point the first beam at the lens - Sherlock Holmes The Awakened: Ardnamurchan Point - Chapter 8 - Ardnamurchan Point - Sherlock Holmes The Awakened Walkthrough

Point the first beam at the lens. Walk up to the second beam and point it in any direction to unlock the third beam.

When both beams are directed at one lens, you can smash it with the obsidian dagger - Sherlock Holmes The Awakened: Ardnamurchan Point - Chapter 8 - Ardnamurchan Point - Sherlock Holmes The Awakened Walkthrough

When both beams are directed at one lens, you can smash it with the obsidian dagger.

During the conversation with Rochester, choose the middle dialogue option - Sherlock Holmes The Awakened: Ardnamurchan Point - Chapter 8 - Ardnamurchan Point - Sherlock Holmes The Awakened Walkthrough

During the conversation with Rochester, choose the middle dialogue option.

Enter the crowd of people and follow the directions appearing on the screen - Sherlock Holmes The Awakened: Ardnamurchan Point - Chapter 8 - Ardnamurchan Point - Sherlock Holmes The Awakened Walkthrough

Enter the crowd of people and follow the directions appearing on the screen.

6 - Sherlock Holmes The Awakened: Ardnamurchan Point - Chapter 8 - Ardnamurchan Point - Sherlock Holmes The Awakened Walkthrough
Go around the tower and find the broken lantern - Sherlock Holmes The Awakened: Ardnamurchan Point - Chapter 8 - Ardnamurchan Point - Sherlock Holmes The Awakened Walkthrough

Go around the tower and find the broken lantern. Continue along the path and interact with the next non-functioning lantern Go back to the previous lantern and take the crystal from it. Put the crystal in the second lantern and turn it on.

Point the lantern beam to the nearest lens - Sherlock Holmes The Awakened: Ardnamurchan Point - Chapter 8 - Ardnamurchan Point - Sherlock Holmes The Awakened Walkthrough

Point the lantern beam to the nearest lens. The lens should turn green. Return to the crowd of people and go to the previous part of the tower. Circle the mechanism in the middle and find the green lens. Stick the dagger into it and watch another cut-scene.

When talking to Rochester, choose the third answer - Sherlock Holmes The Awakened: Ardnamurchan Point - Chapter 8 - Ardnamurchan Point - Sherlock Holmes The Awakened Walkthrough

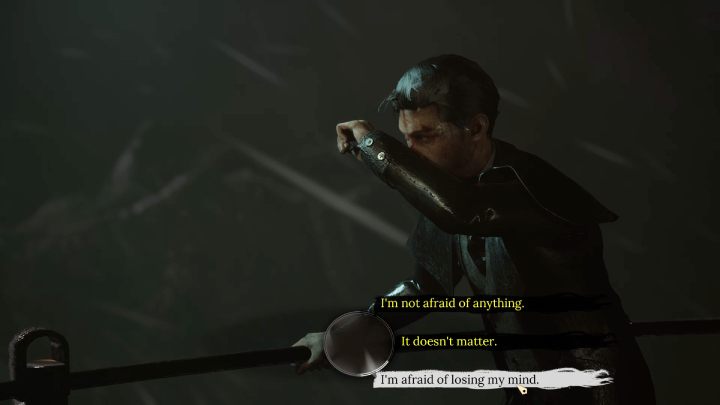
When talking to Rochester, choose the third answer.

Go through the crowd of people and move the mirror reflecting the beam to the left, so that the lens is exposed - Sherlock Holmes The Awakened: Ardnamurchan Point - Chapter 8 - Ardnamurchan Point - Sherlock Holmes The Awakened Walkthrough

Go through the crowd of people and move the mirror reflecting the beam to the left, so that the lens is exposed.

Then direct the first beam into the lens - Sherlock Holmes The Awakened: Ardnamurchan Point - Chapter 8 - Ardnamurchan Point - Sherlock Holmes The Awakened Walkthrough

Then direct the first beam into the lens.

7 - Sherlock Holmes The Awakened: Ardnamurchan Point - Chapter 8 - Ardnamurchan Point - Sherlock Holmes The Awakened Walkthrough
Go to the right and go through another crowd of people - Sherlock Holmes The Awakened: Ardnamurchan Point - Chapter 8 - Ardnamurchan Point - Sherlock Holmes The Awakened Walkthrough

Go to the right and go through another crowd of people. Point the second beam at the lens. Go back through the crowd of people to the lens and destroy it.

When talking to Rochester, choose the second answer - Sherlock Holmes The Awakened: Ardnamurchan Point - Chapter 8 - Ardnamurchan Point - Sherlock Holmes The Awakened Walkthrough

When talking to Rochester, choose the second answer.

Go to the right and through the crowd of people - Sherlock Holmes The Awakened: Ardnamurchan Point - Chapter 8 - Ardnamurchan Point - Sherlock Holmes The Awakened Walkthrough

Go to the right and through the crowd of people. Move the mirror to the right.

Point one of the beams at the mirror so that it is reflected at the lens - Sherlock Holmes The Awakened: Ardnamurchan Point - Chapter 8 - Ardnamurchan Point - Sherlock Holmes The Awakened Walkthrough

Point one of the beams at the mirror so that it is reflected at the lens. The color of the beam should be orange.

Point the second beam at the second mirror and smash the final lens - Sherlock Holmes The Awakened: Ardnamurchan Point - Chapter 8 - Ardnamurchan Point - Sherlock Holmes The Awakened Walkthrough

Point the second beam at the second mirror and smash the final lens. Watch the cut-scene.

See/Add Comments

You are not permitted to copy any image, text or info from this page.

This site is not associated with and/or endorsed by the Frogwares or Frogwares. All logos and images are copyrighted by their respective owners.

Copyright © 2000 - 2024 GRY-Online S.A. for gamepressure.com, unofficial game guides, walkthroughs, secrets, game tips, maps & strategies for top games.