Map of Raedric's Hold M9 | Pillars of Eternity Pillars of Eternity Guide
Last update: 10 July 2019
Key points of Pillars of Eternity M9 - Raedric's Hold
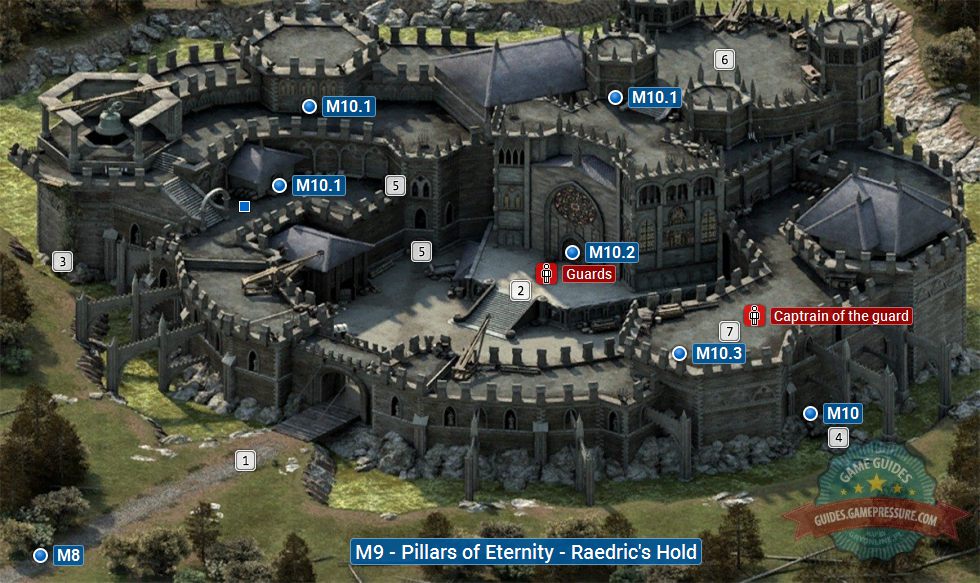
Important areas on the map
Exits from locations
Locked doors or chests
Traps
Important NPC's (quest givers, traders etc.)
New potential team members
Dangerous enemies (bosses, elite monsters etc.)
Important areas on the map
Guards by the draw bridge
You can kill them or avoid them.
Main entrance to the hold
It's guarded by a large group of enemies.
Climbing wall
It leads to the upper walls. It requires a character with high Athletics or a grappling hook.
Iron bars
The passage leads to the dungeon. It requires a character with high Might or a prybar.
Door connecting the courtyard with upper walls
Siege platform
You can get here by choosing a passageway in the sanctuary.
Side quest: The Champion of Berath - Area where you'll meet with the reborn Raedric.
Eastern walls
You can get here by choosing a ladder in the dungeon.
Exits from locations
M8 � Path to Esternwood.
M10.1 � Passageway to Raedric's Hold - sanctuary.
M10.2 � Passageway to Raedric's Hold - main level.
M10 � Passageway to Raedric's Hold - dungeon.
Raedric's Hold - description and map of the location
The above map presents Raedric's Hold. It is a big location that you visit while completing the Lord of a Barren Land side quest which you receive in Gilded Vale. The hold comprises four smaller locations and you have to explore the surface area before you infiltrate it. Since the party cannot access the hold, you need take into account that they might be attacked by the guards of the hold if they are spotted. Luckily, there are several ways to access the hold, which makes it possible to avoid some of the fighting or all of it.
Important places in Raedric's Hold
1. Guards at the drawbridge
You are refused access to the hold. There are two options to choose from - kill Cletlan and Ludwin or find another way into the hold.
2. Main gate of the hold
There are numerous guards here, with paladin Paladin of Berath and an Archer among them. To defeat the opponents and gain access to the hold, you require a strong party.
3. Climbing wall
Climbing this wall allows you to reach the upper walls of the hold and, ultimately, get to the sanctuary (one of the hold's levels) To climb the wall, you need to have a party member with Athletics at the level of at least 3, or possess a grappling hook in your inventory.
4. Grates
Bending the grates allows your party to get to the dungeon, which is one of the hold's levels. To do that, you need to have a party member of high Strength, or own a prybar.
6. Siege platform
You can reach the hold's rooftop only from the sanctuary. You can find some loot there.
7. Eastern wall
You can reach the eastern walls from the dungeon (a ladder can be found in one of the underground chambers). There are quite a few opponents there, commanded by the Captain of the Guard. After you win the battle, plunder the enemy corpses and explore the eastern part of the hold in search of loot.
Types of enemies and monsters in Raedric's Hold
While at the hold, you may be attacked by every living opponent that you encounter, assuming that you enter a place that you aren't allowed to be in. You can bypass the enemies (by sneaking or thanks to disguise), or gradually eliminate them.
Other important information in connection with Raedric's Hold
Often, guards in the hold come in groups. If you intend to fight them, try to lure single opponents away from the rest, or at least first attack those guards that pose the greatest threat to you (mages, archers, Captain of the Guard on the Eastern walls, etc.).
The area with the siege platform and the eastern part of the walls are inaccessible to the party at first. You can get there only by taking certain passages in the hold (map M10).
It is recommended that you explore the hold thoroughly no sooner than towards the end of your stay there. Regardless of the decisions that you take towards the end of the Lord of a Barren Land quest, you will be able to explore this location without the necessity to fight any additional battles.

