
Withermoore's Soul Jar | Act I Divinity Original Sin 2 Guide, walkthrough
Last update: 16 October 2017
In Caverns, you meet a boy named Mody. It is easy to notice him as he is playing right by the cave entrance, After you start a conversation with him, he will ask you to play with him. If you agree, he proposes hide and seek.
Stage 1: Find the hatch
![In the first turn, you find him on the wooden pedestal [1] - Withermoores Soul Jar | Act I - Chapter II - Fort Joy - Divinity Original Sin 2 Guide](/originalsinii/gfx/word/344051890.jpg)
In the first turn, you find him on the wooden pedestal [1]. The boy will praise you on your perceptiveness and he will become invisible before the next turn.
All in all, you will find him in a recess near the entrance [2]. This time, Mody will decide that he will introduce you to his friend.
If you do not have a lizard on your party, it is necessary that you have a shovel, because otherwise you will be unable to continue this quest.
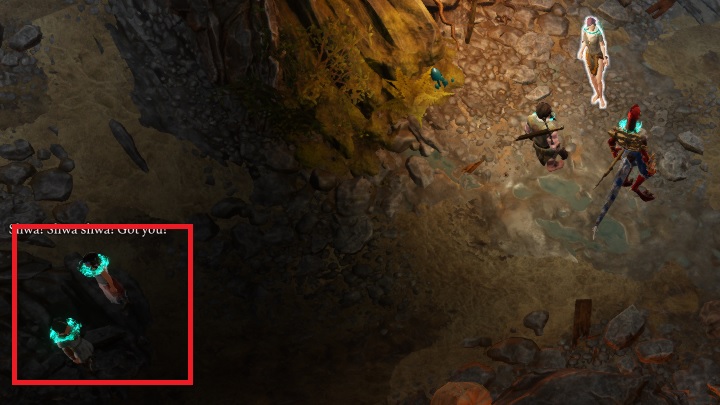
![The boy hides in a small cave [1], and he suggests a better solution to you and he will suggest a better solution to you - Withermoores Soul Jar | Act I - Chapter II - Fort Joy - Divinity Original Sin 2 Guide](/originalsinii/gfx/word/344051905.jpg)
The boy hides in a small cave [1], and he suggests a better solution to you and he will suggest a better solution to you. You can use the suggestion after you search the mound [2]. Use the shovel, or claws, to reveal a manhole.
Stage 2: Lord Withermoore

The hatch leads to the Forgotten Cell. You can find the boy next to the tall statue. Mody will tell you that this is his friend. After a short conversation, approach and interact with the statue.
During the conversation you learn that Lord Withermoore has been turned to stone a thousand years before. He will ask you to take the Spear of Braccus Rex out of his chest,, thanks to which he will be able to move.
Spear of Braccus Rex can be pulled out or destroyed. When you choose the former one, it ends up in your inventory. In both cases, however, the character is no longer a statue. It will turn out that there is something stronger than the spell that is binding him. He will ask you to find where his soul is trapped in the Fort and set it free.
Before you leave, ask the boy if he is not going to miss his friend. Afterwards, tell him that he owes you something for saving his friend. He will show you, on your map, the location of his most precious treasure.
Stage 3: Entering the Fort

After you leave Caverns, go to the Shrine of Seven mentioned by Withermoore. Interact with it and you will notice an additional dialogue option appear. Pick it. Your character will pull the lever behind the statue, which will open a passage next to it.
After you descend, you will find no enemies, but you will find lots and lots of chests that may be hiding treasures. Finally, you will reach a door. There will be a picture of a shrine right next to it. You can open the door by picking the lock, but to make it possible, you have to use a character who has Thievery of, at least, 2.
[Alternative way of entering the location: See chapter Escape from Fort Joy /Choice 1 (STAGE 1): Reach Holding Cells]. The location that you have just entered is Holding Cells. Follow to the end of the corridor, where you will fight Magisters. You can spare the wounded Magister, if only you have not killed him during the fight [See chapter Escape from Fort Joy /Choice 1 (STAGE 2): Holding Cells and Fort Joy Prison], but you should take interest in the key that opens the upper level of the Fort, which you find on the floor of that room. If you have difficulties spotting it, press left "ALT".
Stage 4: Soul Jars
While in Fort Joy Prison, you have to use the secret handle shown in the above screenshot. This will open up a secret passage to The Ancient Passage.
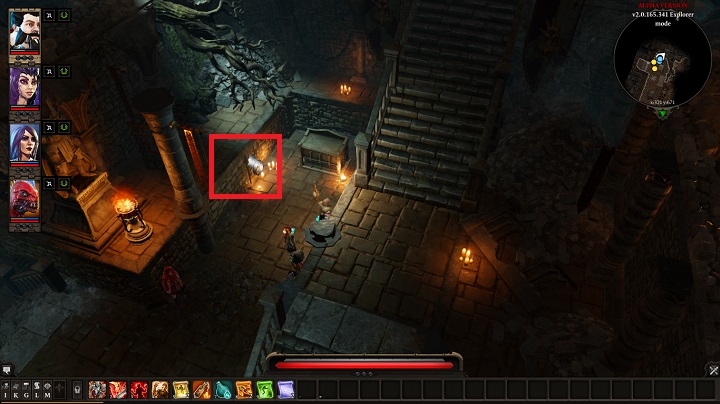
![There are two poison traps in the way[1] - Withermoores Soul Jar | Act I - Chapter II - Fort Joy - Divinity Original Sin 2 Guide](/originalsinii/gfx/word/344051983.jpg)
There are two poison traps in the way[1]. Move jars and use them to block a places which gas is going out. You can also use pyromancy or Trap Disarm Tool, you can use it.
Now you will walk into a big chamber [2] where there are five jars in the center. One of them binds the soul of Lord Withermoore and this is the one that you came here for. Before you do anything, take a look around the chamber, search sarcophaguses [3], but do not touch any of the jars.
Over the chamber, Baraccus's statue [4] looms, which you can interact with. After you do that, you will only receive a message with the character's utterance. The situation is different if you perform the action as a character with 15 Wits. As a result, a list of dialogue options appears but, regardless of which one you pick, you will be able to interact with the statue again and receive Baraccus's greaves.

The above screenshot specifies the jar that you have to interact with to push the quest forward. Under each one, there is a tablet calling Lord Withermoore a different name. You are here for the one that says "Withermoore the Supplicant".
Interacting with a wrong container might summon additional foes. If you want to obtain some more experience, you can summon them.
Finally, after you have interacted with the correct jar, you will see a dialogue box. After you select the option that is connected with taking action, you will enter a dialogue within the party, where you decide together what to do.
Choice 1: Destroy the jar
The energy trapped in the jar will be released and Lord Withermoore will die. If you chose this option then Lord Whitermoore will help you to get rid of a magic barrier in Gargoyle's Maze Tower.
Reward: 1400 experience points
Choice 2: Consume the energy
The energy in the jar will be consumed by the character that interacted with it. It is only possible after completing the quest called The Collar.
Reward: 1 Source Point