Combat in Divinity Original Sin 2 Divinity Original Sin 2 Guide, walkthrough
Last update: 09 March 2020
This chapter of the Divinity Original Sin 2 guide is dedicated to combat. We explain, among others, the turn-based combat system, how to spend action points, what effects influence the chance of dealing damage, and finally what to do in a situation where enemies are too powerful.
In special circumstances, or in a situation where you encounter hostile beings, you'll need to fight. The result of the encounter depends on many factors, first of them being the correct development of each of the party members. If you participate in combat with a high-level team, in which every member has a determined role, and is good at his job, every encounter will be a piece of cake.
Of course, it will often turn out that the monsters you encounter along the way will be too strong for your party. In that case, you can always try to reload your save and attempt to take on the encounter in a different way. The issues discussed in the chapter below will describe the gameplay mechanics to you, and help avoid many mistakes that can result in defeat, or even loss of a party member.
The individual elements have been discussed in the separate sections, which can be found below.
- The Location
- Unit Placement and Formation
- Turns
- Action Points
- Modifiers
- Attacks of Opportunity
- Statuses / Surface / Atmosphere
- Friendly Fire
- Escaping Combat
The Location
If the battle starts from your initiative, try to find an area that is without neutral characters. It may turn out that as a result of some script, seemingly neutral characters will attack you, but the more important thing is that if you hit one of the neutral characters, they will join the battle, forcing you to make some adjustments to your plan, or even causing your defeat.
Following this trend, you need to watch out for neutral characters that are your allies during the encounter. The game is designed in such a way that most of the AoE attacks ignore allied units, but there is always a possibility that you will attack them. In this case, the ally will attack you, and even if he doesn't pose much of a threat, it may be the reason for the failure of the mission.

Aside from that, the battlefield shouldn't contain any elemental sources that the enemy can use against you. Of course, if you have a high initiative factor, you can be the first to use them, but sometimes there aren't any opportunities to do so. Avoid such areas if possible.
Unit Placement and Formation
Good unit placement at the beginning of the encounter can visibly tip the scales to your favor. If there aren't any hills nearby, your objective is to defend the weak character, and placing durable heroes on the front.
If there are hills on the battlefield, try to place all your characters on them. As a result, they will be safer, and will receive a bonus to damage and range as a result of the advantageous position.
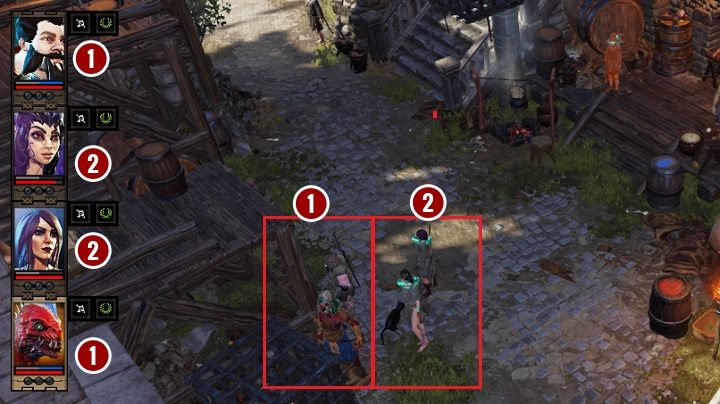
Assuming that there are four heroes in the party, you can place them in any formation, depending on who you want to place at the front. The currently controlled hero [1] will always be at the front - you can see the marked portrait on the screenshot above. The second leading hero is the character whose portrait is on the top in the left upper corner of the screen [1]. Regardless of whether you are controlling him, or he is only following the rest of the party, he will always be in the first line. The remaining character always places themselves behind the first line [2].
Turns
The battles are turn based. The initiative factor is verified at the beginning, and its value sets the sequence in which individual characters can perform their actions. From all the races in the game, the biggest natural initiative factor is found in humans. You should equip all human characters in spells or powers that can slow down or temporarily incapacitate your enemies.

During combat, the sequence is always shown in the top part of the screen. You can recognize your party members without any hassle, while enemies' portraits will be encircled by a red garnishing. If there are allied units (outside of the party) participating in combat, their portraits won't have any garnishing.
The sequence of attacks doesn't change during combat, so the only chance for a higher position is eliminating one of the enemies. Aside from that, you need to remember that if the battle is a result of an ambush (i.e. you walked into the range of enemy monsters) they have a bonus to initiative, and will be placed at the beginning of the turn.
Action Points
As a part of each turn, every character has a set amount of action points that determine the number of actions that can be performed during a single turn. The amount of action points can be increased through skills and abilities, or through spells that temporarily increase the amount.
Each of the actions that can be performed during a turn, has a set cost of action points, so before performing any action, you should take a notice of that. This information can be acquired by reading the description of the ability, but during combat there are always extra information concerning the number of points lost after performing the action.
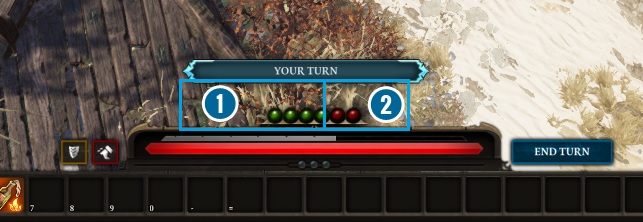
The action point bar has three colors. Black color marks the blocked points - our character can have that many points to use, but currently haven't developed the adequate skills. Green color marks all action points available for the current turn [1]. If, for example, we decide to use a spell, after clicking it, the green points marking the action points will change to red [2]. This way, we can easily verify how many action points need to be spent on completing the action, and make a decision.
It should be noted that unused action points from one turn are moved to the next one, but you cannot have more than 6 during one turn, so the rest will be just forfeited.
The cheapest action is of course moving around the battlefield, and in this case, points are deducted depending on the distance crossed by the hero. To change our location, we don't have to choose any ability; all we have to do is to click on the area next to the hero. While moving the cursor, we can see information near the cursor, detailing how many points will be deducted if we decide to proceed to that place.
In case of physical attacks, most of the time they cost 2 action points, albeit it is determined by the type of the attack. In this case, we should constantly take notice of values that appear during combat. For example, if the attack requires extra movement, it will cost more. Using the remaining abilities has a predetermined cost that can be found in their descriptions.
Moreover, you should take the most important utilities from your inventory, and place them on the action bar, as opening the inventory during combat is also burdened with extra cost.
Modifiers
Every single attack is governed by an endless number of modifiers that decide whether the attack will have its desired effect. Things to take under advisement: the effectiveness of the attack, the chance for a critical strike, and overall damage. Aside from that, we need to verify if the attack will hit the enemy health points directly, or will be reduced by a type of armor our enemy wears.
All these modifiers should be taken under advisement, especially that the individual skills and weaponry rarely show the real damage dealt while attacking. The individual parameters are in bracket of minimal and maximal damage, so we always have to deal with the resultant of these two values. While planning an attack, you need to be vary of whether you have a chance to make a final hit, who is next in line in the turn, and how many hits our hero will have to take until we are able to heal him.
Attacks of Opportunity
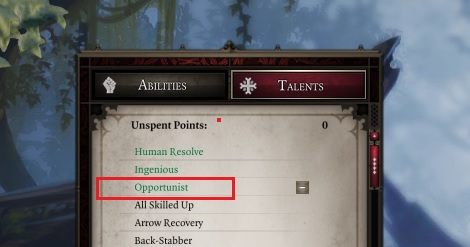
Attacks of Opportunity is one of more important mechanics that are present during encounters. It comes into play only during combat, and only when the given character has this ability. By referring to the hero, I'm thinking about your party, as you can be sure that most of the enemies will engage you in such a way.
Attack of Opportunity is an attack that is performed by the hero outside of his turn, when the enemy is open. You don't have any influence over its course and how much damage it deals, as every event happens automatically. Lowering the guard most often happens in a moment when the enemy who fought in melee range wants to return to a safe position. If he tries to switch positions, there is a chance that you will attack him.
This also applies to your units, so the important thing is to keep the ranged heroes in a safe distance from the enemies. If your hero is surrounded or is simply melee fighting in a close distance, you cannot change his position (move him). Otherwise, he can suffer serious damage that will corrupt the whole position-changing decision. You need to remember that throughout the whole fight, as you negate your chances of winning by revealing yourself.
Statuses / Surface / Atmosphere
Statuses are very influential on the course of the fight. In Divinity Original Sin 2, we can distinguish those connected to elemental powers (water, fire, earth, air), poisons, and bleeding. The individual statuses can be added using magic weaponry, or as an element of a spell.
A status can only be placed temporarily, which during combat is counted using turns. Of course, the status that is placed using magic weaponry or special attacks can be constantly renewed or even multiplied, if the status was placed by a few units or different kinds of activities. These statuses are very dangerous, as they have a large number of destructive effects that can quickly eliminate our hero or even the whole party.
Powers
Status | Source | Notes |
Burned | Fire | Depending on the length of the status, the character has a lowered resistance to fire, so with each turn he suffers more fire damage. |
Chilled | Water | Worst case scenario - it can completely immobilize a hero. In a lighter version, it will considerably slow down his movements and make him vulnerable for water spells. |
Stunned | Air | Most useful against the enemies with water-related statuses. It immobilizes the hero for a certain amount of time, and during this period the hero is completely defenseless. |
Petrified | Earth | It removes all statuses, but immobilizes the enemy in progress. He cannot perform any actions, and his turns are forfeited. |
Poisoned | Poison | Works similarly to the "burned" status, - deals damage which is generated round by round throughout the duration of the status. The hero is especially vulnerable to fire. |
Conventional Weaponry
Status | Source | Notes |
Crippled | Slash | The crippled character is immobilized throughout the duration of the status. If there are enemies in the vicinity, the hero can still attack, but cannot close in on the enemy in any way. It is especially useful when you are trying to stop the enemy forces before they close in on your supporting or ranged heroes. Once you apply the status, you can keep them in their current location. |
Bleeding | Slash | Bleeding works similar to Burned and Poisoned statuses. Only difference is that a blood puddle appears around the hero, which can be used by the enemy to deal extra damage. Eventually, a powerful mage can use the blood to regenerate his health points. |
Knocked down | Blow | As a result of a blow, the hero can be knocked down. You should keep in mind that a similar effect can appear when walking on a slippery surface. The player's turn is forfeited, and when the status disappears, the player gets up just before his next turn. Used as a tactical move, it is similar to Bleeding; the upside is that the enemy cannot attack while the status is in effect, while the downside is that the effect lasts only one turn. |
Aside from status effects, the location of the encounter is also important. If for example your party is standing in a puddle (any liquid), the character using appropriate spells can use that against you. It can change water into poison, which will place the poisoned effect on your units, or use one of the spells from air school that will focus electricity on the water. This way, your whole party will feel the effects of the shock in form of injuries, and in the worst case scenario can get immobilized.
Surface
Liquid | Meaning | Notes |
Water | Lowers the fire resistance. It can be used to electrocute. Knocked Down status. | Water can help our enemy stun us, or our enemy can freeze the water, which will make our team unable to move efficiently. |
Oil | Explode when contacting fire, leaves a burning spot. The damage is instant, with a Burned status. | The biggest dangers are all spells connected with fire. Aside from the blast damage, the heroes receive a Burned status. |
Blood | It can be changed into poison; some of the characters can heal themselves when standing in it ("Leech" Talent). | Blood can be source of health, but using a special spell, the enemy can change it into poison, which will render it useless and create a hazard for your party. |
Fire | Places Burning status on the hero who stands in the fire, or walks through it. | Places a status once contacted, dangerous, but can be easily avoided. |
Poison | Applies a Poisoned status. Some characters can heal themselves using it ("Zombie" Talent) | Similarly to the burning spots, poison fields apply a temporary effect. They should be burned as quickly as possible, before someone uses them against your party. |
The surface is also influenced by the climate, as all those factors interfere with the base resistances of the character against any of the elements. You'll find a table below that explains this phenomenon.
Effect | Result |
Wet | Resistance to Fire +10% Resistance to Water -10% Resistance to Air -10% |
Warm | Resistance to Fire -10% Resistance to Water +10% |
All of the effects detailed here has to be taken into account, and either avoid them completely, or use them to your advantage.
Friendly Fire
Taking into account all the information from the previous section, you should take a look on a certain phenomenon that takes place during combat, when our party uses area of effect abilities.
To explain it, I'm going to use the natural power of the Lizard race - Dragon's Blaze. The ability works in a set cone, which location is determined using the location of our character. We can choose the angle in which we want to use the spell, but it will always be connected to where our hero stands, and if there are enemies inside the cone, they will be dealt appropriate damage. By contrast, every party member or ally will be ignored by the ability - he won't be dealt any damage, effects, etc.
However, once you use the ability, it leaves a burning area in the shape of a cone, which reflects the range of the ability. If there is an enemy in this area, there will also be a burning ground below him, which will apply the status on him. But if any allied character stands in the range, there won't be any burning ground underneath it.
When it comes to the active phase of the spell, each of the allied characters is safe. The problem is when the hero himself will be hurt from the passive phase of the spell. The hero stood inside the cone, haven't received any direct damage, statuses, and the ground underneath him doesn't burn. However, there is burning ground all around him, and if he makes a move, he will be burned the same as the rest of the enemies, and will be dealt the same damage resulting from the status.
You should avoid situations where you burn, poison, or deal damage to your units. Your allies only ignore the active part of the spell, and will be faced with passive consequences if you force them.
Escaping Combat
If you see that the current battle is unable to win with the current hero, you can try to escape the encounter. The important thing is that this ability is only available when the enemies aren't standing in the melee range. What's even more important, the escape ability affects only one hero, the rest of the party stays on the battlefield.
The hero who used the escape option will be teleported to a safe place near the battlefield. In this place, the hero can regenerate his health, reinforce his armor, and return to the battlefield by approaching its location.
In the meantime, you can continue the encounter with the rest of the party, or wait until the party is whole again.