
Guardians of the Galaxy: Chapter 15 - walkthrough, solution Guardians of the Galaxy guide, walkthrough
This page of the Guardians of the Galaxy game guide contains the walkthrough of Chapter 15 (Broken Promises) from liberating Nikki and defeating Raker.
Last update: 25 November 2021
On this page ofMarvel's Guardians of the Galaxy guide, you can find a walkthrough for Chapter 15 of the story (Broken Promises). Our guide will help you with completing the birthday party scene, making Nikki see the truth, defeating the Unifiers and Grand Unifier Raker - one of the final bosses of the game.
- Help Nikki see the truth
- Boss fight - Grand Unifier Raker (the first phase of the battle)
- Boss fight - Grand Unifier Raker (second phase of the battle)
Help Nikki see the truth

This is the second scene from the birthday party and this time, it will be your job to get Nikki to break free from her Promise. The first part of the scene is identical to the previous one, so after reaching the kitchen and talking to Nikki (choice of dialogues is purely cosmetic) you must:
- Light the candles on the birthday cake.
- Attach the projector and calibrate it by passing the scene with the cursors.
- Go to Nikki's room to get your birthday present and put it on the counter.
- Go to office door after Ko-Rel starts knocking.

After the Ko-Rel scene, go back to the kitchen. You can optionally talk to Nikki or immediately ruin the party by destroying the cake and the gift, as well as damaging the projector.
A scene of confrontation with Nikki - The Matriarch will be played. Your task is to make sure that she opens her eyes, and you have to choose 3 dialog options. The following list is an example because there is more than one combination to correctly complete the scene:
- With the first choice, choose the right dialog option - Acknowledge Limits.
- With the second choice, choose the left dialog option - Try to Relate, Again.
- With the second choice, choose the left dialog option - Trust Nikki. This is the most important of the options.

If you pass this scene correctly, Nikki will be liberated, and you'll advance to the next part of Chapter 15.

Making bad choices will cause Nikki/The Matriarch to "restart" the scene. This will allow you to select different dialog options to play the birthday party scene differently.
Boss fight - Grand Unifier Raker (the first phase of the battle)

After you pass the scene with Nikki and "liberate" her you'll be moved straight to the confrontation with the Grand Unifier Raker This is the final boss of the game. The actual final boss faced in the final chapter doesn't even have a health bar and is a much simpler fight in general.
It is worth knowing that your previous actions may have weakened Raker., that is, to deprive him of one of the upper limbs. This will happen if in Chapter 8 you let Gamora go in pursuit of Raker - she manages to cut one of his limbs. This decision affects the battle's difficulty - Raker is a bit easier to deal with if his arm got severed.

You can't start fighting the Grand Unifier right away. First, you must deal with four regular Unifiers.
The enemies are weak to lightning, therefore you should be using lightning attacks during the battle. Make sure to only attack the opponents that aren't protected by Raker's energy barrier. Otherwise you'll be wasting time destroying the barriers.

After you manage to fill a Unifier's stagger bar attack him with the entire team's strongest skills. Once you bring a Unifier down to the verge of death, there's a chance you'll be able to trigger a stylish attack by pressing two buttons at the same time. Do it whenever you can, you'll dispatch the enemies quicker without prolonging the battle.

Always keep moving and don't let the Unifiers get too close in fear of their dangerous melee attacks. Their other attacks are equally as dangerous:
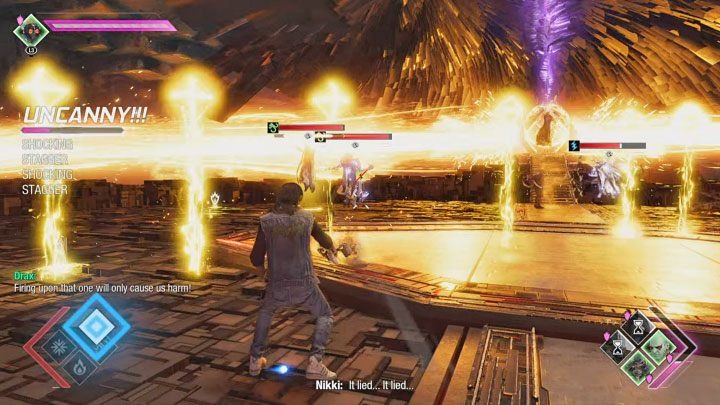
- Bombardment (example shown on picture 1) - move away from the red circles on the ground, which signal where the explosions will happen.
- Moving energy walls (example shown on picture 2) - try to go for a perfect dodge or fit in the gap between the energy streams to avoid getting hurt.

During the battle Star-Lord can be trapped in a forcefield as shown on the picture above. This, however, doesn't mean you'll have to stay in one place. A double jump will get you out of the trap.
Boss fight - Grand Unifier Raker (second phase of the battle)

By defeating the Unifiers you'll progress to the second stage of the battle. This time you're facing the Grand Unifier Raker himself.
Additional note - The game creates a checkpoint between the two phases. You won't need to fight the Unifiers again if you die to Raker.

Raker's basic attacks are identical to the regular Unifiers, which means he can use bombardments, energy walls and forcefield traps. We've already described how to avoid these attacks.
Raker can also charge, which is signalled by a red exclamation mark. To avoid his charges you must dodge sideways at the right moment, otherwise he'll knock you down to the ground and deal a lot of damage.

Raker is surrounded by a yellow barrier which unfortunately doesn't have any weaknesses - you can't use any elements to break it down faster.
Keep shooting him with your blasters while using the Charged Shot perk to increase your firepower and cool down your guns quicker. This should significantly shorten the fight.

Your objective during this battle is emptying the barrier bar and temporarily shutting it down. Use this opportunity and unleash your most powerful attacks to deal as much damage as possible before the barrier appears again. One of our recommendations is the Fan the Hammer skill which lets Star-Lord rapid-fire his blasters. Make sure the other Guardians use their most offensive skills as well.

One of the more annoying things about facing Raker is that the arena gets periodically shrouded by darkness. Unfortunately you can't interrupt this in any way. Each time the darkness falls, you have to wait it out.
As you wait for the darkness to disperse, you must keep moving and watch out for red exclamation marks which keep warning you about the boss' attacks. You should especially watch out for his charges and the bombs landing on the ground.

It's almost certain that you'll need to revive your teammates during the battle. Help your allies as often as you can, but only when Raker isn't charging any new attacks at the moment. Try to "revive" your teammates when their health drops to zero or if they're weakened somehow (for example, by getting frozen).
Raker has several health bars, so be ready for a long battle.

After the battle is won, a cut-scene will begin depicting the victorious march of heroes. Push the left analog stick to continue walking. Along the way, the heroes will stop and talk to various NPCs.
Do not turn off the game at the end credits'cause it's not over. After the credit roll, you'll find yourself onboard Milano, beginning Chapter 16.