
Lost Ark: Hildebrandt Palace - boss, how to beat? Lost Ark guide, walkthrough
On this page of the Lost Ark guide, you will read how to complete Hildebrandt Palace, the second Abyssal Dungeon of the Tier 1 Phantom Palace series.
Last update: 21 June 2022
Hildebrandt Palace is the second Tier 1 Phantom Palace Abyssal Dungeon in Lost Ark. On this page you will learn the boss fights mechanics and how to complete this dungeon.
Basic information
To enter it, you need an item level of at least 460. This is one of the longer games, so the basis is to try to survive. Don't focus on dealing damage to the enemy, but on dodging and performing the mechanics as it should be. This dungeon doesn't require you as much cooperation and coordination as in Hall of the Twisted Warlord, but you must be familiar with the level mechanics.
As in many Abyssal Dungeons, there are a lot of Stagger Checks waiting for you. Therefore, stock up on the right skills and grenades: Whirlwind/Clay. Other items which might prove useful are Swift Robe - for faster movement and dodging, as well as Time Stop Potion - for temporary invincibility. Don't forget HP Potions!
Phantom Legion Queen

Phantom Legion Queen is the first boss in Hildebrandt Palace. She is extremely swift, often performing a sequence of moves after which, for a brief moment, she becomes an easy target. Almost all of her attacks are area-based. They involve shooting matter in multiple directions and orbs appearing in the arena - basically nothing new compared to previous boss fights. Sometimes, however, she can create a zone around her - touching its border and trying to get out results in continuous damage until the zone disappears.

The first simple mechanic starts once the boss has 9 health bars. The camera pans away for this time, and a wave of energy with deadly force appears on one of the four sides of the arena, heading to the opposite end. Now, have a quick look around to select the correct portal in the mirrors that will take you to safety in the arena. As a rule, there is only one correct option. In the attached screenshot, you should use the yellow portal to teleport the characters behind the wave. While performing this mechanic, you must perform 2-3 dodges to be able to continue the fight.

This mechanic will roll around again when the boss has about 6 health bars left. However, after the second mechanic is performed, the boss gets additional attacks, the most notable of which are energy waves that appear during combat. There is always a safe gap between them, which you should use to hide. These attacks not only inflict damage, but also move the player away and interrupt their attacks.
Brelshaza - first stage

Brelshaza is the second boss. The fight is divided into two stages with a break (and a save point) between them. Both involve the mechanics explained below. In the first stage, the fight arena is of a rectangular shape. The distinguishing trait of that fight is that the boss basically doesn't move (only occassionaly teleports to another location) and casts all spells from the same spot. Many spells are divided into two stages, thanks to which they are easy to dodge.
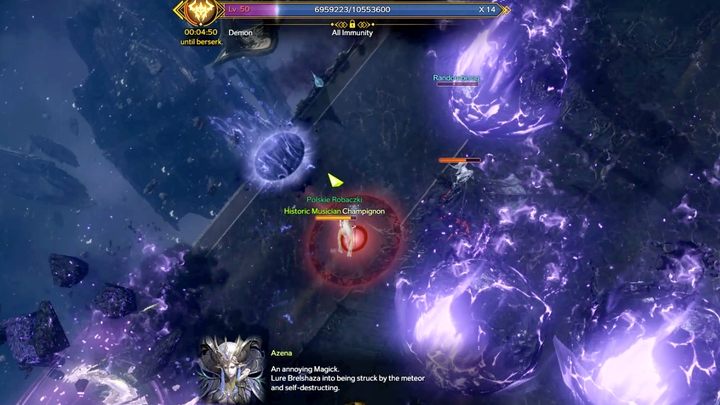
When the boss has approx. 15 and 6 health bars respectively, certain combat mechanics follow. The arena is tilted and energy orbs start rolling down from above. The enemy continues to attack. Here you should focus only on dodging, especially when it comes to large orbs, which otherwise will push you down the arena. The boss at this stage takes significantly reduced damage. Interrupting this mechanics involves taking advantage of a red round field appearing around one of the players every ten seconds or so. When this happens, the particular player is targeted with a meteorite attack. The player needs to get close to the boss so that the meteorite strikes Brelshaza too and thus, interrups her attack. When the field around the player disappears or when you see a meteor coming, you can perform a dodge. Wipe is not involved here in any way. The mechanics can be completed even with only one player left alive.
Brelshaza - second stage
The second stage takes place in a different arena. As many as four mechanics (of two types) await you here.
In this fight, the boss's attacks are more complex and cover larger areas than before. You will not be able to complete the dungeon if any players die before the last stage of the mechanics.

The first stage is a Stagger Check preceded by a cutscene. When the monster's hand attacks Brelshaza, you must destroy its shield using Stagger attacks or proper grenades. This mechanic occurs twice - when the boss goes down to 34 and 26 health bars respectively. It is also subject to a time limit of only a few seconds.
If the mechanic occurs in a corner of the arena, you can skip the first Stagger Check by running off to the opposite corner of the arena. However, you cannot do it the second time around.

After performing a Stagger Check, the boss gains additional area skills. Here it is recommended to focus simply on surviving, especially that the fight can last as much as 10 minutes, so you don't have to rush. One of the powerful attacks involves energy streams moving from one side to the other across the arena. In addition, you will have to deal with numerous area attacks that can affect up to half of the entire arena and can also impose a Darkness curse on players, resulting in limited vision.

The second mechanic, which also appears twice, occurs when a boss has consecutively 16 and 8 health bars. At this point, a red and gold "X" will appear on one of the players while the rest will have a glowing cone or beam in front of them. In this case, the other players must target the player with the "X" until the mechanic ends (each player will then fire a shot towards the X). At this point, a meteor will be falling down from the sky - if you don't perform the mechanics correctly, you won't be able to move and you will die. Otherwise, you will be able to escape the meteor by running off to the edge of the arena.
To perform this mechanic correctly, the marked player should immediately stop moving and the other players must move closer to them. They should stop moving and use a basic attack targeting the marked player to allow for a precise aim.
The difference here is that a round field will appear behind the back of one of the players (who does not have an "X"). That player must aim the field at the player with the "X", so turn their back to the marked player. The remaining allies must still target the marked player. In theory, if you have strong attacks or a higher level ally, you can avoid the second mechanics if you eliminate Brelshaza at 8 health bars.

On a side note, beware of "blisters", which are one of Brelshaza's attacks. They petrify you and only your allies can break you out of this state by attacking you. If a mechanics starts when one of the players is petrified, you will not be able to complete it.