Achievements, endings and choices | Chapter 1 - A Knight to Remember King's Quest Guide
Last update: 11 May 2016
Napping on the Job

In the cave under the well, in the first chapter, you find a bed on the ground. If you interact with it 3 times in a row, you receive a Steam achievement: "Napping on the Job".
In The Mouth of Danger

While sneaking to the dragon lair in the first chapter, you can head straight on to the sleeping monster. You will then be devoured and, at the same time, you receive a Steam achievement: "In The Mouth of Danger". Unfortunately, this action also means that you need to start the sequence over (you start at the moment after crossing the river).

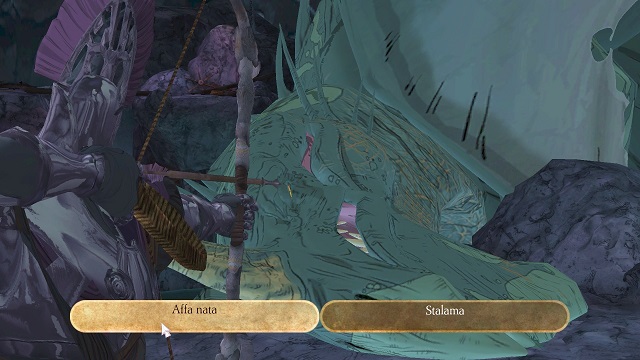
Apart from that, the ending of the 1 chapter needs to be mentioned here. At the moment, at which the dragon jumps you, you need to pick one of the three spots to shoot the bow at.
1. If you hit the eye of the monster, he gives up. In the final cutscene, he is shown wounded.
2. If you hit the bell, this distracts the dragon, who loses his interest in you. In the final scene, you see him chained in the cave.
3. If you hit the turning wheel, you break the chains keeping the dragon down. The grateful dragon spares your life. Actually, this is the best course of action, especially that a extra dialogue line becomes available during the final cutscene. At the end, you witness him liberated from the chains.
Unicorn Snack Food and A Secret Entrance

At the beginning of the second chapter, you encounter the Merchant. If you equip the axe for four successive times, while right next to the unicorns, you die. This way, you receive a Steam achievement: "Unicorn Snack Food". If you get around the unicorns on the right, instead, you find a secret path to the cave. Unfortunately, you will be turned back on your way there, because there is no connection between this story and the main storyline. You will be rewarded with an achievement: "A Secret Entrance".
It is worth noting that in the final cutscene, you witness the merchant's cart with the spare wheel that you have brought him, i.e.: stale bread, the shield or the table.
A Prickly Situation

While traveling between the city and the merchant's cart, you run into a passage behind prickly roots, which takes you to the well. If you interact with it, you learn that this must be the well from the previous chapter of the game. If you walk straight into the roots, instead, you die but you receive a Steam achievement: "A Prickly Situation".
Graham the Basilisk

In the second chapter, where you need to cross the river, you can simply walk over to the other side (the water is shallow). You do get to the other side, but the game returns you back to the initial point. This action grants you an achievement: "Graham the Basilisk".
Horn Blower

At any point in the game (after you have taken the test of chivalry), you can go to the garden next to the city and go down the path. This way, you reach the next location, where there is the red horn. You need to interact with it nine times, which grants you a Steam achievement: "Horn Blower".
Froggy Throat

If you go past the red horn and head down the path, you reach a pond with several frogs at. If you try to catch them 6 times in a row, you receive a Steam achievement: "Froggy Throat".
Misteak

Towards the end of chapter 2 - when the area opens up a little bit more - you can receive a secret achievement. However, you need to ensure correct order of actions. After you obtain the steak, used as a bait for the trap (the location to the North-East of the statue) you first need to leave the city across the back gate and use the steak while next to the bushes in the woods.

Thanks to this, you will be devoured by a wolf and receive a Steam achievement: "Misteak". Only then, can you take the steak to the bushes at the main road and attract the badger (at this point, you lose the steak and the option to receive this achievement, in case of an incorrect order of actions).
Purple Badger Don't Care

During the mission that you complete or the baker, you find a picnic area. Shake the tree there to make fruits drop down, i.e. the Starberries. Unfortunately, at the same time, you agitate the bees in the hive, which take interest in the nearby table with food on it. Here, use the purple badger (you have earlier put it into the cauldron with goo in the potion shop), which does not drive the bees away. Still, you receive a Steam achievement: "Purple Badger Don't Care".
That's The Ticket
After you have completed the test of chivalry the game becomes discernibly less linear. It is then that you can complete many quests without the necessity to stick to specific objectives. If, in the first place, you go for search of Achaka, the choice that you make at the end will be important. If you attack the dragon, you receive the eye, which counts as the solution to the final test. If you decide to escape, you will be left with nothing (only at the surface, Manny gives you the eye during the cutscene). In both cases, Achaka dies.

Things are a little bit different if you first complete the quest for troll Olfi. Also, thanks to his help, you can successfully complete this duel. You simply need to approach the horn next to the ramp by the main arena and equip the Olfie's horn mouthpiece. Thanks to this, you summon the troll, who shows the hosts is eyes. If you have already completed the duel and you are heading out for the journey with Achaka, the choice connected with the dragon makes no sense, because it has nothing to do with anything that would later affect the course of events (the knight dies anyway).

Alternatively, before you complete the quest for Olfie, and before you go for the journey with Achaka, you can bring the pumpkin and the 1 gold coin from the potion makers in the city. Then, you can dip the lantern in the cauldron with the strange substance. Thanks to this, the item is colored purple, which makes it resemble the eye of the beast. This way, you will be able to show it to the guards and complete the duel. If you pick this method, you will be left penniless and you cannot buy the cake for the troll (completing this quests unlocks the rest of the storyline). To obtain the coin, you will have to use the lantern to light the way in the cave to the North-East of the location with the statue (this has been described in the 5th chapter of the walkthrough, in the "Rescue Triumph" tab).
The cutscene at the end of the game will change a little, which results from which eye you have shown to the hosts of the tournament: the eye of the dragon (Bravery), Olfie's eye (Compassion), the lantern that resembles the eye (Wisdom). Regardless of your choice, you receive an achievement: "That's the Ticket".
Dead End Dancer

While exploring the cave with Achaka, you find a fork. One of the paths leads to the depression, whereas the other one joins a very long corridor. Take this one, although the narrator wants otherwise. If you reach the edge of the ledge and stop there for a moment, your character starts dancing. As a result of this, you receive a Steam achievement: "Dead End Dancer". The game takes you to where you would be, had you chosen the first path.
Opening Knight

After Achaka frees you from the trap, approach the door and squeeze through the gate to the other side. Now, you have to solve the complex mechanism of ropes, shields and weapon stands. If you try to take the same path back, three times in a row, you receive a Steam achievement: "Opening Knight".
Strong Minded

After you win with Acorn in the Duel of Strength, you receive a Steam achievement: "Strong Minded". The walkthrough for the battle itself has been provided in chapter 4.
Fast Feather

If you win with Whisper in the Duel of Speed, you receive a Steam achievement: "Fast Feather". The walkthrough for the race itself has been provided in chapter 5.
Helping Hat

In the game, there is an achievement called "Helping Hat", which you receive after you complete the final stage, but only if you have earlier completed specific tasks from citizens:
1. You shut the back gate, each time you left the city that way.
2. You saved the picnic area by knocking the beehive into the chasm, with the fruit stick.
3. You brought the potion makers ingredients: A snoozing leaf and a frog.
In the final cutscene, after you ended the game, you note the citizens in different situations, depending on the choices that you have made so far:
1. If you meet the conditions, Maya is happy, and if you did not - sad.
2. If you meet the condition, the baker is happy, and if you did not - bee-stung.
3. If you meet the conditions, the potion makers have white teeth, and if you did not - yellow.
Apart from that, it is worth noting that they will offer you some items, before the final battle with Manny. The citizen, from whom you bought your weapon, does not have it on the cutscene.
The End?

You get the last achievement by completing the entire storyline in the 1st episode of the game. After you win the final battle with Manny, the final cutscene starts. Now, you receive the Steam achievement: "The End?".