GTA 5: The Big Score 2, the Obvious variant walkthrough
This page of the guide to Grand Theft Auto V has a walkthrough for mission 83 - The Big Score #2 - the obvious variant. Our GTA 5 guide explains how to use the driller to get inside the vault, how to defend yourself while stealing gold, how to get out of the bank, lose the chase, and place the stolen cargo on the train car.
If you chose the subtle variant for The Big Score, check out the walkthrough for mission 79.
- Mission 83 - The Big Score #2 - the Obvious variant general information
- Mission 83 - The Big Score #2 - the Obvious variant full walkthrough
- Rewards and challenges in mission 82 - The Big Score #2 - the Obvious variant
Mission 83 - The Big Score #2 - the Obvious variant general information
Way to unlock: You need to complete main missions 80 (Getaway vehicle #3), 81 (Driller) and 82 (Sidetracked). You can now visit the strip club (letter H on the world map).
Playable characters: Michael, Trevor, Franklin
Additional information: You have probably figured out already that this is going to be a relatively long mission and, unlike the Subtle variant, it consists of a series of very demanding fights, which will start right after you drill the tunnel to the vault. Further into the mission, you will also need to handle a police pursuit, which is going to be easier if only you invested into the upgrades for the getaway car. Paradoxically, the final part of the mission is the easiest one, because the act of shooting down the choppers chasing after him will play out without him intervening too much in it.
Mission 83 - The Big Score #2 - the Obvious variant full walkthrough

Just like earlier, you can start this mission as any of the playable characters and you need to visit Trevor's strip club. After you watch the cutscene, cut to Michael and get into the car (Ubermacht Oracle) to reach the region of the bank's main entrance and collect one of the hired accomplices. After you receive an appropriate piece of information, cut to Franklin.

You probably already noticed that Franklin is already in the driller's cab (HVY Cutter). Start by coming closer to the wall separating the construction site from the vault. Stop in the spot shown in the above screenshot and press the button on the D-pad that the game prompts you to. This will start the driller.

Wait for the blades to drill through the wall, into the tunnel to the vault, rev up the driller and stop it near the starting point of this part of the mission. Exit the cab and walk through the tunnel. Select the sticky bombs from the inventory and plant them, one on each of the metal gates. After you do that, get away and detonate the charges.

Quickly return to the area where the driller is parked, because there will soon the SWAT team members start to appear. Start protecting your ally by conducting fire from behind a cover and do not allow any of the enemies to come close. While fighting, be prepared to change your position at some point, because a group of law enforcers will start approaching from the opposite tunnel. You should decide to do that only after you have eliminated all of the enemies from the first wave, thanks to which you will not be attacked at both side simultaneously.

You are going to fight another battle after Franklin manages to attach the cargo with gold to the sling of the chopper piloted by Trevor. They will approach from the side of the vault that you have stolen the gold from. It pays off to take advantage of the fact that they first need to walk through a narrow tunnel to come close to you. The last wave of the SWAT team members will abseil down the hole that you used to get the gold out so, you should be prepared to change positions swiftly (it pays off to defend yourself while near the vault that you have just emptied).

Continue fighting until the game suggest that you should cut to Trevor. During the interlude, you do not need to figure things out on your own, and only follow the chopper ahead, to the North where you can leave Los Santos. After you receive an appropriate message, cut to Michael.

You are going to deal with yet another series of fights but, along your way to the place where you are supposed to meet Franklin, you will, at first, have to deal with weak police officers. Keep pushing forward, use the covers on a regular basis and slow down time frequently. After you come close to a small bridge, the game will grant you with the possibility to cut between Michael and Franklin freely. You will also get a new objective to the mission, being the reaching of the underground parking lot where you have parked the getaway car previously.

Resume your walk and keep in mind that you will need to eliminate not only the regular policemen, but also SWAT team members. This is not the only problem, though, because there will appear a chopper around very soon, and it would be a good thing to shoot it down, by targeting the pilot. Keep following your allies, cut between the playable characters on a regular basis, to take the best advantage of the position in which they currently are. Wait for a moment when there will appear another chopper appear on the left and eliminate the pilot.

Take the stairs to the square in front of the skyscraper, deal with the enemies that you find here and shoot down the third chopper, from behind a safe cover. After you have cleared the area, go towards the narrow passage that some of the policemen earlier appeared at. This time, it will become necessary to shoot down a helicopter belonging to the Merryweather corporation.

Climb down the stairs, while eliminating all of the enemies that you encounter. After you come close to the one of the trunk roads, it would be a good idea to lay fire, from the balcony, down on the police cars (it is a good idea to use the grenade launcher or explosives), to kill the policemen next to them the easy way. Take the first left turn and enter the underground parking lot. There is the last major fight to handle here, during which it pays off to hide behind pillars and explode cars (apart from the one that you are going to use as the getaway vehicle!).

After you have secured the area, get quickly into the vehicle that you have left here earlier, exit the garage and start your escape. It is not going to be that easy to lose the five-star pursuit but, if you have taken my advice and upgraded the car with the armor and the bulletproof tires, you will not have to worry that the car will be destroyed too early. Traditionally, a good place to hide is a multi-storey parking lot but, you can also drive out of the city and take advantage of the fact that policemen do not do that well off-road. A risky choice is attempting to reach the Los Santos Customs garage.
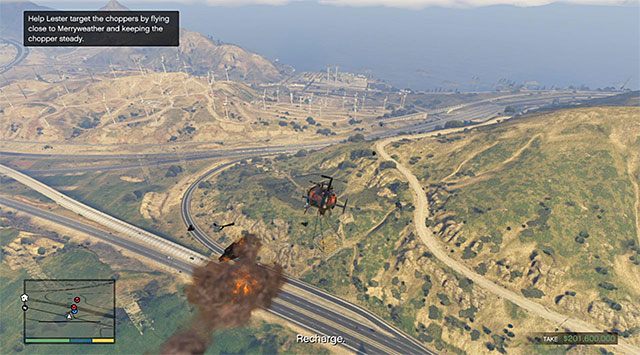
After you have lost the pursuit, cut back to Trevor, to learn that you will need to shoot down the hostile Merryweather choppers. What makes this a lot easier is that you do not need to attack them personally, and only need to make sure that the flight is stable. Thanks to this, the rockets discharged by Lester will be hitting their targets. At the same time, remember not to fly too low because you will easily bump into a tall object in the environment (e.g. a pole or a wind power plant).

The final main part of this mission is to put the gold into the cargo car attached to the railway engine that you have stolen earlier. What makes this more difficult is that the train remains in constant motion. Therefore, you not only need to steer the chopper above the track, but also move for the whole time and await the moment at which you can press the button on the D-pad and release the cargo. You can now return with Lester to the airfield, which will complete this mission.
Rewards and challenges in mission 82 - The Big Score #2 - the Obvious variant
Rewards for the completion of the mission:
- The skills of the accomplices in the heist increased (if they survived)
Requirements for the completion of the mission in 100%:
- Headshots - you need to kill 20 enemies by shooting them on the head.
- Mission Time - You need to complete this mission within 16 minutes. Use the best available weapons, thanks to which you will be able to win all of the fights quickly. It is also necessary to lose the police pursuit on the car taken from the underground parking lot.
- Cha-Ching - You need to put the gold onto the train within 30 seconds.
- Accuracy - you need to complete this mission with the accuracy rating of, at least, 60%.

You are not permitted to copy any image, text or info from this page. This site is not associated with and/or endorsed by the Rockstar Games or Rockstar Games. All logos and images are copyrighted by their respective owners.
Copyright © 2000 - 2025 Webedia Polska SA for gamepressure.com, unofficial game guides, walkthroughs, secrets, game tips, maps & strategies for top games.