Hamlet of Stormbreach | Walkthrough Legend of Grimrock II Guide
Last update: 01 June 2016
Key points of Legend of Grimrock 2 - Hamlet of Stormbreach
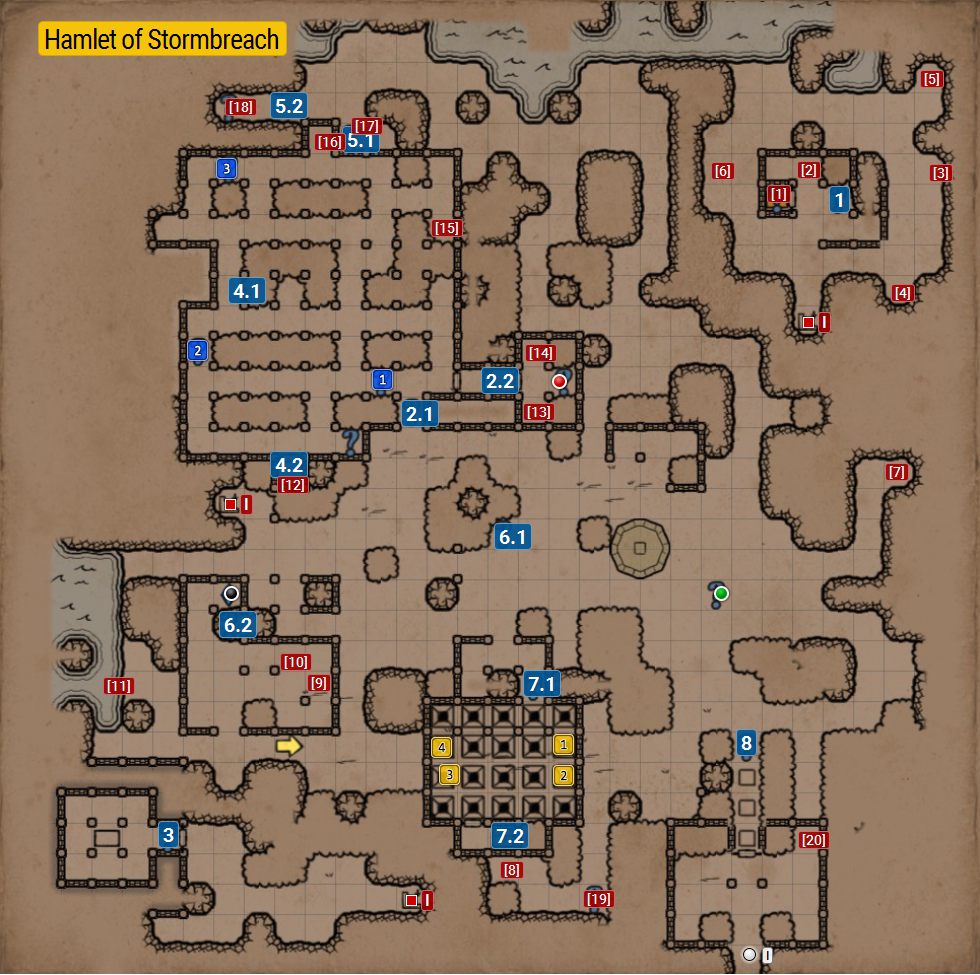
20 - Puzzle/quest element
[12] - Item
Healing Crystal
Power Gem
Buried Treasure
I � To Sewers
I � To Crystal Mines
Buried Treasure
Buried Treasure: Crystal Shard of Protection, Jeweled Scepter of Ruling
20 - Puzzle/quest element
1 � Secret - you have to press three keys in the right order. Every time you press the right key, you will here a characteristic sound. If you don't here it, you have to start again.
The right sequnce: right, left, forward, forward, right, left, left. This combination should allow you to access the secret.
2.1 � A puzzle in which you have to pull three levers (blue squares 1-3 on the map) to open the passage to a Power Gem (2.2). The situation is made difficult by spikes through which you have to make your way by standing on safe fields.
2.2 � Passage to the Power Gem. You can open it using three levers.
3 � Shrine of Air. Bring four Power Gems here and they will be turned into Essence of Air.
4.1 � A lock to which you need a Gold Key. Opens the room marked 4.2.
4.2 � The room opened using a Gold Key (4.1).
5.1 � Secret - A switch on the wall that opens the room marked 5.2.
5.2 � A secret chamber opened with a switch (5.1). There is and Ogre inside.
6.1 � Teleporter to The Hub. You can find the key near the Healing Crystal in this location (6.2).
6.2 � Teleporter key to The Hub. Use it in 6.1.
7.1 � A puzzle that will allow you to access a chest with a Hammer once solved. You have to pull all the four levers (blue squares 1-4) without falling down. The hatches fall and raise depending on which one you stand on.
Here is the step sequence, from the start to the chest:
straight, straight, left - lever, back, right, straight, left, straight - lever, straight, right - key (to a shortcut in Sewers), right, right, back, right - lever, straight, left, back, right, straight, left, back, back, back, left, left, straight, right, right, back, right, straight - lever, left, left, straight, right, straight. After performing this sequence, you should be near the chest (7.2).
The easiest way to go back is to jump into the hole and heal near the closest Healing Crystal.
7.2 � Chest: Maul.
8 � Puzzle: You have to step onto next plates but waiting a little more before stepping onto each plate. Step onto the first one and count to five, then step onto the second one and count to six. On the third plate, count to seven and stepn oto the last plate. The gate should open.
[1] � Chest: Tome of Energy, hint to a puzzle in the Archives.
[2] � Pellets
[3] � Food
[4] � Food
[5] � Healing Potion
[6] � Food
[7] � Blooddrop Cap
[8] � Gold Key, Broadhead arrow x3
[9] � Throwing Axe x2
[10] � Pellets
[11] � Orb of Wisdom
[12] � Rogue Boots
[13] � Greater Energy Potion
[14] � Greater healing Potion
[15] � Spirit Mirror Pendant
[16] � Potion of Ressurection
[17] � Food
[18] � Tome of Knowledge
[19] � Blooddrop cap
[20] � Blooddrop cap
Hamlet of Stormbreach is located below the Sewers. Apart from a new type of enemy (ogres) it is rather easy to explore. You can also find there turtles or worgens, which will drop food after they die. Be careful though for the charge attacks can be rather devastating for your party. You can also find here a temple of air (3), available to enter through one of the sewer exits. You can also find here the door to the Crystal Mines (8), but in order to open them, you will have to solve the riddle based on walking through special plates. The most frustrating can be solving the riddle (7.1) in which you have to pull four levers, in order to get to a chest. Sequence for that is: Forward, forward, left, lever, backward, right, forward, left, forward, lever, forward, right, key (for the shortcut in the Sewers), right, right, backward, right, lever, forward, left, backward, right, forward, left, backward, backward, backward, left, left, forward, right, right, backward, right, forward, lever, left, left, forward, right, forward. After this sequence of moves, you should find yourself by the chest. There is also a power gem in this location to pick up. To get it, you will have to solve the puzzle (2.1) with spikes and, again, levers.

