Herder's Den | Walkthrough Legend of Grimrock II Guide
Last update: 01 June 2016
Key points of Legend of Grimrock 2 - Herder's Den
20 - Puzzle/quest element
[12] - Item
Healing Crystal
Power Gem
Buried Treasure
20 - Puzzle/quest element
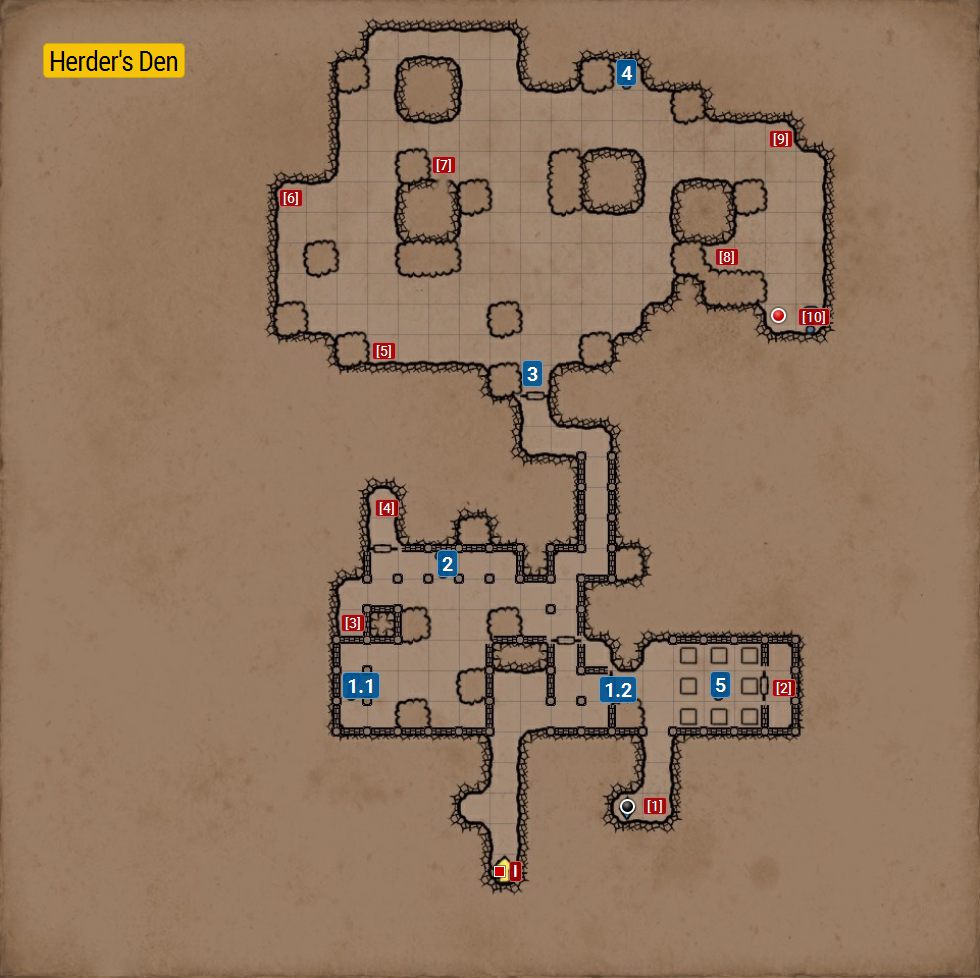
[1] � Timepiece
[2] � Serpent Staff - needed to open the gate: Pyramid of Umas
[3] � Pickaxe
[4] � Iron Basinet, Antivenom
[5] � Pellets
[6] � Skull
[7] � Pellets
[8] � Lock Picks
[9] � pellets
[10] � Mudwort, Etherweed, Recipe
I � To Keelbreach Bog
1.1 � Chest - a monster. After killing it, it drops a key to a gate (1.2) and a Battle Axe.
1.2 � Puzzle gate. The monster has the key (1.1).
2 � Secret - a hidden swtich to another room
3 � A fight with multiple enemies and a boss. You have to destroy the plants (parts of boss's body) as soon as you can. You should have some antidotes with you. First, destroy the plants (body parts) and ignore the other enemies completely, unless you have no option of moving. After defeating the boss, the gate to the room from which you came will open and you will be able to step back and eliminate the rest of the enemies in the corridor and, if need be, go back to the Healing Crystal.
4 � Key to a Teleporter (Kellbreach Bog 6).
5 � Using some items, create three symbols. After making each symbol, collect the items. A number marks verses:
The first sign has to symbolize the Fireball spell: 3 - left, 3 - center, 3 - right, 2 right.
- the missiles launched behind the gate should turn into ice.
The second sign should symbolize Ice Shards spell: 1 - left, 1 - center, 1 - right.
Missiles should turn into lightning.
The third sign should symbolize Lightning Bolt: 2 - left, 2 - center, 3 - center, 3 - right.
The gate will open.
You will obtain Serpent Staff - an item that will open the passage to Pyramid of Umas if you use it on the door.
This is a dungeon that you will have to approach from the Keelbreach Bog's swamp side. You may encounter big moving mushrooms, quite durable and letting out smaller equivalents of them (attacking your whole party from a distance, but easy to kill). They are also releasing the cloud of poisonous gas in front of them. Watch out for the one particular chest (1.1), as it is the Mimic (a monster disguising as a chest) who drops a key which you can later use in order to open the chamber with a crystal of life which surely may come handy later on. Further on, there is another chamber (3) which may present quite a challenge. After entering it, the doors behind you will be locked shut until you will defeat every totem (big plants) inside. It is pointless to engaging a fight with any enemy as you will surely be outnumbered and pinned to a corner. Adding to that a poisonous cloud, you will be dead sooner than you will be able to kill them. Be mobile and focus on destroying every totem and then rush to the doors, luring the enemies behind you to a tunnel. Attack them while retreating and help yourself with the crystal of life if necessary. In the big hall you will find a key to the portal and a Power Gem.

