ESO: User interface guide ESO guide, tips
Last update: 26 May 2020
On this page of our guide we explain the user interface components in The Elder Scrolls Online. We have prepared a sample TESO screenshot for this purpose. In this section you can find explanations of the information that appears on the screen and the meaning of each of them.
Not all icons and information are displayed all the time. Some of them appear on the screen only when they are needed, for example, when you start fighting monsters.
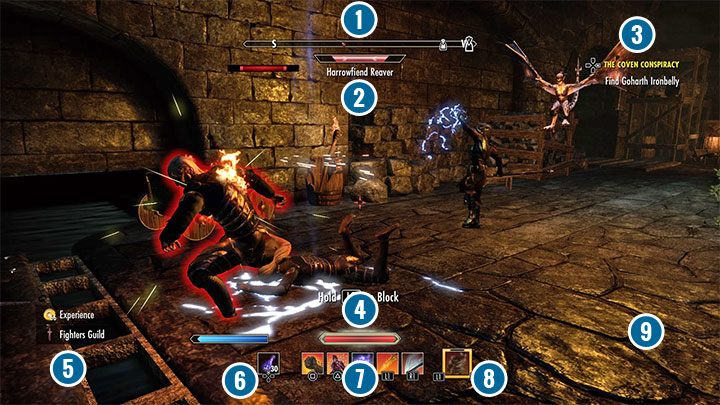
1 - Compass. It has several uses and the most obvious is to indicate the direction of the character's direction (north, south, east, west). However, there are also markers on the compass pointing to important places from the surroundings - these can be, for example, quest markers or entry/exit markers from the location.
2 - Name and health bar of the character / opponent. Pay particular attention to the design of the health bar - it looks different for stronger monsters that are more robust.
3 - Name and list of objectives for the currently selected quest. You can freely switch between quests that you currently have in your journal (press T key on PC or right directional button on PS4/XONE).
4 - Bars of Health, Magicka and Stamina of the hero. They only appear on the screen if their current value changes. For example, a health bar may appear if you lose your health points, a magicka bar if you cast a spell, and a stamina bar if the character's stamina drops as a result of sprint.
5 - Area of minor notifications. In the bottom left corner, various notifications may appear. These may include, for example, items and gold gained, advances in character skills, or the current amount of bounty awarded for a hero who broke the law.
6 - Icon of the item from the quick selection slot. You can quickly consume a disposable item (press Q key on PC or top directional button on PS4/XONE) or hold down the button to trigger the drop-down item menu.
7 - Icons of active skills. Only those abilities will appear on it that you have put on the quick selection bar beforehand.
8 - Ultimate skill icon. You must unlock Ultimate ability in advance and place it on the quick selection bar. In addition, it has to recharge and only then can it be activated (press R key on PC, L1+R1 on PS4, LB+RB on XONE).
9 - Quick chat. A quick chat window may appear in the bottom right corner of the screen. You can use this option if you want to send and read messages faster.