The Tomb of Fairel Dragon Age: Inquisition Guide
Last update: 11 May 2016
Way to unlock: Meet with Lace Harding.
Quest giver: Lace Harding (M16,1)

This quest is unlocked after arriving to the Hissing Wastes for the first time (when talking the Lace Harding (M16,1)). The main hero will learn about a dwarven tomb and receive a Sketch of Four Pillar Tomb, containing hints on where to find one of the five additional tombs. Visiting these smaller tombs will turn out to be necessary when searching for keys to the Tomb of Fairel. The order in which you visit the tombs doesn't matter. You can find information about where to find them below.

The first one of the five tombs is located in the south-western corner of the map and there is a large square in front of it (M16,1b). To gain access to this tomb (and to any other tombs), you have to light the Braziers located nearby in the proper order (you can figure out the order by reading the inscriptions around, but if you're using this guide, you don't need to do that). If you make a mistake, a couple of strong enemies will appear near the tomb. You will have to defeat them and start all over. The right order of lighting the Braziers is:
- The one in the southern part of the square
- The one in the eastern part
- The one in the northern part
- The one in the western part (the closest to the entrance)

You can now start exploring the first tomb. The most important thing is to find a large chest located in the main hall. Inside the chest, you will find few very valuable items and a Key Fragment (one of five).

The second tomb is located near a cultist camp in the central part of the wasters (M16,1e). Theoretically, you could try to sneak behind their backs, but as they are connected to the "Sand and Ruin" quest, it is best to eliminate them. After the battle is over, search the area on the surface (there's a book nearby, containing a sketch) and find the stairs leading down. Go to the main hall and find another book.
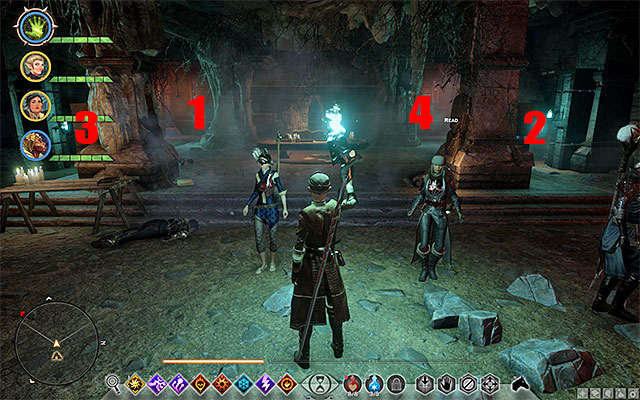
Just like before, you have to interact with the Braziers in the right order, as it will prevent the enemies from spawning. The right order is marked on the screen above (start from 1 and end on 4). After lighting all the Braziers, go to the last chamber of the tomb and open the large chest to find the next Key Fragment.

The third tomb is located at the bottom of the canyon, west from the place when you've found the second tomb (M16,1g). To safely get to the bottom, use a mount (you can also take a longer path). Be careful, as there are Poison Spiders around and inside the tomb, which can poison you and your team members.

You have to do the exact same things in this tomb as in the previous ones. The right order of lighting the Braziers is marked in the picture (start from 1 and end on 4). After lighting them all, go inside and open the chest to collect the third Key Fragment.

The fourth tomb can be found in the eastern part of the map, north from one of the camps in this area (M16,1i). You have to be careful, as there are Venatori around the tomb. You can try to sneak past them, but the best thing to do is to eliminate them all. The tomb itself is quite well hidden. Locate a large hole in the ground and use the ladders to go all the way to the bottom.

After some walking, you will reach the hall with Braziers in it. Light them in the right order (shown in the picture). After going inside, find the large chest and collect the fourth Key Fragment.

The last tomb is located near the camp in the Northern part of the Wastes (M16,1l). Like in the previous tombs, be very careful here, as there are Poison Spiders near the entrance.

Reach the main hall and start lighting the Braziers. The proper order is shown in the picture above. Find the chest and collect the fifth Key Fragment.

Now, you can set out to the Tomb of Fairel, which is located in the eastern part of the Wastes (M16,1m). You don't need to hurry, as there is a dragon (Sandy Howler) flying near the tomb (M16,1n). However, fighting the beast is not necessary to complete the quest. You can go past it using the path to the South. It is the best thing to do if your team is below level 22-23.

After reaching the tomb, the main hero will use the key automatically. Go inside and explore the whole tomb. Open the large chest and collect the treasures to end this long quest.
Rewards:
- Experience (a lot)
- 2000 Inquisition influence
- 3 Inquisition power