Chapter 3: Five-Oh-Sink - SIXTH ASSIGNMENT:
Destroy the 88 | Chapter 3: Five-Oh-Sink
BiA: HH Guide
Last update: 11 May 2016
SIXTH ASSIGNMENT: Destroy the 88
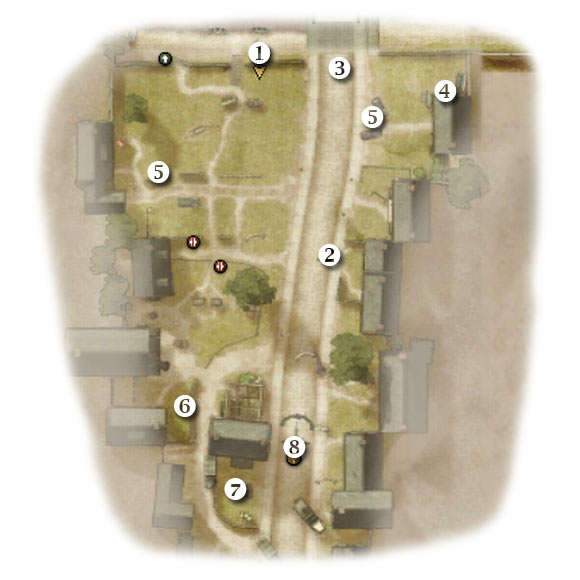
Map legend: 1 - starting area; 2 - machine gun post; 3 - second recon point; 4 - third kilroy; 5 - cover points for your squads; 6 - good cover; 7 - enemy units; 8 - 88 cannon
This is going to be a very challenging assignment. First of all, you have to acknowledge the fact that you'll be surrounded by enemy units and they'll start firing at you and your colleagues right away. You should also know that the wooden fence won't take too much damage. You start near the river bank (1 on the map). Order your bazooka team to disable an MG nest which can be found to the south-east (2 on the map) [#70].

#70
It would be a good idea to find two remaining bonus areas, because if you destroy the 88, you won't be able to return here. The second recon point (3 on the map) is much easier to find. All you have to do is to approach the destroyed bridge. Press the action key to unlock a new report (Son Bridge). As for third kilroy, you will have to inspect one of the walls of the eastern building (4 on the map) [#71]. Go back to your colleagues or reload the checkpoint (you won't lose these achievements) if it's already too late.

#71
Now you should focus all your efforts on finding good cover points for your teammates. Send the assault team to the east and order it to take cover behind parked vehicles (5 on the map) [#72]. You should also order this squad to begin firing on the cannon. Hopefully this will distract the soldiers operating the cannon (8 on the map).

#72
Your bazooka team should perform other activities at the same time. Your colleagues should begin firing on enemy troops located to the south of the river. Once you've secured this area, send your bazooka squad towards a brick wall (5 on the map) [#73]. As long as your assault team is doing its job (attacking the cannon), your other teammates should be safe while travelling to a new location. Obviously you must join them, because eventually you'll want to get closer to the 88.

#73
I would recommend staying near the brick wall for a longer period of time. Focus on eliminating some of the nearby enemy units. As for ways of reaching your goal area, obviously you shouldn't choose the main road. Instead, head on to a smaller passageway, located to the west of your target. Take cover behind a brick wall (6 on the map) [#74] and keep heading towards your current destination.

#74
A large group of enemy soldiers (7 on the map) is guarding the access to the 88. I'd strongly recommend using grenades to kill them, especially since you're near the end. You can also take cover behind the truck and lean out with a machine gun in your hands. Vault over a small cover and approach the cannon (8 on the map) [#75]. Press the action key to place a satchel charge and move back to a safe distance. Destroying the cannon will allow you to finish the mission.

#75