Map of Pannesa Film Studios | Collectibles - Pannesa Film Studios Batman: AK Guide
Last update: 28 October 2019
Key points of Batman: Arkham Knight - Secrets - Panessa Film Studios
Riddler trophies
Riddles
Breakable objects
Riddles
1 � Riddle 1
You can solve this riddle in the quarantine area - this is the first room with the cells. You won't be able to complete it until you've advanced in the main storyline and imprisoned Robin in one of the cells. You must now approach this cell (first one from the left) and scan it.
Riddler trophies
1 � Trophy 1
The trophy is behind the locked gate. Use a remote controlled batarang in the quarantine area and send it towards the electricity near the ceiling. Once you've electrified the batarang make it crash through a window near the exit from the room. Send the batarang to the lower level and hit a fuse box with it. You may now enter the new room. The trophy is near the stairs.
2 � Trophy 3
Unlock the side area by following the instruction from the description or trophy #1. Use the stairs to reach a room on the upper floor. You must solve a riddle here and your objective is to turn off all question marks. Here's an example of a correct order of hitting them: lower middle, lower left, middle left, upper left.
3 � Trophy 3
Find a door to the side area and use a ventilation shaft. Stand near a weakened wall, directly behind one of the five Riddler's robots. You must activate fear takedown here and you will be able to solve this riddle ONLY if you've fully upgraded this ability so that you can take out five targets in one go. After you've succeeded go back to the previous room to take the trophy from the cage.
4 � Trophy 4
Find a hitch in the backstage area, use your batclaw on it and start pulling. Use the same gadget for the second time to grab the trophy.
5 � Trophy 5
Use the remote electrical charge so that the Poseidon statue starts moving. Its red arrow must stop near the B letter plate (use the remote charge again to stop the statue). Throw a batarang in order to light the right green arrow. Make the statue start rotating again and wait for it to get to the A letter plate. Now highlight the green arrow, use the remote charge and wait for the statue to reach letter T. You may collect the trophy.
6 � Trophy 6
Use an explosive gel on a weakened wall to the north of the cage with the trophy. Enter a new room and stand on a pressure plate. Start throwing remote controlled batarangs inside a small shaft - two of them must hit question marks in the shaft and the remaining third batarang must hit a fuse box. You may now collect the trophy.
7 � Trophy 7
Use the remote electrical charge to unlock the room with the secret. You must solve a riddle here. The objective is to use the remote electrical charge on the nearby generators in the correct order. Here it is (counting from left): first generator, fifth generator, seventh generator, third generator, second generator, fourth generator, eighth generator, sixth generator. You may now pick up the trophy.
8 � Trophy 8
Check the area to the east of the secret to find a pipe with hot steam. Use freeze blast on this pipe and make your way to the upper platform. Here you must begin by using your disruptor on a weapons crate in order to sabotage it. Now use a voice synthesizer on Riddler's robot and order it to check the crate. The robot should be destroyed and a cage with a trophy will open on the upper level.
9 � Trophy 9
Use a remote electrical charge to raise the gate and stand on the first pressure plate. Choose a line launcher and activate it. Slow down while using the line launcher and activate it again when you're close to the left corridor (you'll make a 90-degree turn). Land on the second plate, turn around and repeat these steps to get to the left third plate. You may now use a batclaw to grab a trophy from a cage on the wall.
Riddles
2 � Riddle 2
Check the south-western part of the backstage area to find a closed gate. Open this passageway using a voice synthesizer (Harley's voice). Enter a small room and scan a Joker altar prepared by Harley Quinn.
3 � Riddle 3
Get to the stage A of the movie studio and check a small room located to the right of the entrance. Scan a poster seen in a glass display.
Riddler trophies
10 � Trophy 10
Stand on a pressure plate in a small room of stage A and start using batarangs to hit nearby question marks. You must choose correct colors for them. The correct combination is (starting from left) blue, green, red and yellow. Take the trophy from a newly opened cage.
11 � Trophy 11
Go to the back of stage A and use a grappling hook to reach an upper ledge. There are two active sentry turrets under Batman. Use a remote hacking devicle to temporarily disable one of the turrets. Quickly get to the active turret and perform a sabotage. Finally destroy the hacked turret. You can now pick up the trophy.
12 � Trophy 12
Find a big robot at the back of stage A and attach yourself to it using a batclaw. Start pulling in order to uncover a generator. You must now begin using remote electrical charge. The objective is to overload the generator so that it explodes. All that's left to do is to locate an opened cage and pick up the trophy.
13 � Trophy 13
The trophy is in stage B of the studio. Find a control panel near the roof and use a remote hacking device in it. Input the IMPELLER password. You can now face the turned off fan and use a batclaw to grab the collectible.
14 � Trophy 14
Find a grating on the ceiling and pull yourself towards it using a grappling hook. Once you're in a new area activate the line launcher. When you're close to a new wall jump on the rope of the line launcher and turn around. Look up to locate two pipes and seal both of them using freeze blasts. Get to the upper balconies and use them to reach a side room with a trophy.
15 � Trophy 15
Find a grating in the floor and use it. Once you've reached the lower area look around to find two mines. You have to disarm them using an upgraded version of the disruptor (if you don't have the upgrade yet then you must purchase it). After you've destroyed the mines perform a slide here to reach a small room with the trophy.
16 � Trophy 16
Use a remote electrical charge on a generator and disperse the explosive gel on the back side of the right metal panel that moved down. Go to one of the nearby vantage points, send the opposite charge towards the generator and wait for the panel to move up. You must detonate the gel when the panel gets close enough to a weakened wall. Once this is done you only have to glide to a small ledge to get the trophy.
17 � Trophy 17
Reach the southern room of stage B and stand on a pressure plate. Choose a remote controlled batarang and throw it a western ventilation shaft. Once the batarang is in the western room aim it at the green question mark. Hitting the question mark will unlock a cage containing a trophy.
18 � Trophy 18
Reach one of the southern room of stage B. The trophy you're looking for is inside a sphere placed in a large tube and your objective is to help move this tube to the right. This is a very simple task, because all you have to do is keep using freeze blasts on pipes with hot steam coming out of them. Once the sphere has dropped to the lower level approach it to take the collectible.
19 � Trophy 19
The trophy is in a cage in the corridor leading to stage C. Explore the north-western part of this corridor to find an entrance to a ventilation shaft. Use the shaft to get to a small room. Turn around and throw a remote controlled batarang inside the shaft. Once the batarang has returned to the corridor with the trophy make a 180-degree turn and hit a question mark found near the ceiling. You may now go get the trophy.
20 � Trophy 20
Use the console found in the central area of stage C. Your objective is to use batarangs to hit the question marks in the order corresponding the colors appearing on the screen. Correct order for the first trial - blue, green, red, yellow. Second trial - yellow, green, blue, blue, yellow, red. Third trial - green, blue, yellow, red, blue, red, yellow, green.
21 � Trophy 12
Approach the slots machine found in the north-eastern corner of stage C. You must start using the remote hacking device here on four controls of the slot machine. The objective of this puzzle is that all icons from a single row must be of the same type so it's about stopping them in a correct moment. Once you've done that you will be allowed to take the trophy.
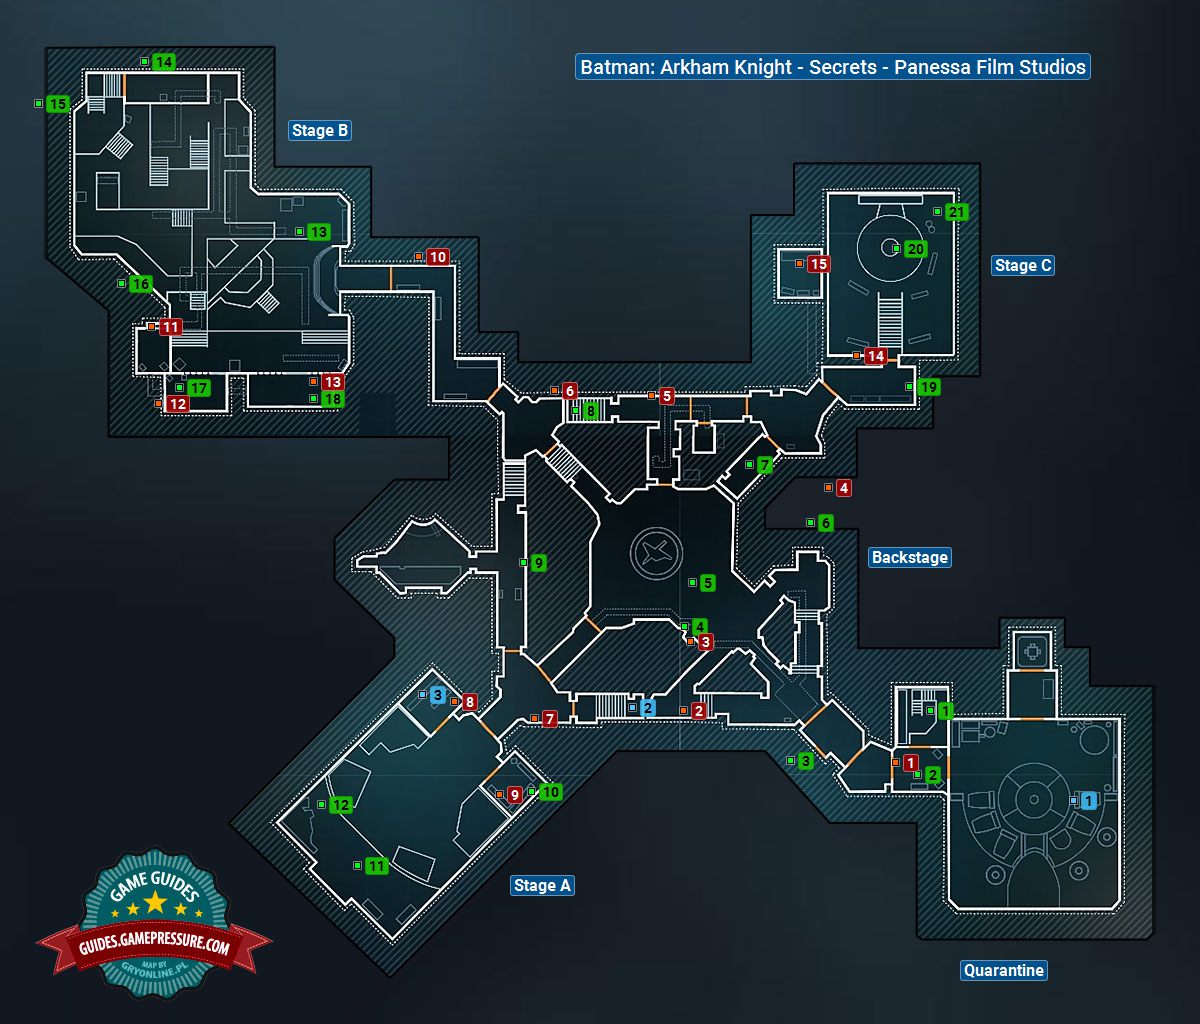
On this page of our guide to Batman: Arkham Knight we have prepared a map of Panessa Studios. The map shows all the secrets and collectibles that can be found in this district of Gotham.
The above screenshot presents the map of the interior of Panessa Studios, i.e. one of the main locations on Bleake Island. This is a location that you will visit many times while completing the main story, but the full access to it can only be obtained after resolving a crisis situation - the appearance of Harley Quinn. You should focus on finding secrets only after completing the main task Stop Harley Quinn from kidnapping infected Jokers.
Note - The game does not save the progress in gaining secrets automatically, so be careful not to turn off the computer too soon, because you might lose some of them. To enforce autosave you need to get outside the building or get back to the central part of the movie studio, which is the Backstage.

