Tenth Riddler trial | Batman Arkham Knight Batman: AK Guide
Last update: 28 October 2019
On this page of our guide to Batman: Arkham Knight you will find a walkthrough to the final (tenth) trial set by the Riddler. At first you need to solve three puzzles in which you have to correctly move the metal plates. After that, you will have to duel with the Riddler for the first time (boss fight).
General rules and the area
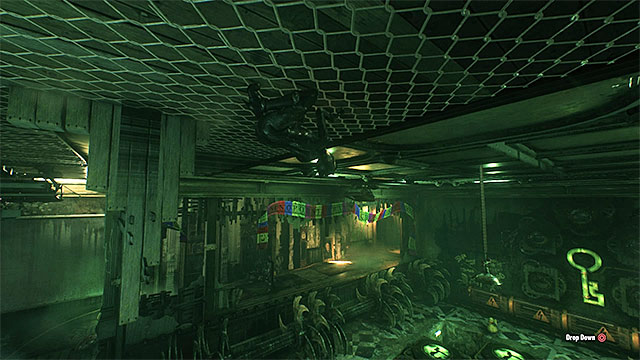
Head back to Pinkney Orphanage and meet up with Catwoman in the building's main hall. Go through the green door that has been unlocked after the previous trial. After you reach a new location, switch to Catwoman and catch on to the grates under the ceiling. Make it over to the huge gaming board, this way, which is inaccessible for Batman (at any attempt to get there as Batman, blockades slide out).
Here, you need to solve three puzzles and each one is highly demanding. The plan is that you move over a board with interactive pressure plates. For this, you need to use generators at the top of the screen and to the right (each generator can move a row of pressure plates associated with it) and you need to activate them as Batman, by sending the electromagnetic pulse. Additionally, in certain situations, it will be necessary to block certain pressure plates to prevent them from moving. You will be able to do this as Catwoman, by standing on the plate that should remain in its position, after the generator is activated.
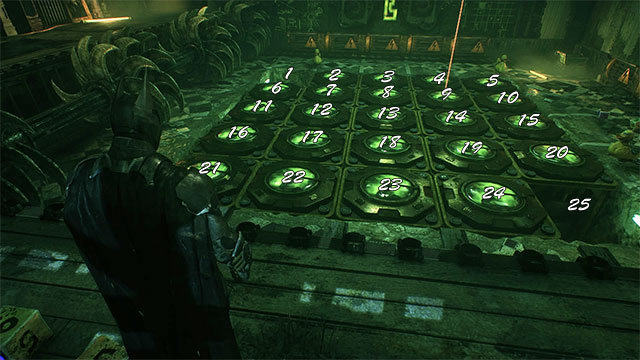
Note - the board is made up of 25 fields that have been numbered in the way shown in the above screenshot - it is necessary that you refer back to this!
Note - Always remember to pick the appropriate type of the electromagnetic pulse. Depending on which one has been used, the plates move in different directions (up, down/ left, right).
Riddle one
The main premise of this puzzle is that you leave the spot, where there is plate 9, thanks to which the color of the beam turns from red to green. At the beginning, the free fields are in slots 1 and 25.
- Move plates 5, 10, 15 and 20 down by one position (shoot at the last of the upper generators)
- Move plates 2, 3 and 4 left, by one position (shoot at the farthest of the generators to the right)
- Switch to Catwoman and walk onto plate 14 (right under the plate with the red beam)
- Move plate 9 up by one position (since you moved Catwoman earlier, plates 14, 19 and 24 remain in their respective positions)
Switch quickly to Catwoman and pull her up to the interactive ceiling, because Riddler soon activates spinning blades. Wait for the cycle of the blades to end, after which they stop.
Riddle two
The second one is much more complicated, because you need to free two spots for red beams. The slots in question are 5 and 12.
- Switch to Catwoman and walk onto plate 6
- Move plates 7 and 8 right by one position (plate 6 remains in position, because Catwoman is standing on it)
- Switch to Catwoman and walk onto plate 17 (below one of the plates with red beam)
- Move plate 12 up by one position (plates 17 and 22 are being blocked by Catwoman and don't move)
Just like before, do not wait for the Riddler to start the blades and have the Catwoman grab on to the ceiling.
Riddle three
In this one, just like in the previous one, you need to "free" two beams. The slots in question are 21 and 23.
- Move plates 17 and 22 up by one position (they join up with plates 2 and 7)
- Move plates 10, 15, 20 and 25 up by one position
- Move plates 21, 23 and 24 to the right, as far as possible (they fall into slots 23, 24 and 25)
- Move plates 2, 7, 12 and 17 down by one position
- Switch to Catwoman and walk onto plate 4
- Move plate 3 left, by one position (plates 4 and 5 are being blocked by Catwoman)
- Move plates 8, 13, 18 and 23 up by one position
Now, you only need to grab on to the ceiling, as Catwoman (faster than before). Do not wait for the blades to end their cycle and join Batman. Return to the previous room, now. In here, there is a capsule with the last key. Thanks to obtaining it, you remove the collar from the neck of the Catwoman.
The first fight against the Riddler

Return to the main hall and try to leave the orphanage. This will result in Riddler appearing, in the flesh. He will be using the machine of his own design and you start your fight with him. After the fight starts, ignore the boss and attack Riddler's henchmen. Remember that Batman needs to fight the blue opponents and Catwoman the red ones. You need to expect that the Riddler may occasionally switch the colors. Apart from that, avoid the green projectiles fired by his machine. You can eliminate opponents effectively thanks to team attacks. After you have eliminated Riddler's goons, do not attack him, nor approach him, because the flooring around him will soon be electrified. You will be unable to finish this fight so, wait simply for Nigma to leave the location.
Note - you now need to find and solve all of the 243 puzzles connected with Riddler. Only then, will you be able to fight the fight proper with him. Detailed information on whereabouts of individual puzzles, and the ways to solve them, have been provided in separate chapters of this guide.