Map and location description - M10 BG: Siege of Dragonspear Guide
Last update: 02 June 2016
Key points of Baldur's Gate: Siege of Dragonspear - M10 Forest of Wyrms
Important areas on the map
Locked doors or chests
Traps
Important characters (allies, quest givers, merchants, potential team members etc.)
Dangerous enemies (main bosses, mini-bosses, stronger types of monsters etc.)
Important areas on the map
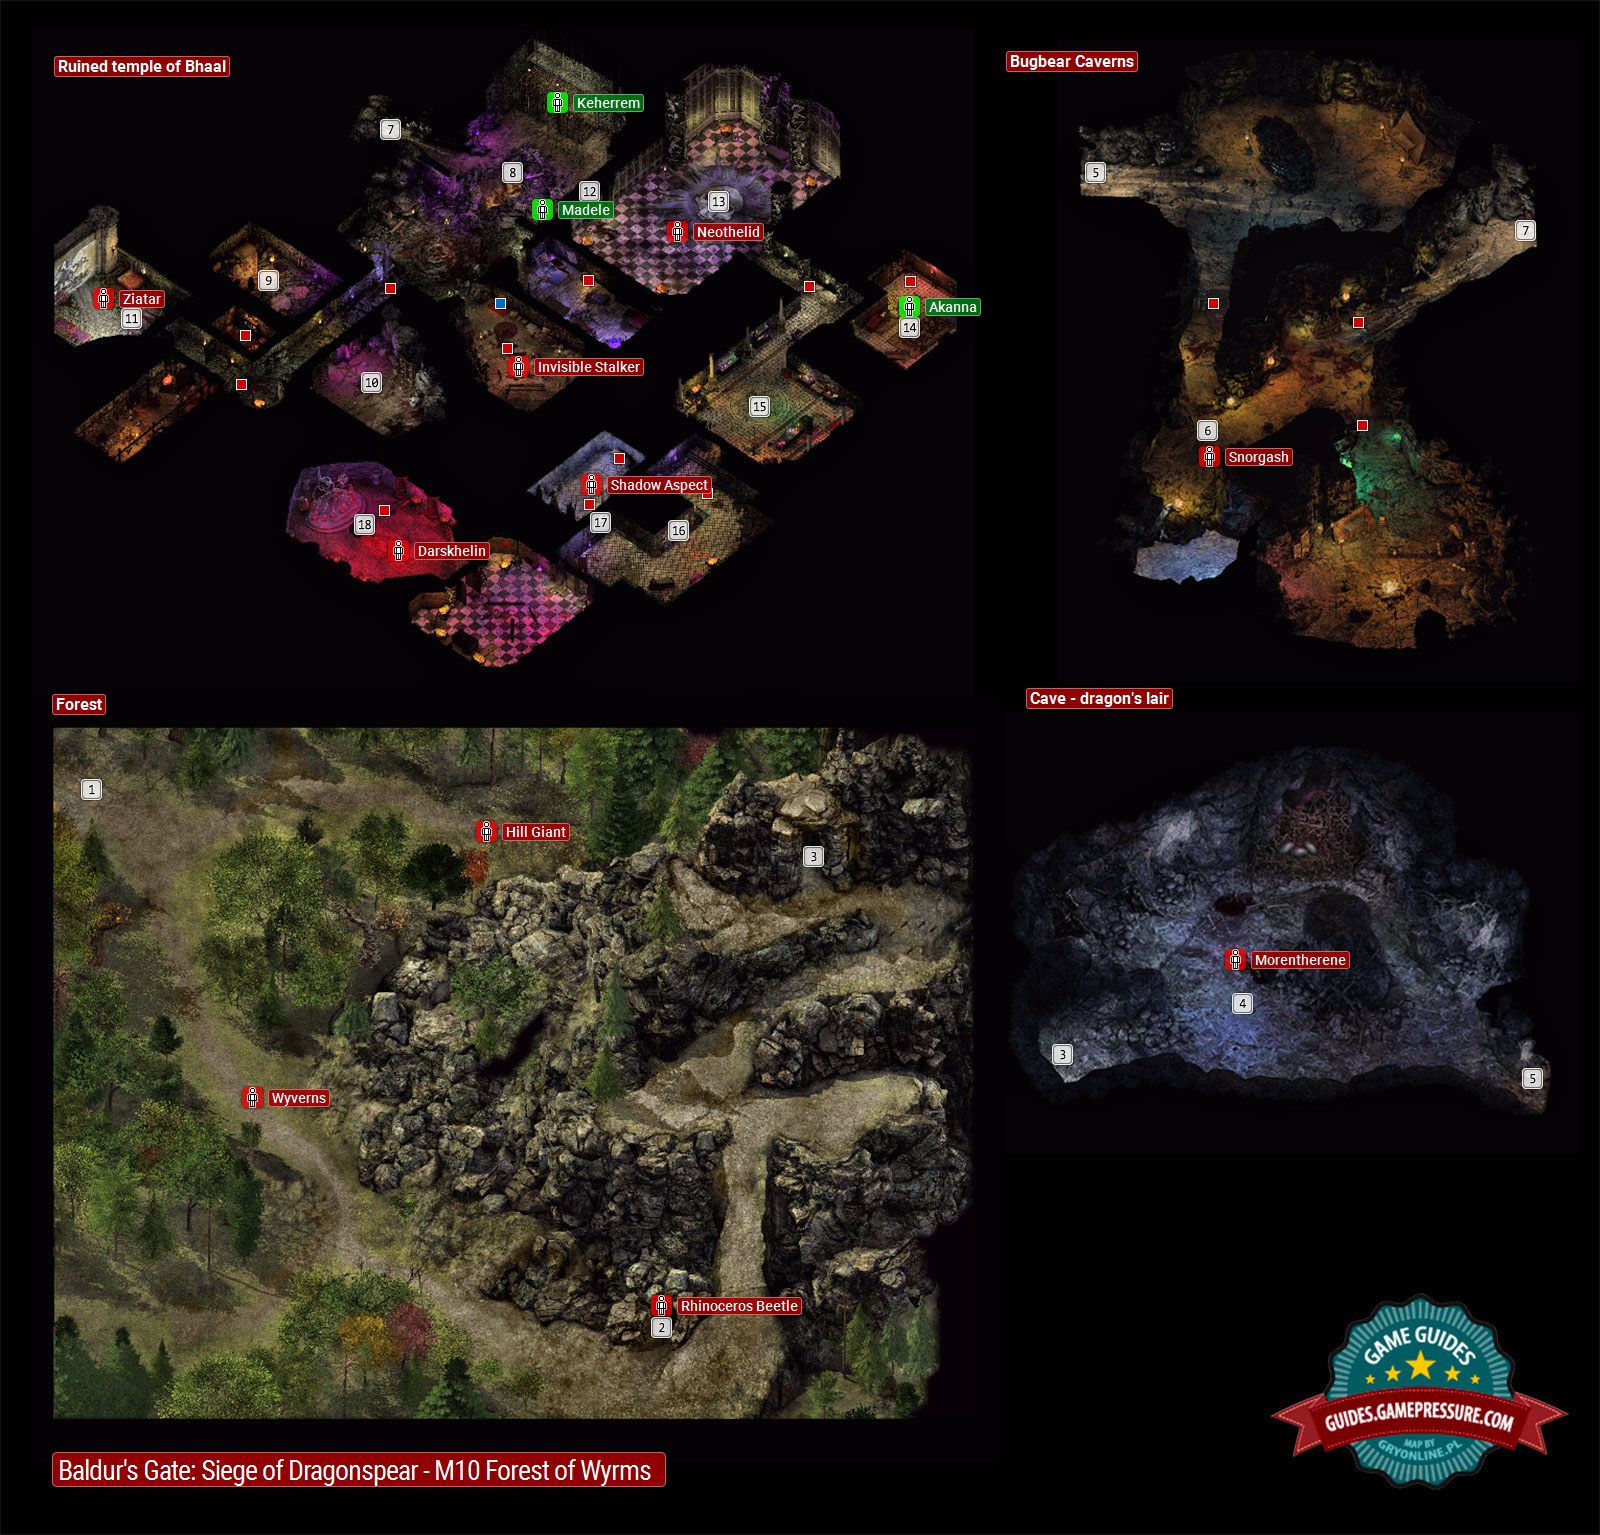
Starting area
You begin the exploration of the forest here. You can leave the map by reaching its edge.
Coogan is nearby and he'll warn your team about the presence of spiders.
Spider lair
You'll be dealing only with large groups of spiders at first and you also have to watch out for traps. You can collect spiders eggs from the area and a bastard sword.
Later on a huge Rhinoceros Beetle appears in the caves - "Beetles and Spiders" side quest. You can sneak past it or defeat it in combat.
Entrance to the cave
This passageway is leading to a cave with a lair of the dragon Morentherene (04). You also must go through the cave in order to the reach the Bugbear Caverns (05).
Dragon lair
Dragon Morentherene resides here. Fighting this beast is not mandatory. You can use the fact that it's sleeping and head directly towards the entrance to the caverns (05).
Passageway to Bugbear Caverns
In order to reach the caverns you must pass by a dragon's lair (04), however you don't have to fight the large beast.
Chieftain's lair
You will encounter the bugbear chieftain Snorgash here. No matter how you'll respond during the conversation the battle will begin. Snorgash will leave behind a magical flail among other things.
Passageway to the temple of Bhaal
You can reach the temple by going through the Bugbear Caverns. You will encounter a cultist near the passageway - you can kill him or let him go.
Prison
Keherrem and other crusaders can be found in the northern cells. You can release them or kill them (switch on a wall) - "The Missing Patrol" side quest.
Madele is being held in the eastern cell. You can release her or leave her in the cell - "The Eyeless Priestess" side quest.
Ziatar from the room with a mural (11) has a key to all of the cells.
Room with the cultists
A conversation will trigger upon entering the room, however all dialogue options lead to combat.
Room with the mad cultist
You'll find several books and magical scrolls here.
Room with a mural
A dragonlike creature named Ziatar resides here and you must defeat it in combat (Ziatar will summon cultist from a nearby room for help). Once you've won you can take the ritual room key (12) and a key for the prison cells (08). You should also inspect a table and collect Ziatar's and Akanna's journals among other things.
Locked door
The door leads to the ritual room (13). You can't open the door using standard methods. Instead you must go to the room with a mural (11), defeat Ziatar and check her body for a key.
Ritual chamber
You must defeat an enormous Neothelid monster there. Doing this will unlock access to other rooms of the temple
Priestess Akanna chamber
If you'll interact with Akanna before killing Darskhelin (18) then you will have to kill her. If you'll talk to her after killing the creature then you'll have a chance for a peaceful conversation. In both cases the main objective is to obtain the magical Wardstone needed to gain access to Bridgefort (main storyline).
Large room
You can explore the room after you've defeated the monsters - there are a lot of various potions here.
Masks on the wall
You may solve the maska puzzle here - "Sarevok's Secret" side quest (M1,23). The puzzle is about interacting with the masks in the right order:
1) Upper row, first mask from the right
2) Upper row, first mask from the left
3) Lower row, first mask from the left
Solving the puzzle will unlock the secret room (17).
Entrance to the secret room
You can unlock this room by solving the puzzle with the masks (16).
You must defeat a powerful Shadow Aspect. After the battle use a thief to disarm a trap on a large chest and to open it. The chest contains a unique short sword Fractal Blade +3.
Reliquary
Darskhelin is in this room and he's responsible for the other people from the temple losing their minds. You can defeat him in combat - "The Eyeless Priestess" side quest.
Basic info about Forest of Wyrms
The above maps shows the Forest of Wyrms location, which can be visited between the Coast Way Crossing (M7) and the Boareskyr Bridge(Bridgefort - M11). On the surface, there is only a small part of the forest to investigate, which doesn't include places of much story importance. Much more important are the areas located underground, especially the ruined temple of Bhaal, which the party reaches after moving through two smaller underground locations. The temple has a few side-tasks, and you can take possession of a very important quest item - magic Wardstone (M10,14).
Most important places in Forest of Wyrms
2. The spiders' cave
It's a additional location, which can be visited on the way to the temple of Bhaal. As the name suggests, you will face a lot of insects, but aside from spiders, you have to be on a lookout for traps.
You can investigate the den, finding spider eggs and a valuable sword. When you try to leave the cave, an oversized Rhinoceros Beetle will appear, and a side quest Beetles and Spiders will be unlocked. You can bypass the beetle or fight him - details in the descriptions of the side-tasks.
4. Dragon's den
A huge dragon, Morentherene, is in the den. The fight with the dragon is not obligatory, and it's good news, because it's an immensely powerful enemy, and in order to defeat him, player has to have a strong and well-knit team. If you can kill the dragon, you will gain dragon scales and several other valuable treasures. If you want to avoid fighting the beast, make use of the fact that the dragon is sleeping, and go straight to the nearby passage leading to the caverns (M10,5)
7. Passageway to the temple of Bhaal
The ruined temple of Bhaal is the most important location on the described map. The entrance to the temple is not on the surface. It can be reached by the cave with the dragon's den (M10,3) and through the Bugbear Caverns (M10,5)
8. Prison
You can speak to the people in the cells. In the northern part of the prison, there is Keherrem and his crusader friends. You can agree to release them, or kill them using the switch on the wall - side quest The Missing Patrol. In the eastern cell, a blind priestess Madele is being held. You can either try to free her, or leave her in the cell - side quest The Eyeless Priestess.
The thief's abilities won't be enough to open the prisoner cells. You have to get a special key, which is dropped by Ziatar (dragonlike creature) in the room with the huge mural (M10,11). The same monster has the second key, which can be used to open the door at (M10,12). This will give you the ability to explore the other part of the temple.
11. Room with the mural
In this room, you have to fight the dragonlike Ziatar, which calls for the cultists from the nearby room (you can kill them earlier if you want). The enemy will leave few items, among them two keys, which can be used to open the cells in the prison (M10,8) and the door leading to the ritual chamber (M10,12)
In the room with the mural, on the table you can find the journals of Ziatar and Akanna. You can read them for the side-quest The Eyeless Priestess
12. Closed door
This door leads to the ritual room (M10,13), and they cannot be opened in the standard way. The party needs to have a key, which can be found in the remains of Ziatar, in the room with the mural (M10,11)
14. The chamber of priestess Atanna
The priestess Atanna is there, and she has the magic Wardstone needed for the main task Acquiring the Wardstone (M9,1). If you meet her on the first occasion, she will attack the party, and you will have to kill her. In turn, if you talk to her after killing Darskhelin (M10,18) (he is mind-controlling the inhabitants of the temple), you will be able to talk to her. This way, you can receive Wardstone as a reward.
16. Mask puzzle
The masks are connected to a side-quest Sarevok's Secret, which could have been unlocked at the beginning of the game in Korlasz family tomb (M1,23) (details on the pages describing the side-quests in M1 location). You can interact with them, in order to unlock a secret chamber of the temple. The correct sequence of the masks is:
- Upper row, first mask on the right
- Upper row, first mask on the left
- Lower row, first mask on the left.
Once you solve the riddle, a secret chamber will open (M10,17). Watch for traps and a strong enemy - Shadow Aspect. Once you defeat the monster, you can use a thief to disarm a trap on a big chest and open it. The party will gain a unique Fractal Blade +3.
18. Reliquary
This room is inhabited by the monster Darskhelin, who mind-controls other people in the temple. The fight with him is connected to the side-task The Eyeless Priestess, but winning the fight can be helpful during the main quest Acquiring the Wardstone. The fight is very demanding, because the creature has some helpers.
List of tasks unlocked in Forest of Wyrms
Beetles and Spiders (side-quest) -You have to investigate a spiders' den (M10,2) and gather spider eggs, causing beetles to show in the cave. You can ignore the big Rhinoceros Beetle, or defeat him in combat.
Morentherene (side-quest) -This task doesn't appear in the journal. The dragon is in the small cave (M10,4), and either can be by passed, or defeated in a challenging fight.
The Missing Patrol (side-quest) -After reaching the prison in the temple of Bhaal(M10,8), talk with Keherrem. You have to release the crusaders by killing Ziatar(M10,11) and taking the keys to the cell, or kill them by using the nearby switch.
The Eyeless Priestess (side-quest) -In the prison (M10,8), you have to talk with the blind priestess Madele. You can release her using the key left by Ziatar (M10,11). Additionally, you can uncover why all the people in the temple have lost their minds, ultimately killing Darskhelin who is in the last chamber of the temple - reliquary(M10,18).

